 EseeCloud Help Center
General
General NVR questions covering time sync, startup failures, channel names, factory reset, and hard disk issues.
Frequently asked questions about general NVR operation and hardware troubleshooting.
How do I set up NVR time synchronization?
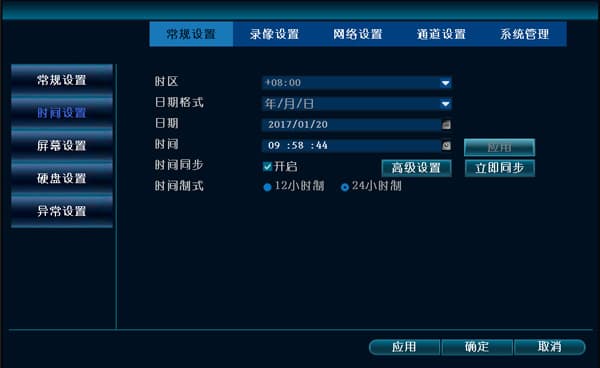
- Go to System Settings → General Settings → Time Settings. Check the option to enable time synchronization, then click "Sync Now" to synchronize the time automatically; this also synchronizes the time of the IPC. Finally, click Apply or OK to save.
The NVR cannot keep its time
-
The motherboard battery has a poor contact or is dead. Reseat the battery or replace it.
-
There is a problem with the clock chip. Return the unit to the factory for repair.
After entering the ID for remote monitoring, a different image appears
-
Provide the ID number to technical support.
-
Contact technical support to resolve it remotely and re-issue the ID number.
The NVR will not start
-
There is no response at all when power is connected. Try a different power supply. If the power supply is confirmed to be working, the problem may be with the NVR's motherboard.
-
When power is connected, the buzzer sounds a long continuous tone. This indicates the firmware is corrupted. The unit must be returned to the factory to re-flash the firmware.
-
When power is connected, the buzzer keeps beeping "beep" "beep" "beep". If this is caused by a failed upgrade, you can try placing a help file on a USB drive to repair it. (The help file is included in the upgrade package.)
-
After power-on, it stops at the logo screen and never responds. Try removing the hard disk and performing a restore factory settings. If that does not work, it is likely a hardware problem or partial corruption of the flash firmware, and the unit must be returned to the factory for repair.
Can the NVR's channel names be changed?
- For an IPC connected via the N1 private protocol: after adding the IPC's IP to a channel, go to the NVR's System Settings → Channel Settings → Channel OSD, make the change, and click OK.
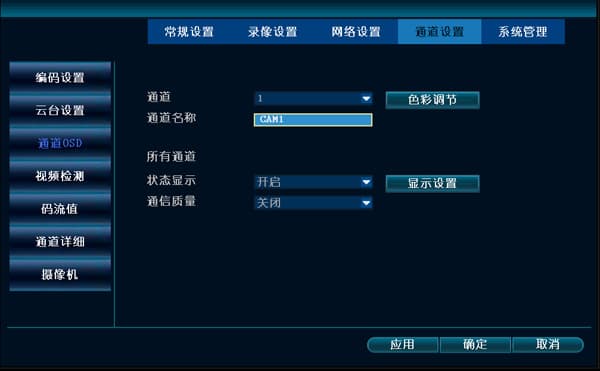
- For an IPC connected via the ONVIF protocol: changing the name on the NVR is supported, but it is only shown locally; the channel name of a third-party camera cannot yet be changed directly.
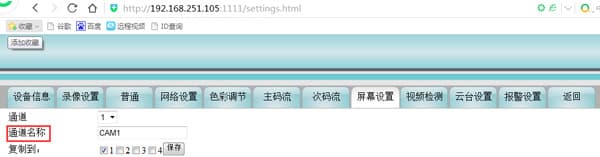
- You can also change it from the web page: log in to the web page successfully, go to Settings → Screen Settings → Channel Name, make the change, and click OK.

The NVR's network port light is off — is the network card broken?
-
The network cable is loose. Just reseat it.
-
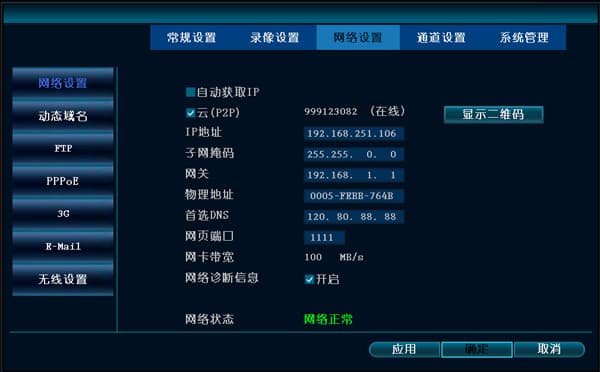
In the NVR's main menu, click System Settings → Network Settings and check the NVR's IP address (for example, the NVR IP: 192.168.251.106).
-
Set the computer's network card IP to the same subnet as the NVR.
-
On the computer, click Start → Run, type the cmd command, and ping the NVR's IP (ping 192.168.251.106). If the network is reachable, you can conclude that the network card is fine and only the light is broken.
If the network is not reachable, please contact technical support.
-
Power supply issue. A component of the power supply is faulty and cannot deliver enough current. Just replace the power supply.
How do I restore the NVR to factory settings?
On the main screen, right-click the mouse → System Settings → System Management → Restore Factory Settings.
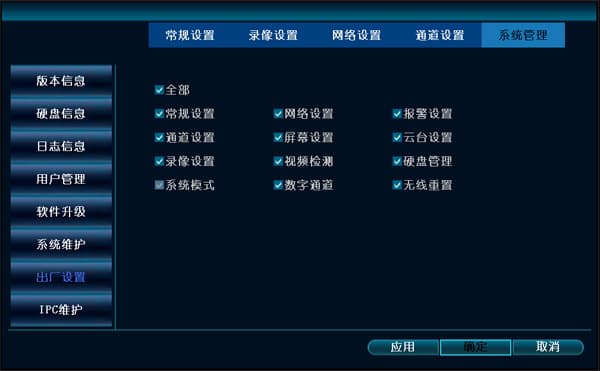
An accidental operation or an abnormal setting prevents the NVR from booting normally (for example, it stops at the boot logo or shows a black screen)?
-
For an NVR with buttons: power off, then power back on. As soon as you hear the "beep", immediately press and hold the "ESC" key on the front panel. After about a minute it will "beep" once more.
Then release the key. The NVR will be restored to its factory defaults and will boot up.
-
For an NVR without buttons, restore factory settings using a USB drive and then boot up:
-
Format the USB drive as FAT32.
A. Copy the file "restore_factory_config_is_dangerous" (you can contact technical support to obtain it) to the root directory of the USB drive.
B. Insert it into the NVR's USB port.
C. Power on the NVR; once you reach the preview screen, the factory parameters are restored.
-
If none of the above steps allow it to boot, contact technical support to check it remotely; if that fails, please return it to the factory for repair.
Hard disk hardware issues
What is the difference between a surveillance hard disk and a regular hard disk?
Hard disk power management and lifespan:
- A regular hard disk spins up at full speed during power-on startup, and the instantaneous current can reach 2 A or even higher — some reach 2.8 A–3 A — whereas a surveillance hard disk accelerates slowly during startup, keeping the startup current below 2 A.
In addition, a surveillance system generally does not require high transfer speeds from the disk, but it performs frequent small-data reads and writes. Therefore the head read/write mechanism needs a structural optimization tailored to the read/write characteristics of surveillance systems,
in order to extend the head's lifespan. The theoretical mean time between failures of a surveillance hard disk is much longer than that of a regular hard disk, and its stability and reliability are higher.
Difference in continuous operating time
- A regular PC hard disk is designed on an 8×5 basis. 8×5 means a regular PC hard disk works 8 hours a day, 5 days a week. An NVR-dedicated hard disk (surveillance hard disk) is designed and developed to meet the 24×7 enterprise-grade requirement.
24×7 means working 24 hours a day, 7 days a week (that is, working continuously without interruption). A regular PC hard disk is not suitable for long-term continuous reading and writing; forcing a regular PC hard disk to read and write continuously for long periods will damage the disk,
causing problems such as abnormal noises, read/write errors, and work stoppages, ultimately leading to disk failure. A digital hard disk recorder runs nonstop all year round, so the hard disk must be able to work continuously for long periods,
which requires an NVR-dedicated hard disk.
Difference in operating power consumption and heat dissipation:
- Operating power consumption refers to the power consumption of the hard disk during normal read/write operations. A regular PC hard disk typically has an operating power consumption of around 14.5 W, while an NVR-dedicated hard disk typically has an operating power consumption of around 8 W. As you can see, the NVR-dedicated hard disk's
operating power consumption is only about 55% of that of a regular PC hard disk. Low operating power consumption is not only significant for the power supply system, but also for the heat dissipation of the digital hard disk recorder system (about 75% of operating power consumption is converted into heat).
If a regular PC hard disk is used, imagine such a high heat source within the tiny space of a digital hard disk recorder; long running times will cause problems such as the disk hanging. The system's heat dissipation requirements are very high, and in order to ensure that the hard disk
has a reasonable ambient temperature (0–60 °C), the hard disk system must be cooled effectively. With an NVR-dedicated hard disk, the heat situation is much better — it lowers the system's heat dissipation requirements and makes the system more adaptable to its environment.
The hard disk cannot be detected, but it works again after a restart?
- The hard disk's motor is nearing the end of its life. At this point a restart can still read the disk again. If the disk has been used for a relatively long time (for example, 3 years), it indicates that the disk is about to fail. The disk needs to be replaced.
The hard disk cannot be detected, and restarting does not help?
-
Power supply issue. A component of the power supply is faulty and cannot deliver enough current. Just replace the power supply.
-
The hard disk is broken, or the hard disk data cable and the power cable connecting the hard disk are broken. Replace with a new hard disk, and replace the data cable and power cable with new ones.
-
The NVR software system has been corrupted for an unknown reason. Update the NVR software version.
The NVR cannot find the hard disk
-
When the hard disk cannot be found, first analyze the specific situation with the customer.
-
Check whether the hard disk recorder's power supply is normal, and whether the hard disk data cable and power cable are normal.
-
You can use a multimeter to test whether the power supply is normal. There are 4 wires connecting to the hard disk: the yellow one is 12 V, the red one is 5 V, and the two black wires are ground. You can test whether they are normal.
-
Try swapping in another hard disk to determine whether it is really a hard disk problem, or whether the NVR is faulty.
-
An electronic product like a hard disk is a consumable; it does not mean it will never have problems. Over time, there may indeed be physical bad sectors. The hard disk works 24 hours a day in the NVR, and every physical sector must be traversed (very different from how a computer works), so a problem with the hard disk itself cannot be ruled out either.
Wireless Issues
How to configure NVR wireless settings and how to diagnose poor wireless signal between wireless IPCs and the NVR.
DVR
DVR (digital video recorder) FAQ — network, remote viewing, audio, video, user management, basic operations, recording and playback, logo, output display, protocol integration, alarms, and general questions.