 EseeCloud Help Center
Basic Operations
Common NVR operations — adding cameras, troubleshooting automatic restarts, startup failures, and a continuously sounding buzzer, plus firmware upgrades and PTZ dome cruise setup.
Frequently asked questions about basic NVR operations and troubleshooting.
How do I add a camera?
Matching-code method:
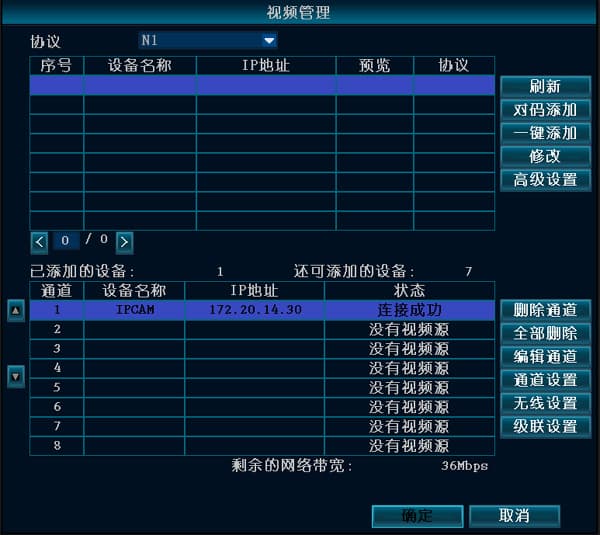
- After powering on both the NVR and the IPC, use a network cable to connect the IPC to any LAN port on the NVR. Right-click the mouse → Video Management → Refresh → Match Code.
When the prompt "Start matching code?" appears, click Yes. It then shows "Matching code", and once an image is displayed on the NVR monitor the matching succeeded. (Tip: you can match the code for several cameras at the same time.)
If it prompts that matching failed, click Refresh. If no device is shown at all, the network cable is not making good contact — reconnect it and perform the matching-code operation again.
Wired add method:
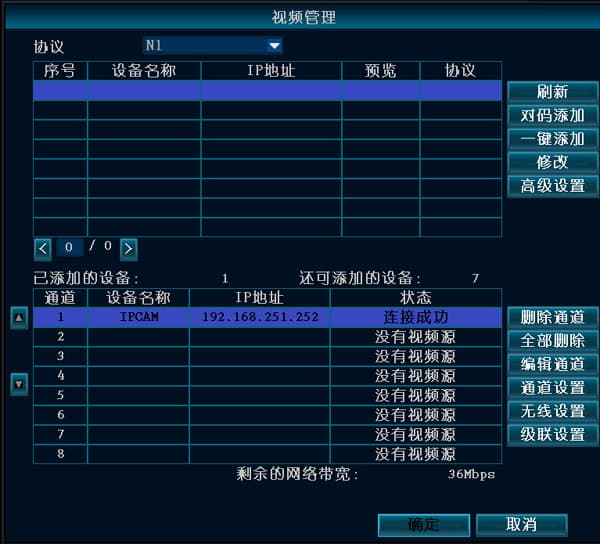
- When the NVR and IPC are connected by a network cable, right-click the mouse → Video Management → Refresh → Add (one-key add) to complete adding the IPC.
The NVR restarts automatically
It runs normally but restarts at random intervals.
- Update to a different firmware version to check whether it is a problem with the current version; restore the default configuration.
- Unplug the network cable to check whether an IP address conflict or MAC conflict is the cause.
- Replace the power adapter to test whether the power supply is damaged, causing reduced power and insufficient power supply.
- Remove the hard disk to check whether the restart is caused by the hard disk.
- Swap in a different NVR for testing to see whether the restart is caused by NVR hardware damage.
- If the problem cannot be resolved, contact technical support.
If none of these work, the unit needs to be returned for repair.
The NVR will not start
- No reaction at all when power is connected — try replacing the power supply. If the power supply is confirmed to be normal, the NVR motherboard may be at fault.
- When power is connected, the buzzer sounds continuously — this means the firmware is corrupted. The unit must be returned to the factory to re-flash the firmware.
- When power is connected, the buzzer keeps beeping "beep" "beep" "beep". If this is caused by a failed upgrade, you can try placing the help file on a USB drive to repair it. (The help file is inside the upgrade package.)
- After booting it stays on the logo screen with no further response. Try removing the hard disk and performing a restore factory settings. If that does not work, it is a hardware problem or partial corruption of the flash firmware, and the unit must be returned to the factory for repair.
The buzzer keeps sounding after the NVR powers on
- If it cannot boot normally, cut the power, unplug the hard disk and the network cable, and restart. If that does not work, restore factory settings and test again.
- If it can boot normally, you can try the following:
A. Update the device firmware version.
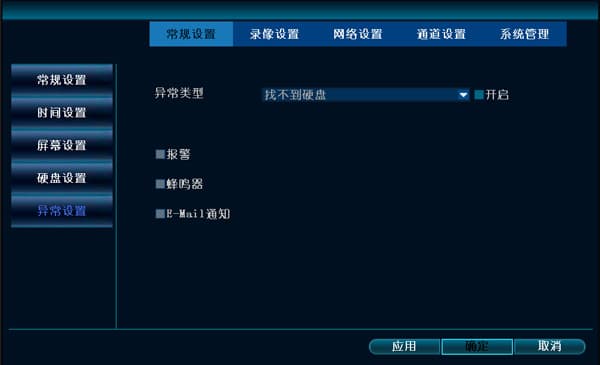
B. Go to System Settings → General Settings → Exception Settings and check whether "Enable Exception Alarm" is selected.
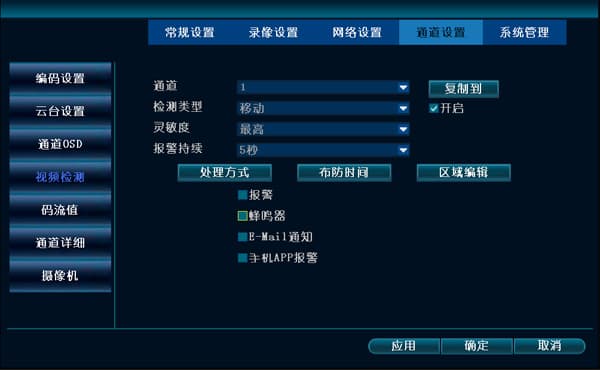
C. Check whether there is a small-person icon on the preview screen, which may indicate that motion detection has been triggered. If you do not need the buzzer to sound, go to System Settings → Channel Settings → Video Detection and clear the buzzer checkbox.
D. You can contact technical support to investigate.
Upgrade steps
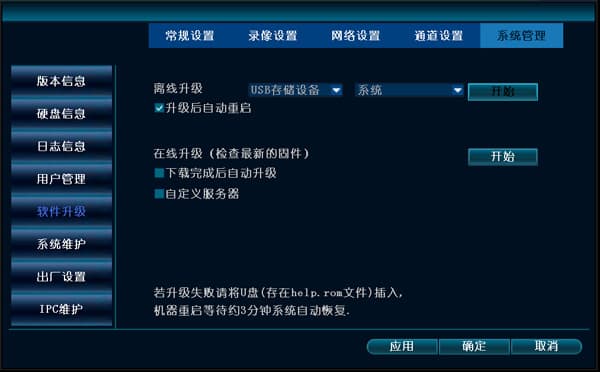
The following are the upgrade steps (USB drive in FAT32 format):
- Copy the upgrade file named FWHI*****.rom to the root directory of the USB drive (the place that opens first when you open the USB drive); do not change the upgrade file name. You can contact technical support to obtain it, or download it yourself from this website.
- Insert the USB drive into the USB socket on the rear panel of the NVR, next to the connector labeled "USB".
- On the NVR, right-click the mouse and choose System Settings → System Management → Software Upgrade.
- Click Start. Wait until the progress bar reaches 100%, after which the NVR restarts automatically.
Setting up dome camera cruise
To set up dome camera cruise, you must first make sure you can manually control the dome's up, down, left, and right movement. Once this condition is met, you can begin the setup. Here we only show how to set three points; if you need more, the steps are the same.
- On the main screen, right-click the mouse → System Settings → Channel Settings → PTZ Settings, and set the correct channel number.
- Set the first cruise point: click New, then click the "?" question mark above to enter the PTZ control interface. Use the mouse to click any of the up, down, left, or right buttons to move to the first position you want.
Change the value in the preset box to 1 (it defaults to 1, so no change is needed) → click Set → right-click anywhere with the mouse → return to the PTZ Settings interface.
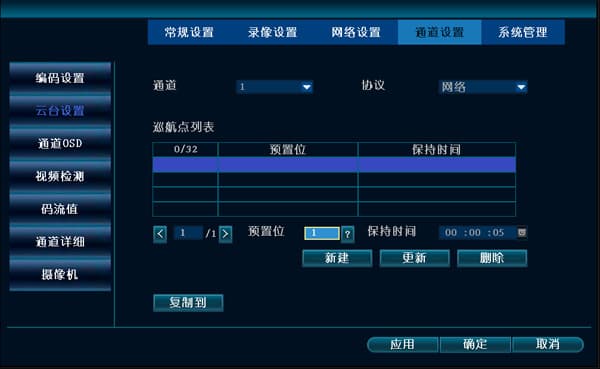
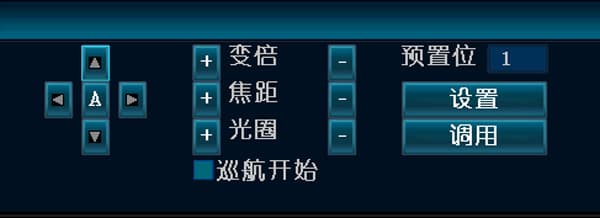
- Set the second cruise point: click New, select the second cruise point, and click the "?" question mark above to enter the PTZ control interface. Use the mouse to click any of the up, down, left, or right buttons to move to the second position you want. Change the value in the preset box to 2 → click Set → right-click anywhere with the mouse → return to the PTZ Settings interface.
- Set the third cruise point: click New, click the "?" question mark above to enter the PTZ control interface. Use the mouse to click any of the up, down, left, or right buttons to move to the third position you want. Change the value in the preset box to 3 → click Set → right-click anywhere with the mouse → return to the PTZ Settings interface.
- After setting the three points, click OK. On the preview screen, right-click the mouse → PTZ Control, check the "Cruise Start" box, and the dome camera will begin to rotate.
User Management
NVR default username and password, password and username length limits, how to reset a forgotten login password, and the maximum number of user accounts.
Recording & Playback
How to configure recording modes, calculate storage, back up footage, and troubleshoot missing or blank playback on the NVR.