 EseeCloud Help Center
Wireless Light Bulb Camera
Quick guide for the Hiseeu Wireless Light Bulb Camera (A037) — appearance, installation, app setup, camera functions, and FAQ.
Quick Guide (A037-V1.1) for the Hiseeu Wireless Light Bulb Camera.
Please read this Quick Guide carefully before using the product and keep it properly.
Appearance Description
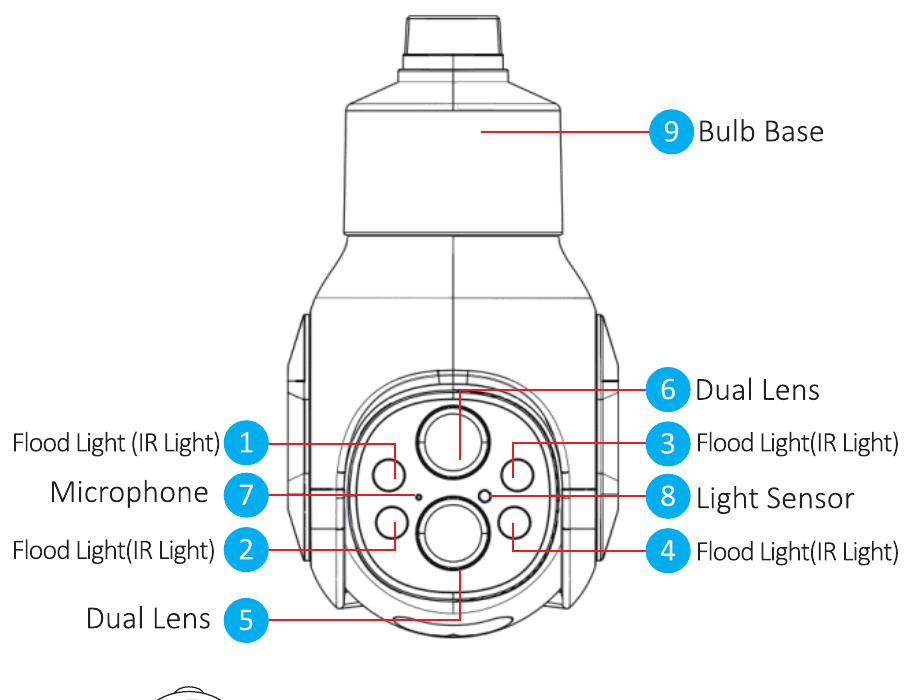
- Flood Light (IR Light)
- Flood Light (IR Light)
- Flood Light (IR Light)
- Flood Light (IR Light)
- Dual Lens
- Dual Lens
- Microphone
- Light Sensor
- Bulb Base
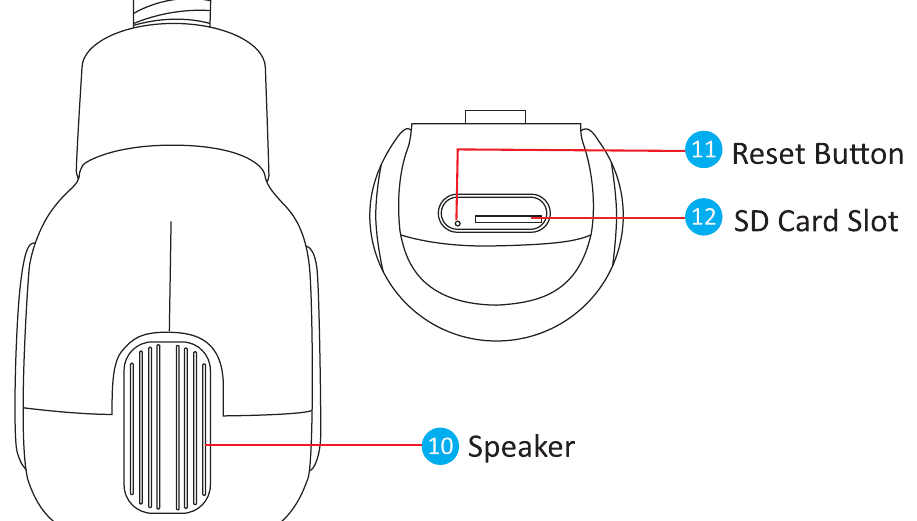
- Speaker
- Reset Button
- SD Card Slot
Description
Light sensor — Collects the ambient luminosity value and turns on the infrared light when the current illuminance is less than 3 Lux.
Reset button — When in the working state, long press the reset button for 8–10 seconds to restore factory settings. The camera will have a voice prompt.
SD card slot — TF card, for storing video and playing back video.
Item Description
| Item | Specification |
|---|---|
| Bulb base | E26/E27 socket |
| Resolution | 4MP (2MP + 2MP) |
| Zoom | 10X Optical zoom |
| Sensor | 1/2.9" CMOS Sensor |
| Connection type | Wireless or Bluetooth |
| Wireless standard | 2.4G, 802.11b/g/n |
| Shutter | Automatic |
| Day/Night Switching Mode | IR-CUT infrared filter |
| PTZ | Horizontal 355° + vertical 90° |
| Storage | Max. 128GB |
| Video Encoding | H.265 (supports dual data rate) |
| Noise reduction | Supports 3D DNR |
| Image Flip | Vertical flip |
Installation
- Ensure that the equipment in the package is in good condition and includes all assembly parts. If you lack accessories, please contact us.
- During installation, please ensure that the distance between the camera and the router is within the area with good Wi-Fi signal.
- This camera can only support 2.4G Wi-Fi, it is not compatible with 5G Wi-Fi.
Methods of Installation
Easy Installation & Use — use it as a light bulb (screw it into a bulb base) or plug it in on a socket.
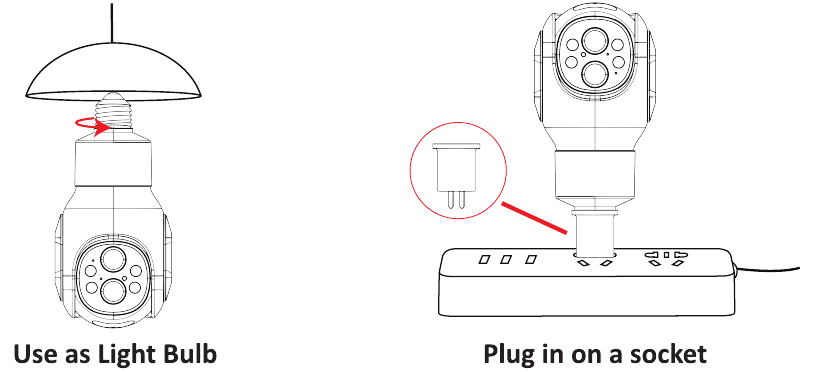
How to turn on the camera
Power on the camera — Install the camera on a bulb base or socket; the camera will power on automatically.
Connect with device
- For the very first time use, the camera will automatically search for a device when you plug it into a bulb base or socket.
- Otherwise, you need to long press the reset button for 8–10s on the camera, then the camera will search for and connect to the device you need.
Add Device
Set up the App
Search the free EseeCloud app in the App Store or Google Play. The EseeCloud app is updated from time to time; if its menu is different from the menu in this user manual, please contact us to get the latest user manual.
For iOS, it requires iOS 8.0 version or above. For Android, Android 4.4 or above.
For a detailed walkthrough of registering and logging in, see the EseeCloud App User Guide.
Register an App account
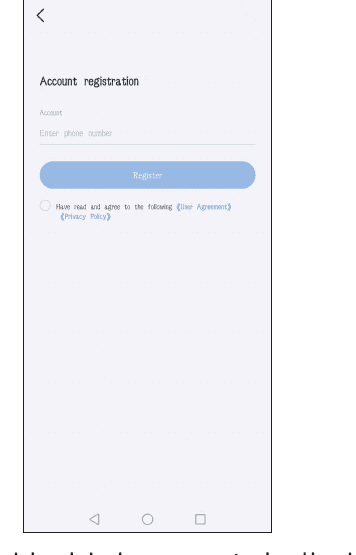
- Enter the EseeCloud home page and switch to Account.
- Click Register to register with your phone number / email, and click Confirm.
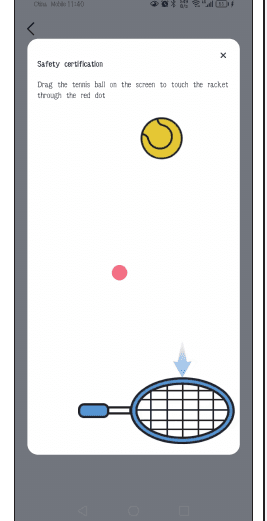
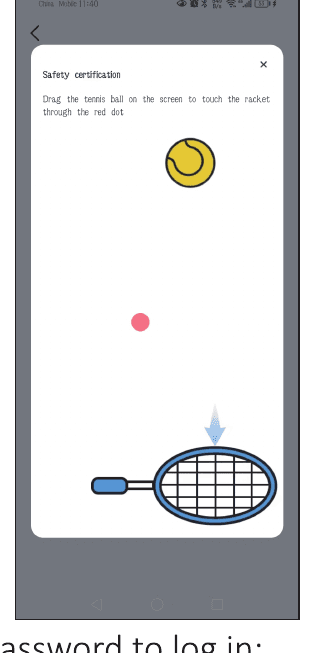
- Manually press and hold the tennis ball, drag it to the red dot, then drag it to the tennis racket.
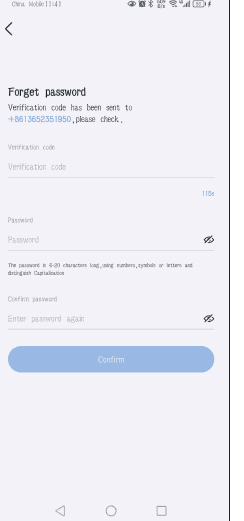
- You will receive a verification code. Input the verification code and set up your password, then click Confirm to finish.
-
Log in.
5.1 When in the homepage, input your phone number and get a verification code.
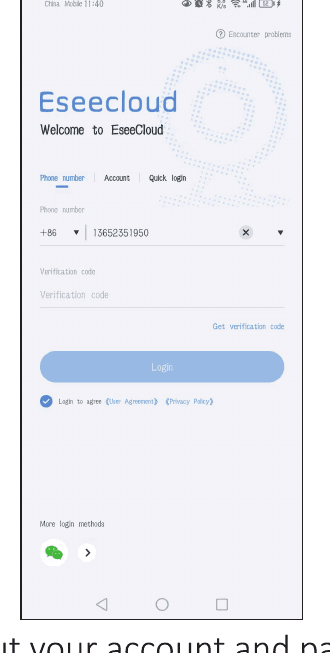
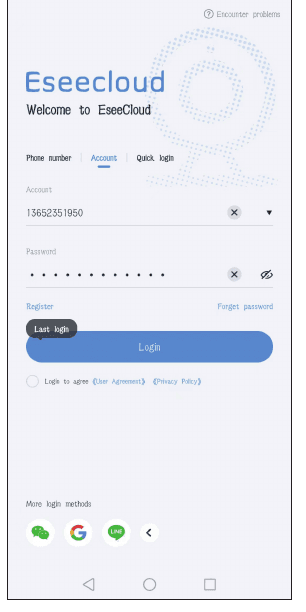
5.2 Input your account and password to log in.
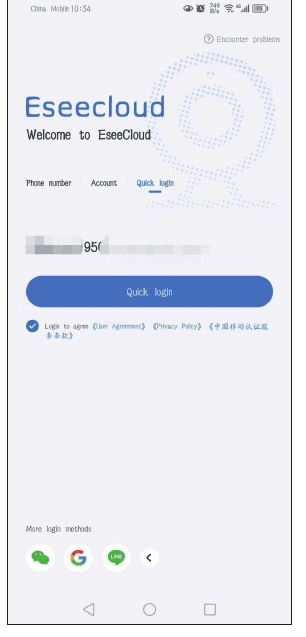
5.3 Quick Login: After your first log in, the app will automatically recognize your phone number; next time you can choose Quick login.
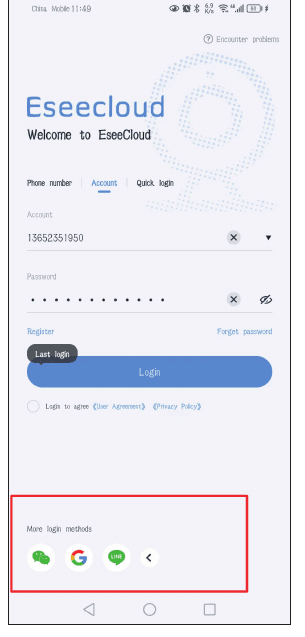
5.4 More login methods: you can log in via WeChat, Google or Line account.
Connect Camera to EseeCloud
Scan QR code on the camera to connect
- Install the camera on a bulb base; the camera will power on and automatically rotate under the VERY FIRST TIME USE. If you matched the camera with a device before, you need to press the Reset Button on the camera for 8–10 seconds, then connect to other device.
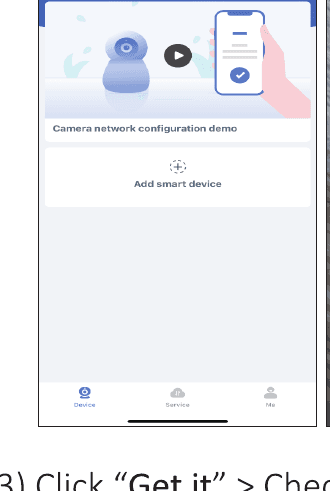
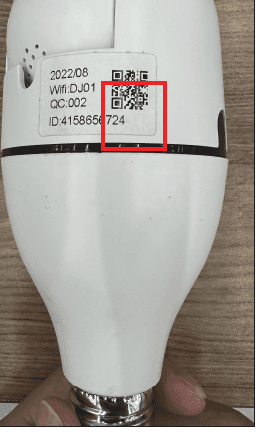
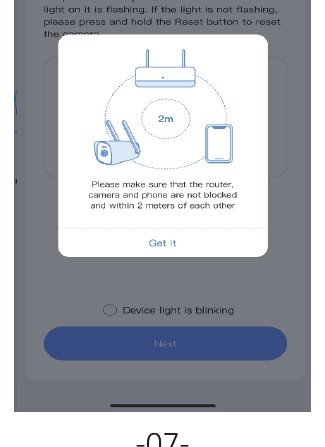
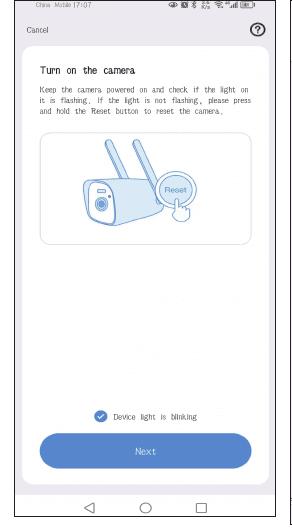
- Click Get it > Check Device light is blinking > Next.
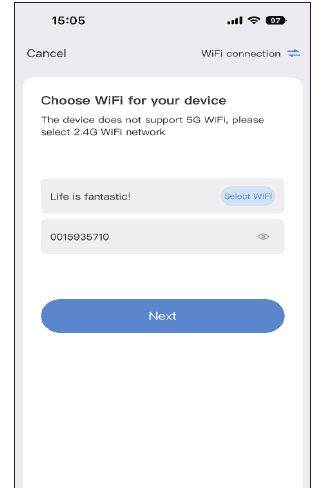
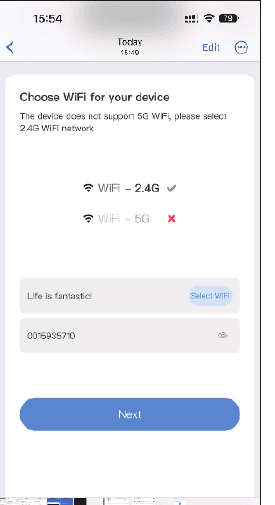
- Select your home Wi-Fi and input the Wi-Fi password.
The Wi-Fi name and password should not include any special character, and the Wi-Fi password should not be over 12 characters.
- There is a QR code on your mobile phone. Aim the QR code of the mobile phone at the camera lens at 15–25 cm. When you hear the prompt voice, click the blue button below, wait for the device to connect successfully, then edit the device name.
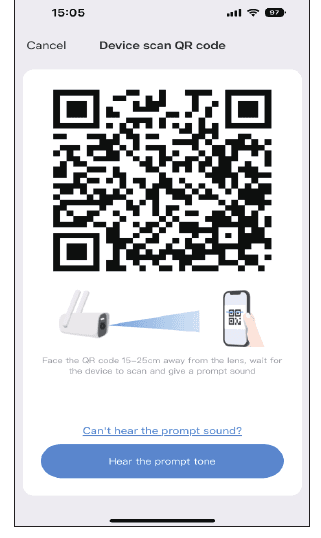
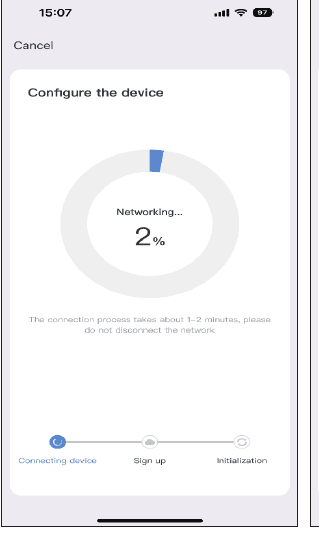
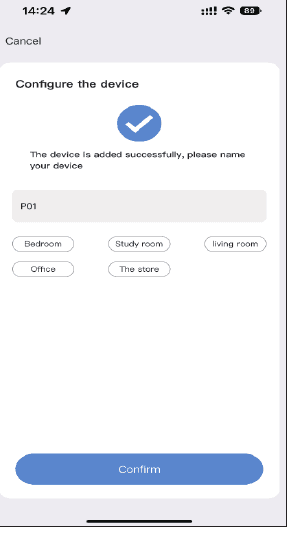
Connect camera hotspots to add
- Install the camera on a bulb base; the camera will power on and automatically rotate under the VERY FIRST TIME USE. If you matched the camera with a device before, you need to press the Reset Button on the camera to turn it on.
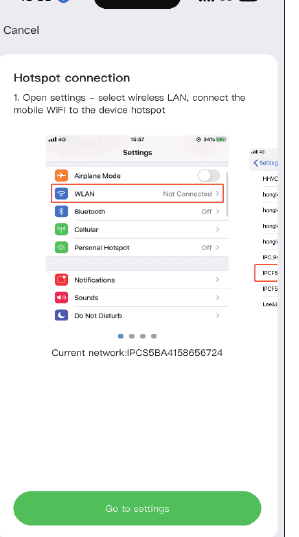
- Enter the EseeCloud app and click Add Smart Device > Other Ways to add > Connecting camera hotspots to add > Select your home Wi-Fi and enter your Wi-Fi password > Next.
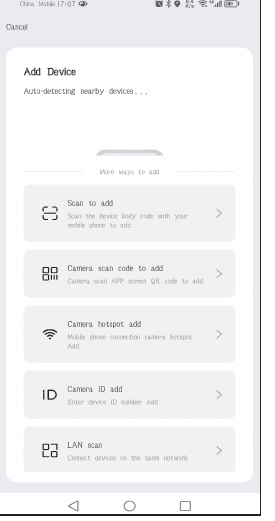
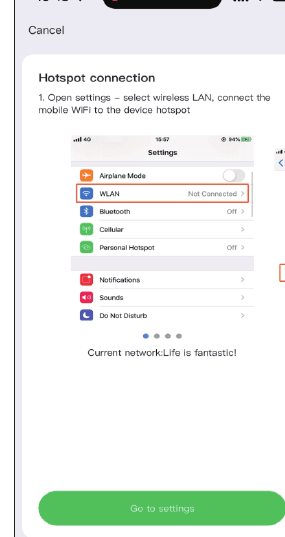
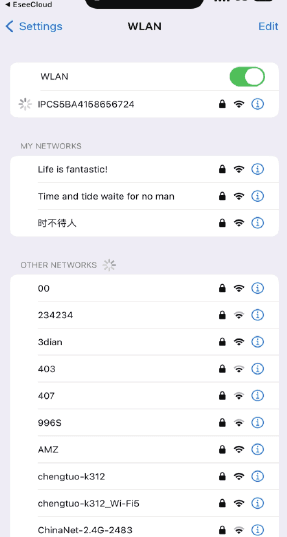
- Go to settings > Then enter the WLAN interface of your phone and find the Wi-Fi starting with "IPC". Input the password. The password is "11111111" (8 characters of 1). > Then return to EseeCloud > Go to settings > Wait for the camera to connect to your home Wi-Fi > Name your camera.
Add Camera to Wireless NVR Kit
For K8208 and K8210 NVR (Old UI)
- Install the camera on a bulb base; the camera will power on and automatically rotate under the VERY FIRST TIME USE. If you matched the camera with a device before, you need to press the Reset Button on the camera to turn it on.
- Take it close to the NVR and search the camera on the NVR setting: right click the mouse and go to Video manage → Match Code, and wait for the camera shown to be added.
- Or, right click your mouse: Wireless add → waiting for camera match code; after successfully matching go to video manage to check whether the camera connects successfully.
The NVR and Wi-Fi camera must connect to the same Wi-Fi.
For K8508 and K8510 NVR (New UI)
-
Install the camera on a bulb base; the camera will power on and automatically rotate under the VERY FIRST TIME USE. If you matched the camera with a device before, you need to press the Reset Button on the camera to turn it on.
-
Take it close to the NVR and pair it to NVR at first before you install the camera outside.
2.1 Make the camera antenna and the NVR Wi-Fi antenna parallel.
2.2 Right click the mouse: enter Camera click + icon to add a camera.
2.3 Continue to next step to enter "Power the camera", then continue to next step and wait for the camera being searched. When the camera shows on the screen, continue to finish; the camera will be automatically added on the NVR.
Visit our Amazon flagship store and search the page of "Wireless System". All these NVR kits can be compatible with the light bulb camera.
View on EseeCloud Software on PC
Register an EseeCloud Account
- You must register an account of EseeCloud on your mobile phone and add the device first, so that you can remote view on PC. The EseeCloud software download link is
https://www.hiseeu.com/pages/eseecloud-camera-system-app. If you need the EseeCloud software for computer, please email us at [email protected] (for US). - Enter your mobile EseeCloud app account and password, click Login. Do not copy your account or password from another place; input them manually.
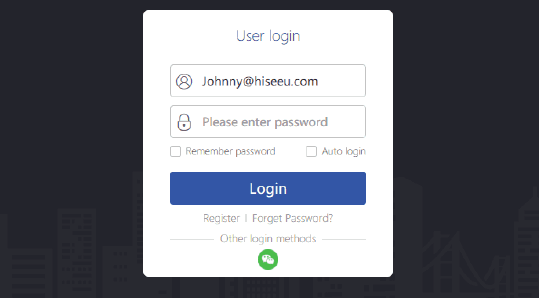
Synchronize Account to PC
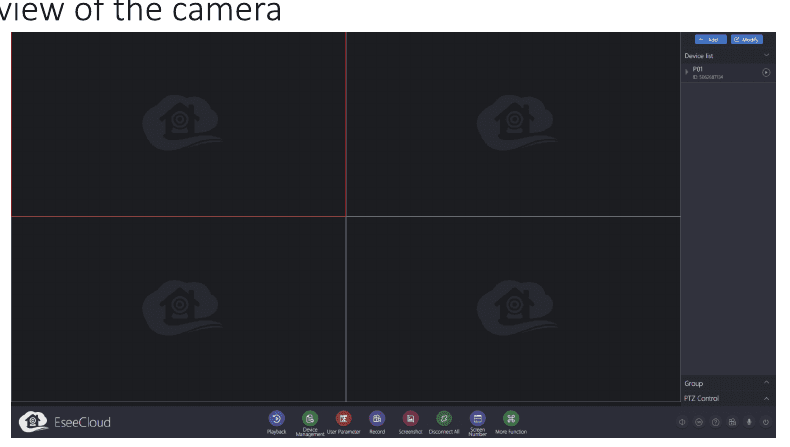
After logging in with the account and password, the device will automatically synchronize to the computer. You can click the play button in the device list on the right to live view of the camera.
Camera Functions
Buttons Function Introduction
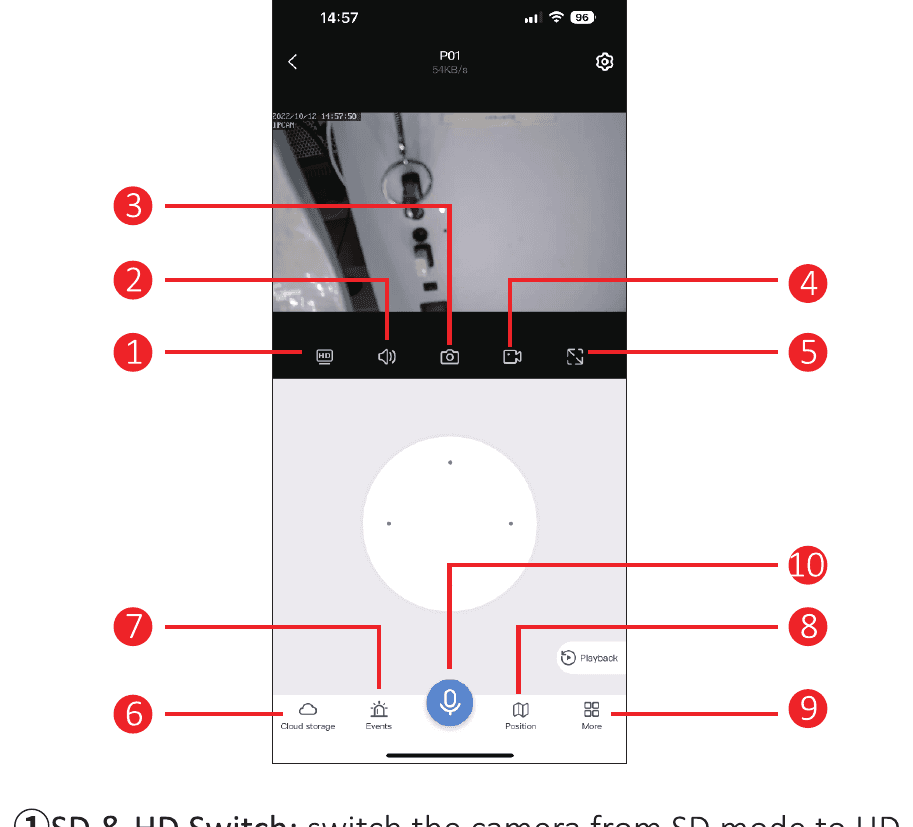
- SD & HD Switch — Switch the camera from SD mode to HD mode. Due to service not supported always in HD mode, each time when preview the camera you need to change it manually.
- Volume — Turn on/off camera volume. If there is no sound, please make sure to turn on the phone volume.
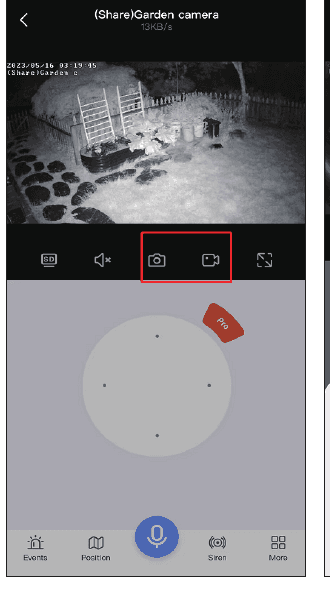
- Photo capture — Capture a photo of the live stream; click Photo album to check photos.
- Manual record — Manual record on the cellphone; click Photo album to check recordings.
- Horizontal screen — Turn the image horizontal.
- Cloud storage — Click it to buy cloud service. If you insert the SD card, no need to buy cloud storage — it is not free.
- Alarm message — Check the motion detection information.
- Preset position — You can set several positions that you view frequently. You just need to click the transfer button instead of moving the camera lens position manually.
- More:
- Open Detect alarm icon — When the camera detects an object moving, it will immediately send an alarm message.
- Mobile tracking — When an object moves within the range of the camera lens, the camera will track the object and record it.
- Cruise — Turned on this function, the camera will start 360° automatic cruise for about 4 hours, and then stop.
- PTZ calibration — When there is a deviation in the camera position or the pan-tilt cannot rotate left and right or up and down, just click PTZ calibration, and the camera will calibrate automatically.
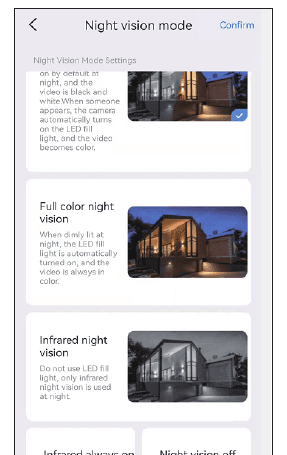
- Night vision model — Night vision has three modes to choose from. Clicking the button will switch one mode.
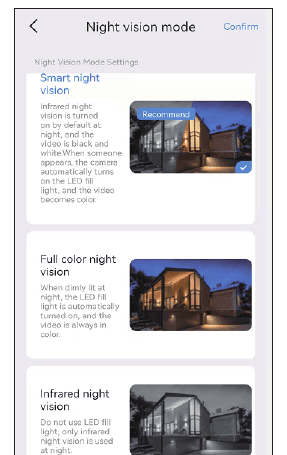
- Smart night vision — When the camera detects a person or object, it will turn on the floodlight, and the image will be switched to full color. Normally, it is a black-and-white image at night.
- Full color night vision — When it is detected that the surrounding environment has begun to darken, the floodlights will automatically turn on and display a color image.
- Infrared night vision — Camera will switch to black and white image automatically at night. Day will switch back to day mode.
- Alarm — When you find someone invading, please click the alarm button, and the camera will sound the alarm for 14 seconds to scare away the intruder.
- Siren — Turn on the icon, camera prompt sound when motion detection happened.
- Microphone Function — Talk to someone through the camera. Click the microphone icon below so that you can talk to others, and then click the "Hang up" button to end the call.
Sound
When you view the camera, please open the sound button, otherwise you can't hear anything of camera recording voice. Please note that you also need to turn the phone volume up.
Screenshot & Recording
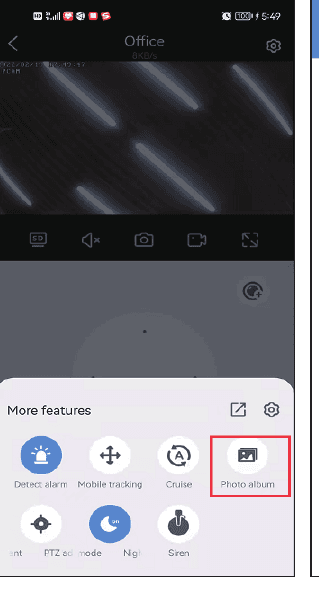
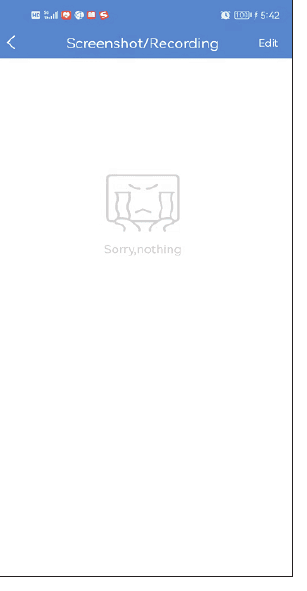
You can take a screenshot or record an important picture and save it on your mobile phone as evidence in the future. After recording successfully, please click More → select Photo album; you can check the video on this interface.
PTZ Control
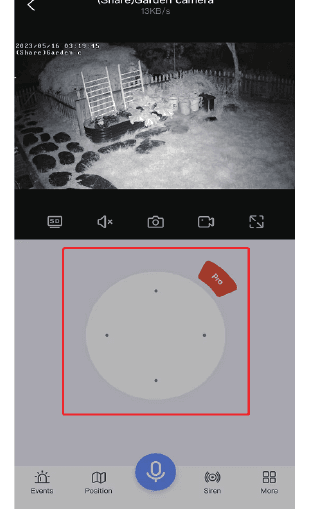
Drag the direction key to move the camera lens up and down, left and right.
Microphone Function
When you want to talk to someone through the camera, click the microphone icon below so that you can talk to others, and then click the "Hang up" button to end the call.
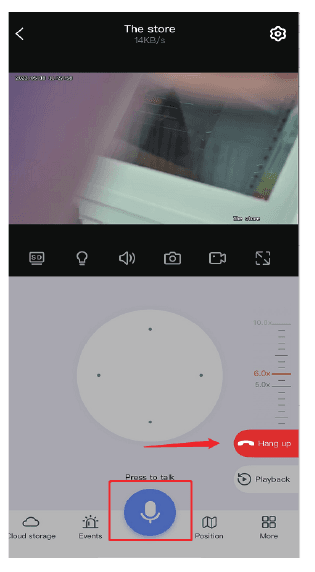
Zoom and Focus
Click the red button "Pro" on the PTZ to see the zoom in and zoom out options.
- Zoom in and out — This function is only for using the optical zoom camera. If you purchase a digital zoom camera, click to zoom in and out will be unresponsive.
- Focus — When you zoom in/out, if the camera is not in focus, click this option to focus manually. However, if the image is normal, do not click it, because it will damage the image definition of the camera.
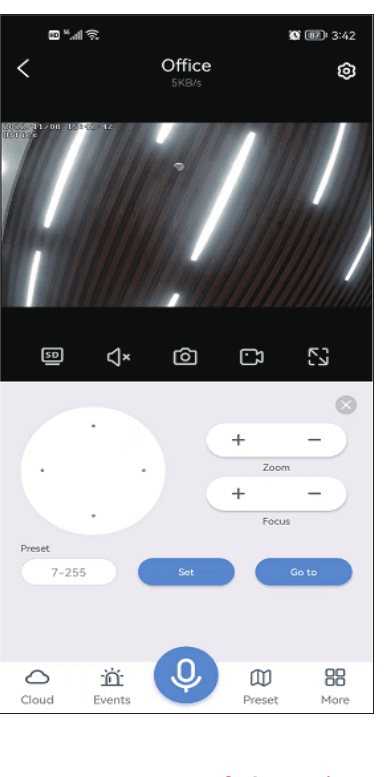
If you want to zoom in the image of a digital zoom camera, please swipe the screen directly to enlarge the image.
Motion Detection Alert
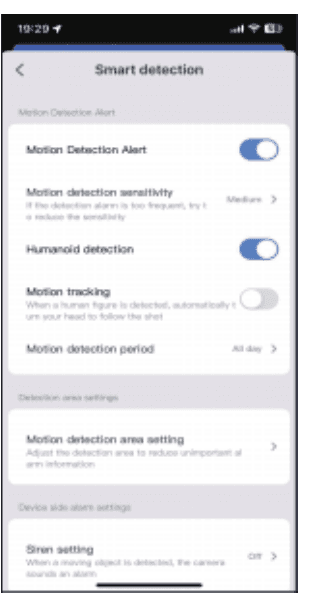
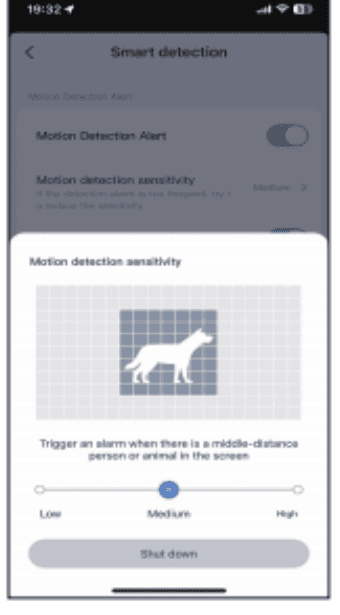
Motion detection sensitivity — If you receive too many wrong alarm messages, please set the sensitivity of motion detection to low.
Smart detection Period — There are four options to choose detection period: all day, day model (the detection time is from 8 a.m. to 8 p.m.), night model (the detection time is from 8 p.m. to 8 a.m.), or you can also customize the detection time.
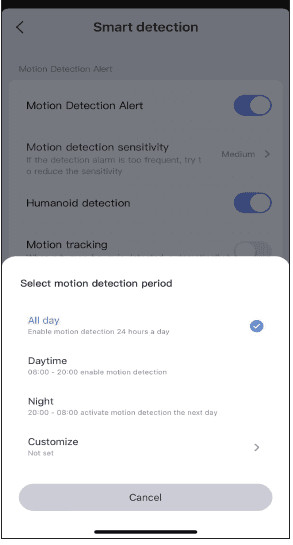
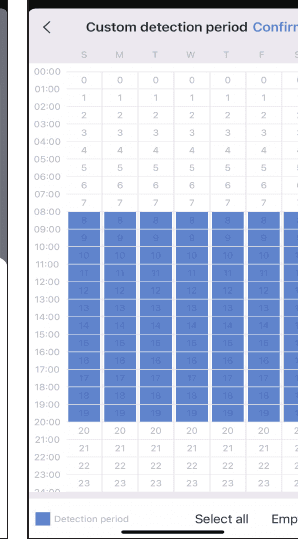
Motion detection area setting — If you want to detect a particular position, you can set a motion detection to Area mode or Cordon mode. When someone enters the detection area, an alarm will be triggered, and it can reduce false alarms.
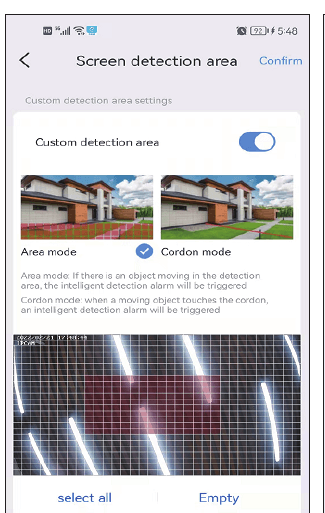
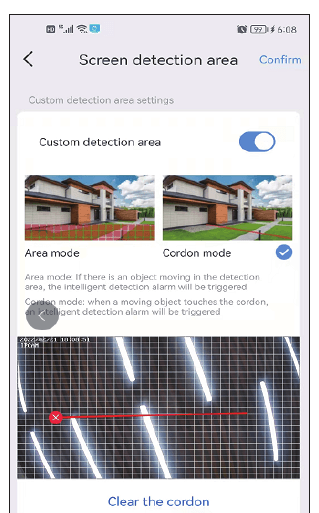
If the detection area you set is too wide, the camera will default to full screen detection.
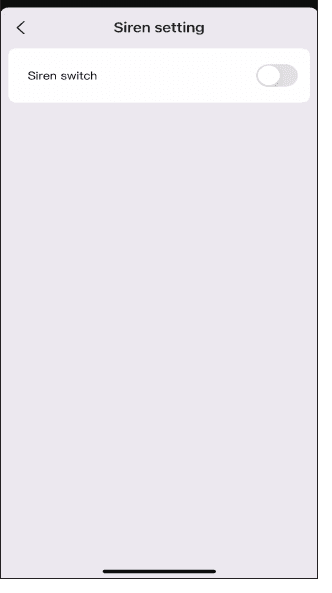
Siren Setting
You can switch off or on the Siren. When someone enters the alarm area, the camera will prompt an alarm sound.
Recording Setting
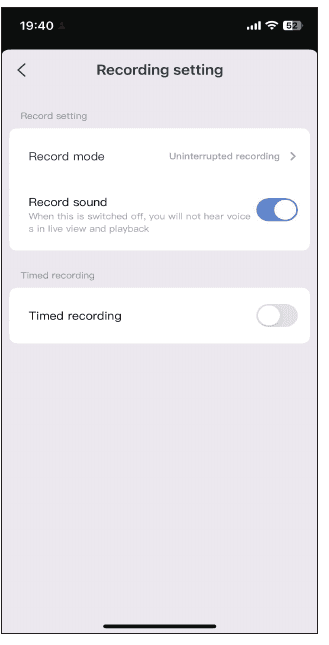
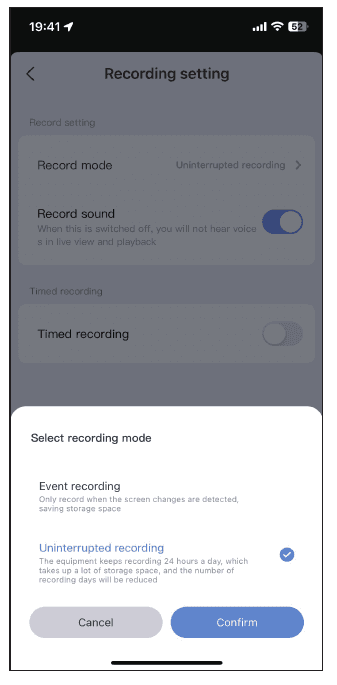
Record Mode — There are two record modes to choose: event recording and Keep recording. Event record means when the screen changes are detected, it will start recording; it will go into sleep at other times. Keep recording means the camera will record all the time.
Record sound switch — If you do not turn on this option, you can not hear sound when playback or view live.
Time record — For time recording, you can choose different dates and different time periods, and you can also make multiple time plans. For example, you can select record only on weekdays or only on weekends. You can also customize the recording time schedule.
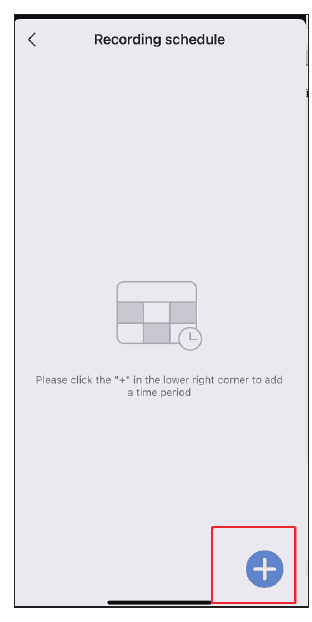
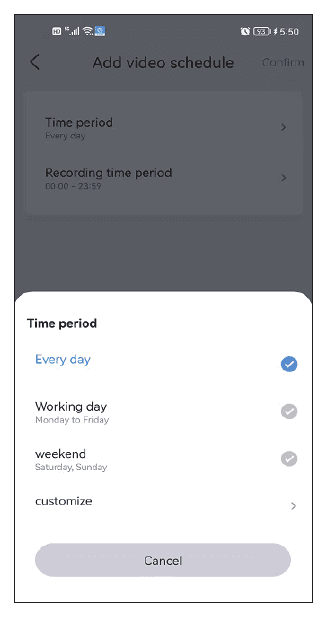
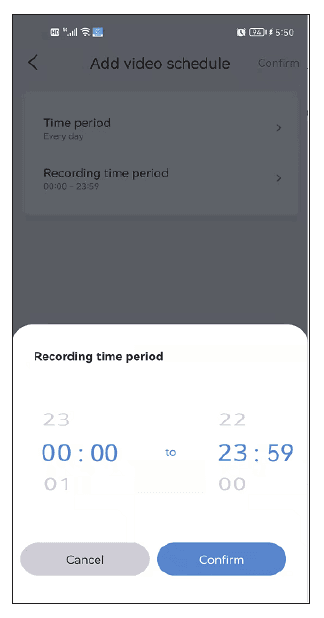
Image Setting
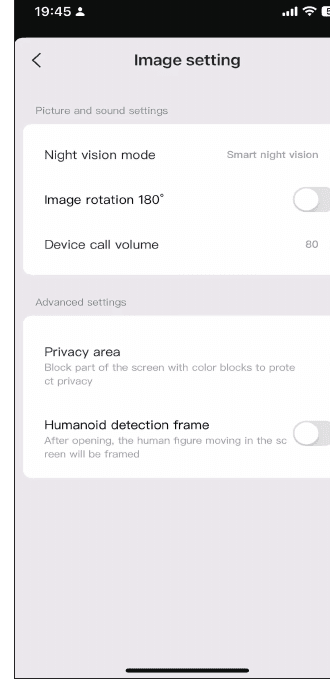
If the lighting mode cannot be set successfully in More options, you can also set it in picture settings. In addition to these three modes, you can also choose to turn on the infrared light all the time, and the image will remain black and white no matter day or night. Turn off night vision and it will always maintain full-color night vision.
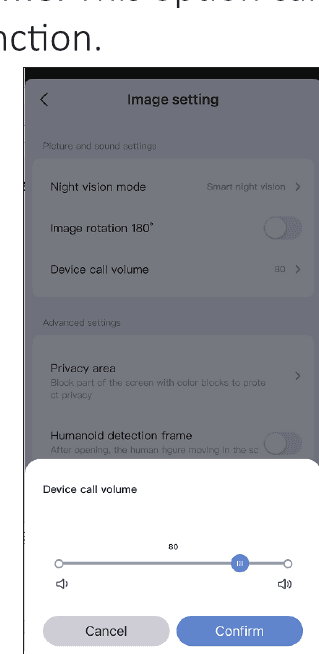
a. Device call volume — This option can set the volume of two-way audio function.
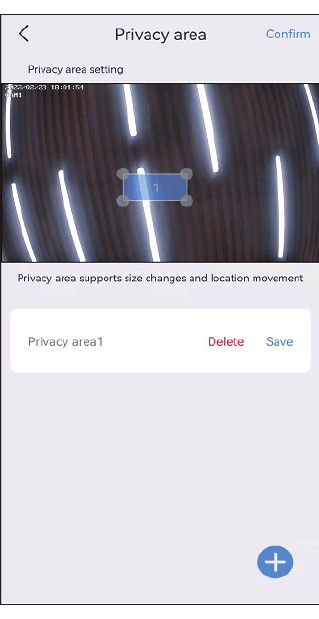
b. Privacy zone setting — Set the privacy area, and the image area you set will be covered with color boxes.
c. Humanoid detection frame — When the camera detects people, it will capture the actions of suspicious people and frame them, and quickly push the alarm notification.
Storage Setting
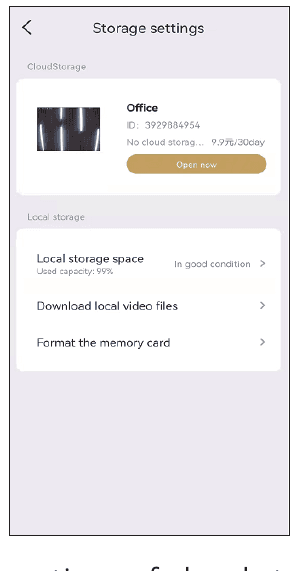
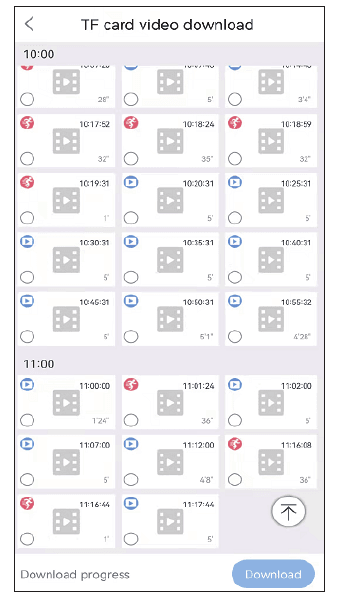
You can view the usage time of cloud storage, the status of SD card and storage capacity in the storage settings interface. If you have inserted the SD card but it is not recording, please check if the SD card status is normal or the SD card capacity is full. If full, please click format to delete all records. And you can also download video on this interface.
FAQ
Customer Service
If you have any questions, you can contact our after-sales service:
- Email: [email protected]
- WhatsApp ID: +8613392810296
- Website: www.hiseeu.com
- Telephone: +1 917 338 1084 (Available Pacific Time: 5:00pm–12:00pm)
The EseeCloud app provides one-on-one online support. For any questions, please contact us directly through the app to get your problem solved. You can also browse our Help Center.
Hiseeu products endure strict test standards before leaving our factory. They are certificated with CE, FCC and UL certifications.
4G LTE Cellular Security Camera
User Manual for the Hiseeu 4G LTE Cellular Security Camera (C016) — important features, what's in the box, camera introduction, EseeCloud app setup, camera functions, 4G subscription, and FAQs.
OOSSXX
User manuals and quick guides for OOSSXX security camera systems, kits, and solar cameras.