 EseeCloud Help Center
4G LTE Cellular Security Camera
User Manual for the Hiseeu 4G LTE Cellular Security Camera (C016) — important features, what's in the box, camera introduction, EseeCloud app setup, camera functions, 4G subscription, and FAQs.
User Manual (C016-V2.0) for the Hiseeu 4G LTE Cellular Security Camera. Suitable for the Hiseeu TDK04U, TDK04U-Q, TDK04UG, HD603, TD704U and TD704U-Q models.
For a better product experience, please read the user manual before using the product.
4G SIM card — no Wi-Fi
This is a 4G SIM Card camera, not a Wi-Fi camera. The included SIM card allows the camera to operate seamlessly in areas without Wi-Fi. The SIM card is pre-inserted into the card slot before leaving the factory. The 4G Cellular Security Camera cannot connect to your home Wi-Fi network.
Important Features about 4G LTE Cellular Security Camera
- The camera is a 4G wireless cellular security camera. The SIM card supports the camera running in any place that you want.
- The 4G LTE Cellular Security Camera can't work with your home Wi-Fi network, so please don't connect the camera to your home Wi-Fi network.
- In order to run the cellular security camera normally, please make sure the 4G LTE Cellular Security Camera has a nano SIM card inserted (included) and a cellular data plan in available state.
To ensure your cellular security camera works properly, please make sure the SIM card you insert into the camera has sufficient 4G traffic data.
- If you use the SIM card we provide, you can check the traffic data in the EseeCloud App.
- If you use your own SIM card, please make sure your 4G service provider is compatible with the camera. (You can find the appropriate service provider on the product detail page.)
If you need to recharge the traffic data (the SIM cards we provide), please refer to the steps below:
- Open the EseeCloud app.
- Click the Recharge icon.
- Select the cellular data plan you want to order.
If you need to recharge the traffic data (SIM card by yourself), please contact your SIM card provider for recharge. Note: You can only recharge in the app with a SIM card provided by us.
Charge before first use
To ensure safe transportation, we do not allow camera batteries to be overcharged before they leave the factory. Therefore, please charge your new camera for at least 6 hours after receiving it. This will ensure the best possible experience.
If there is any question when recharging the SIM card, please contact our 4G customer service team. Quick contact: [email protected]
Indicator Light Introduction
- The red light is always on — the 4G signal is too weak. Please check whether the antenna is up. Or adjust the position and orientation of the device.
Move to an open area and search for areas with strong signals. Replace the SIM card and use a signal provider with a wider coverage area in the local. (USA: AT&T, Verizon, T-Mobile)
- The red light flash slowly — the camera battery is low. Please connect the camera to a power source and charge it for more than 6 hours.
- The red and blue lights flash alternately slowly — if the traffic is insufficient or the payment is in arrears, please replace the SIM card or recharge.
Check whether the remaining data is sufficient through the SIM card provider. If you are using our included SIM card, please contact our after-sales customer service ([email protected]).
- The red and blue lights flash alternately fast — the device does not detect the SIM card. Please confirm that the SIM card has been inserted.
Check if the SIM card is fully inserted into the card slot using the correct method. Check if the SIM card chip is dirty or damaged. Attempt to replace the SIM card.
- Purple and other light flashing — automatic network access failed. Please set the APN.
If you are using your own SIM card, please ask your SIM card provider how to set up an APN. If you are using our included SIM card, please contact our after-sales customer service ([email protected]).
Before contacting our after-sales customer service, please try one time RESTORE THE FACTORY SETTINGS before attempting to connect. Many issues can be resolved by restoring the factory settings.
What's in the Box?
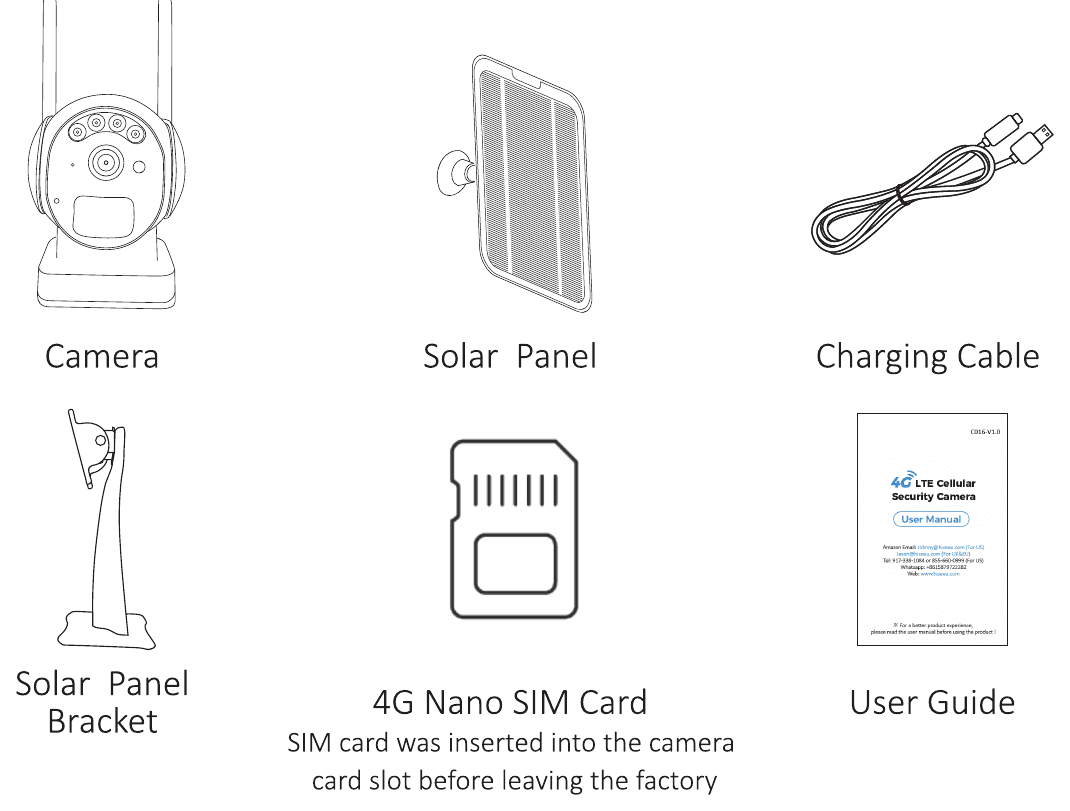
- Camera
- Solar Panel
- Charging Cable
- Solar Panel Bracket
- 4G Nano SIM Card (the SIM card was inserted into the camera card slot before leaving the factory)
- User Guide
If you find any parts missing, please contact us at the first time; we will replace them for you within 24 hours for free!
Camera Introduction
TDK04U, TDK04U-Q, TDK04UG
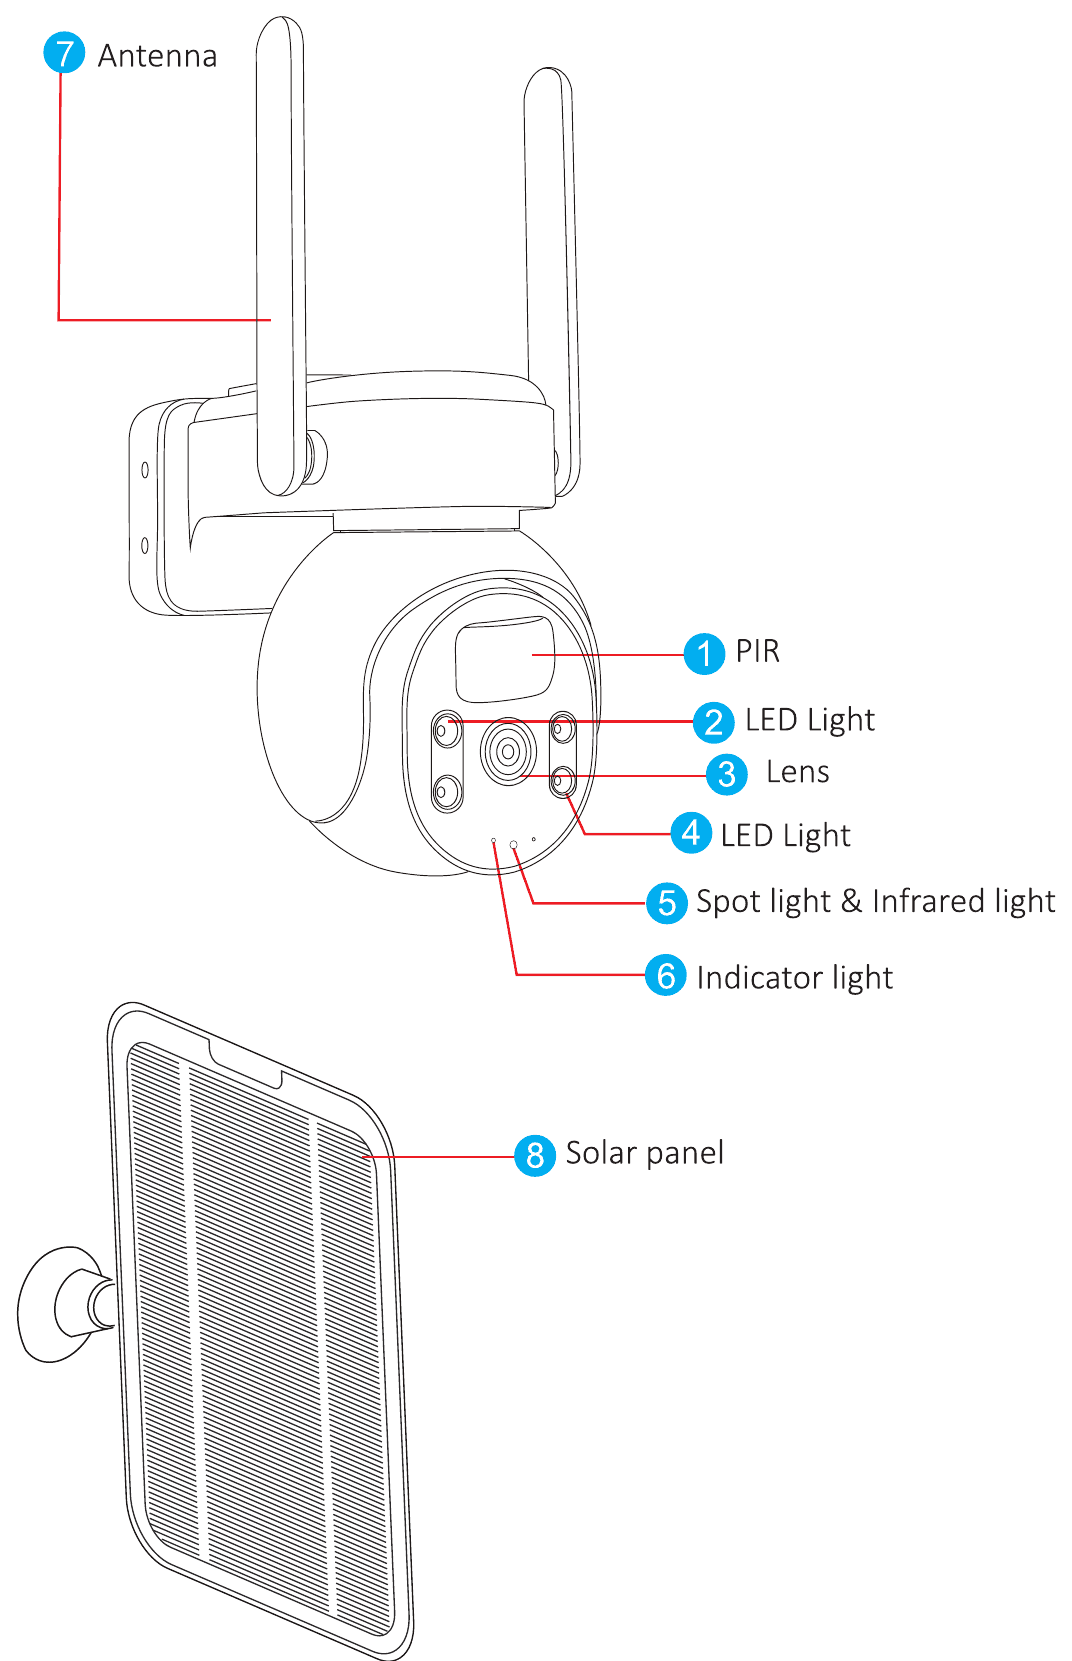
- PIR
- LED Light
- Lens
- LED Light
- Spot light & Infrared light
- Indicator light
- Antenna
- Solar panel
HD603
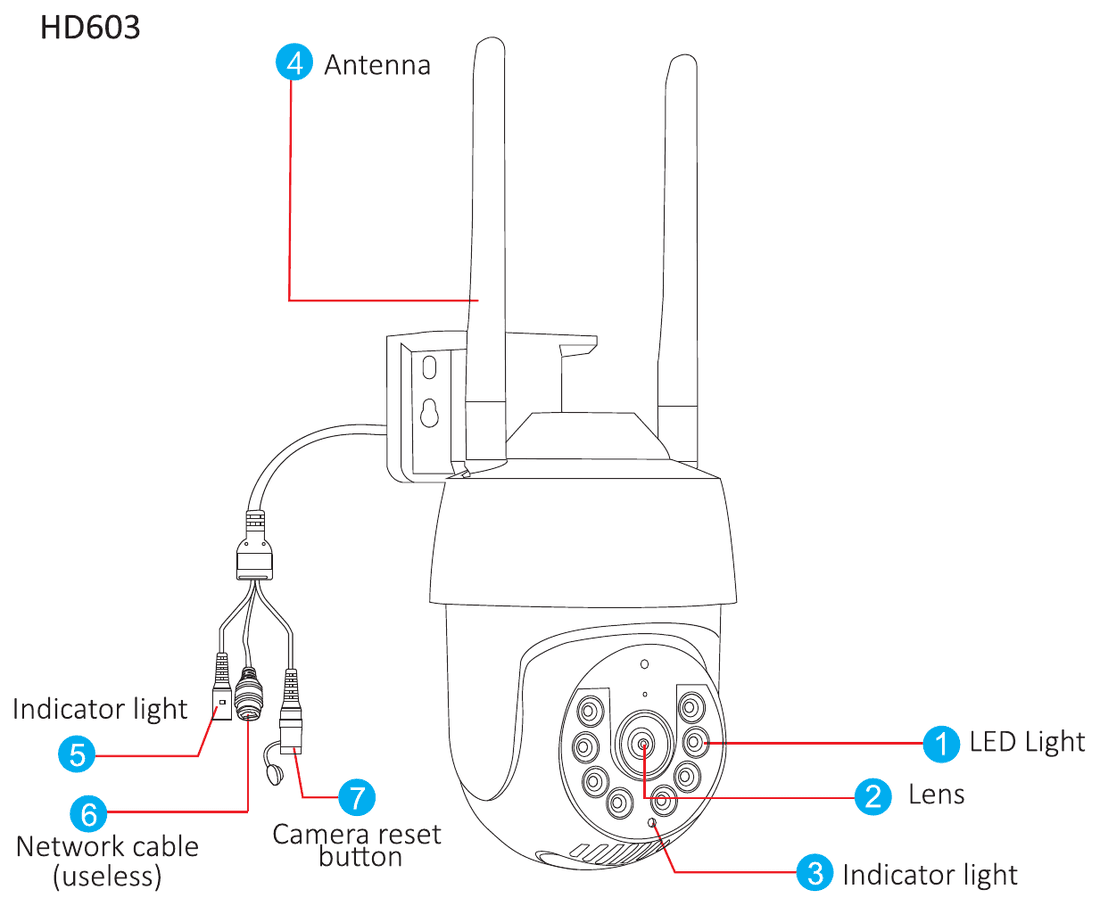
- LED Light
- Lens
- Indicator light
- Antenna
- Indicator light
- Network cable (useless)
- Camera reset button
TD704U, TD704U-Q
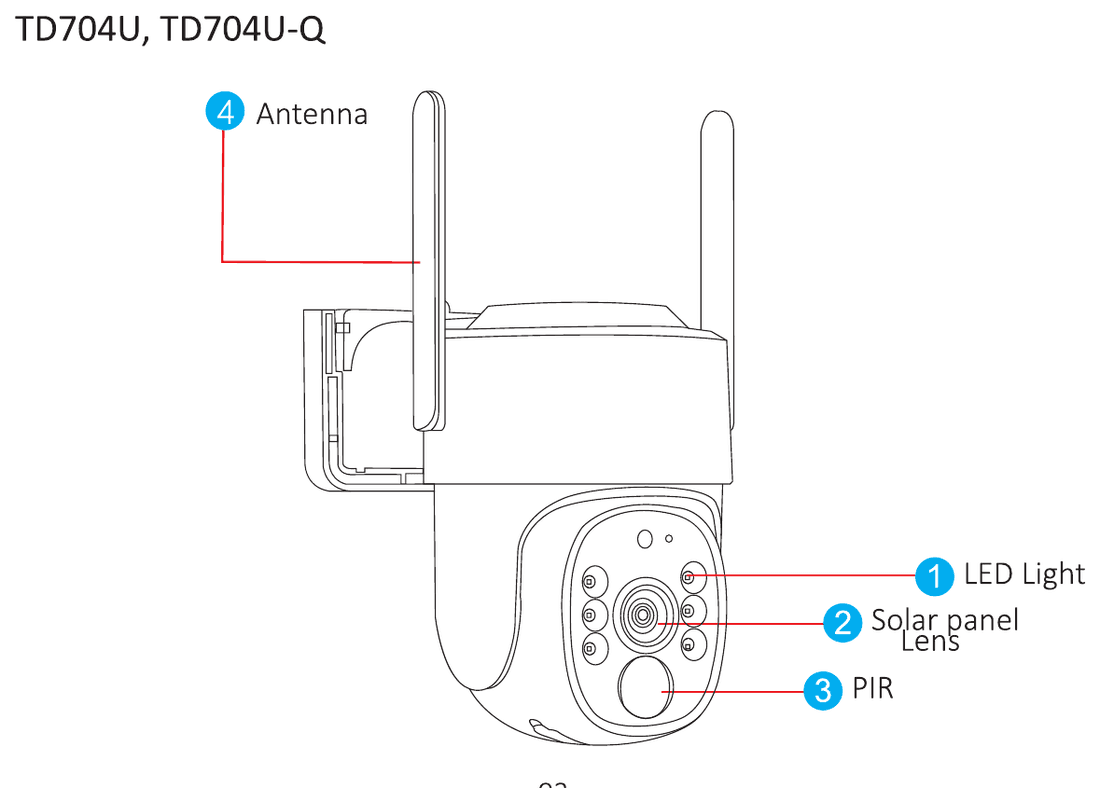
- LED Light
- Solar panel / Lens
- PIR
- Antenna
Setup App
App Installation
Use your mobile phone to scan the QR code below to download and install "EseeCloud", or search "EseeCloud" in your mobile phone's App Store or Google Play. For a detailed walkthrough, see the EseeCloud App User Guide.
App Registration
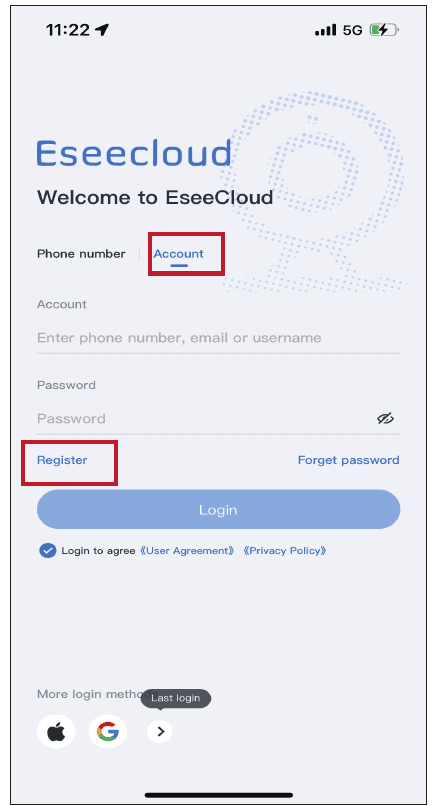
If you are an EseeCloud new user, follow the steps below to register your EseeCloud account:
Go to the login interface, click Account and click Register.
Register with your phone number or email address, click Register.
You'll receive a verification code. Input the verification code and set up your own password, then click Confirm to complete.
Camera Connection
Please connect the device to the power supply to ensure that the device is powered on normally.
Insert the Nano-SIM card (Hiseeu SIM Card has been pre-inserted) into the device, and if you're using your own SIM card, make sure you're using Verizon, T-Mobile, and AT&T's 4G networks.
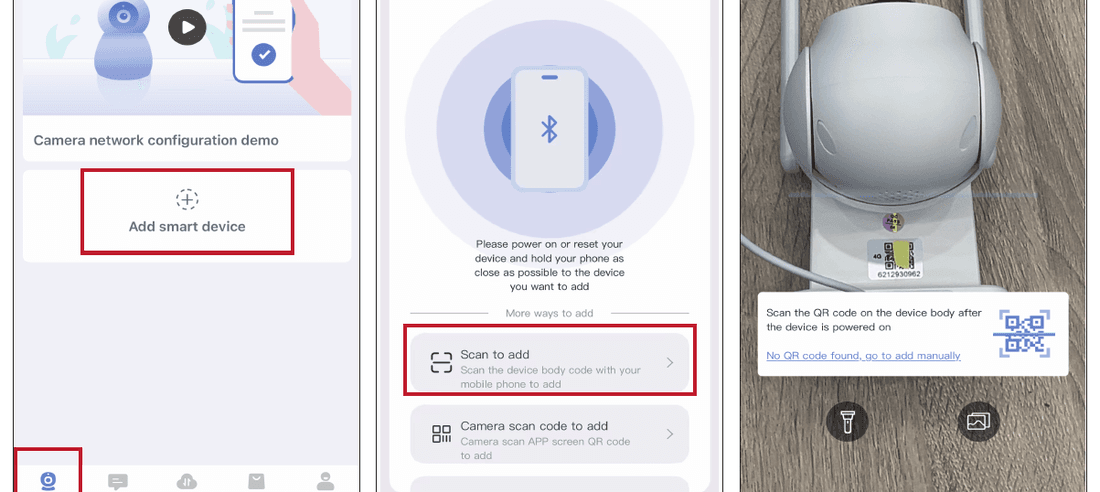
After you have clicked "Add camera" in the "Device" interface, click "Scan to add" to enter the scan code interface.
Scan the QR code on the device body, and add the device according to the interface guidance.
Make sure of 2 things before adding your camera to your EseeCloud app
- Your device has access to a power source and make sure it's charged.
- Your device is inserted into one of our SIM cards or your own Verizon, T-Mobile, and AT&T SIM card with a 4G network.
If you are sure that all the above conditions are met, but still cannot add in, please try once: Press the "Reset button" for 8 seconds to restore the factory settings. Try the "Camera Connection" once again.
Mounting the Camera
For outdoor use, the camera MUST be installed upside down for better waterproof performance and better PIR motion sensor's efficiency.
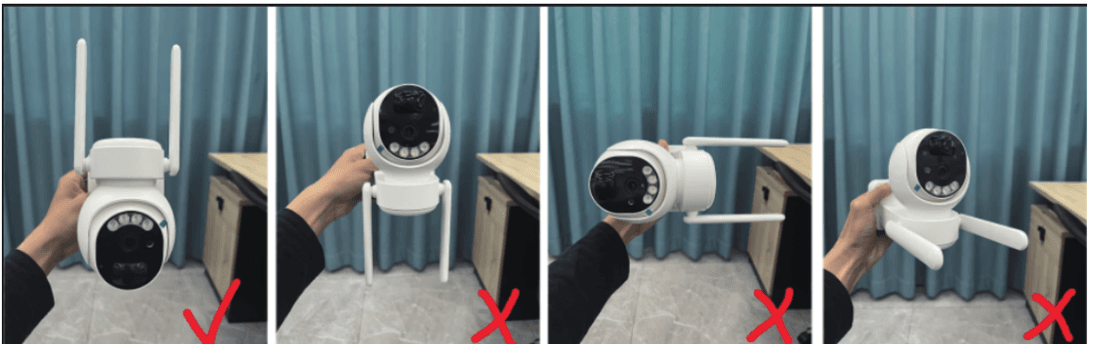
Install the camera 2–3 meters (7–10 ft) above the ground. This height maximizes the detection range of the PIR motion sensor.
If a moving object approaches the PIR sensor vertically, the camera may fail to detect motion.
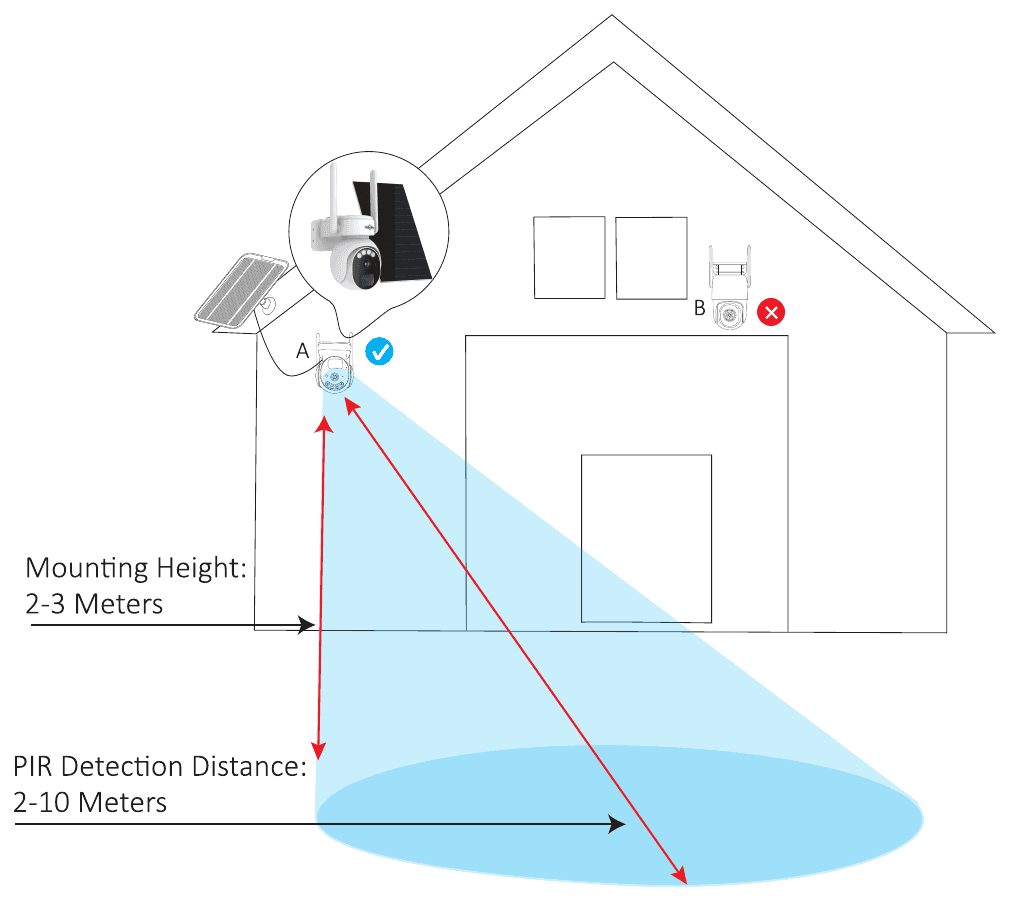
- Mounting Height: 2–3 Meters
- PIR Detection Distance: 2–10 Meters
Camera Function
EseeCloud Main Interface
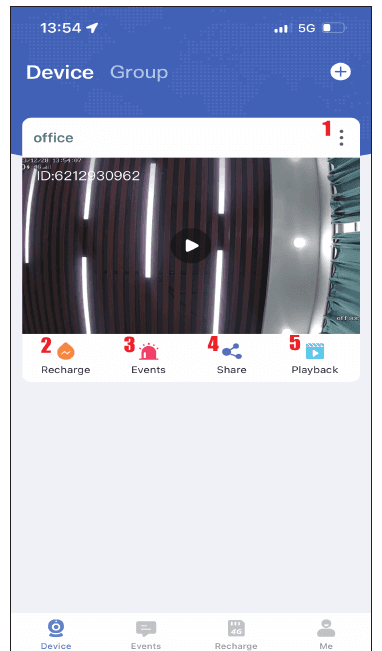
- Click the ⋮ icon, you will see four options (see below).
- Click the Recharge icon to enter the 4G data recharge page.
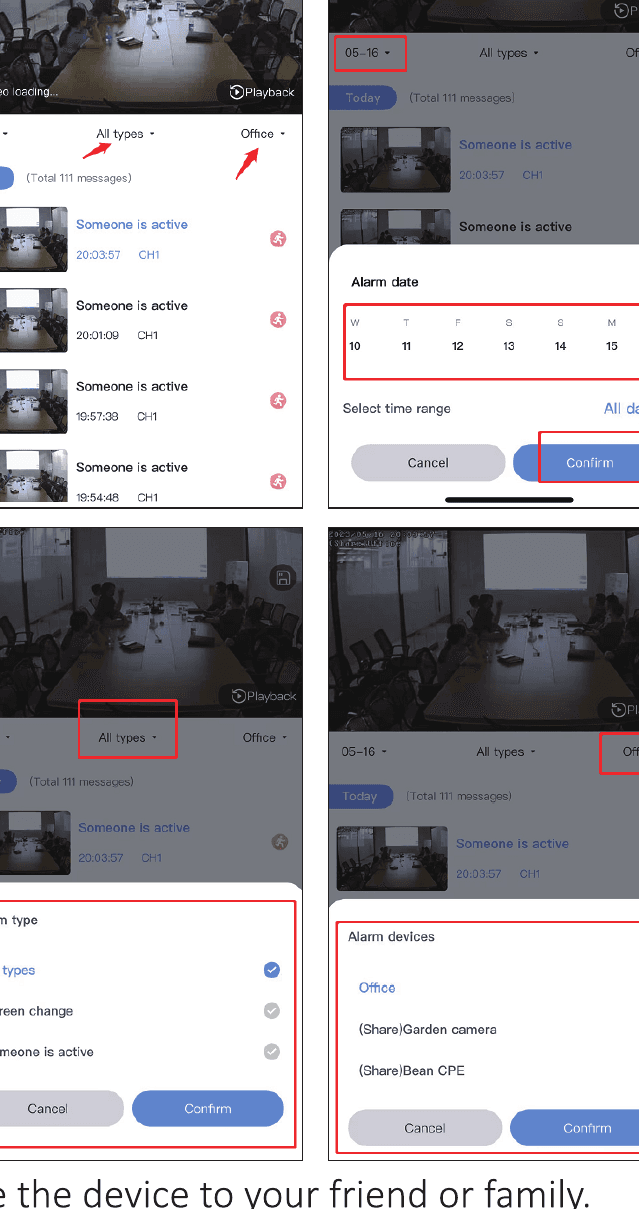
- Click the Events icon to look at the alarm message. You can select date, time range and motion type such as all types, Screen change, or Someone is active, etc. The alarm message will be overwritten automatically after three days.
- Click the Share icon to share the device to your friend or family.
- Click the Playback icon to watch the camera record, but you need to insert the SD card or purchase cloud service first.
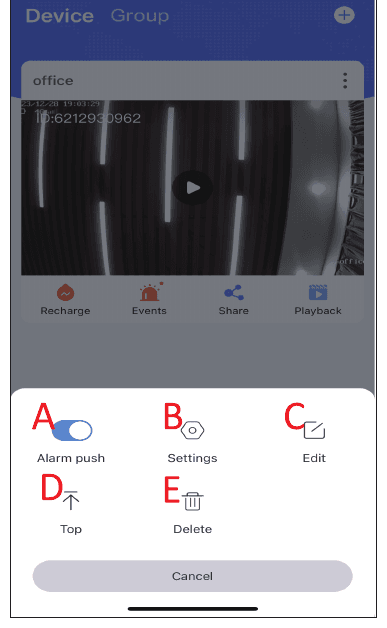
- A. Enable "Alarm push" to get phone alert notification.
- B. Click "Settings" — you can go to the setup interface directly.
- C. Click "Edit" option — you can edit the device name.
- D. The Top option pins this device to the top of the list, if you have more than one device associated with your app.
- E. The last option (Delete) is to delete the device.
Events (Alarm Messages)
Click the Events icon to look at the alarm message and select date, time range and motion type. You can also share the device to your friend or family:
- a. Click the Share icon, select share permission and QR code validity.
- b. Click finish in the upper right corner to generate a QR code, share the QR code to other people.
Share
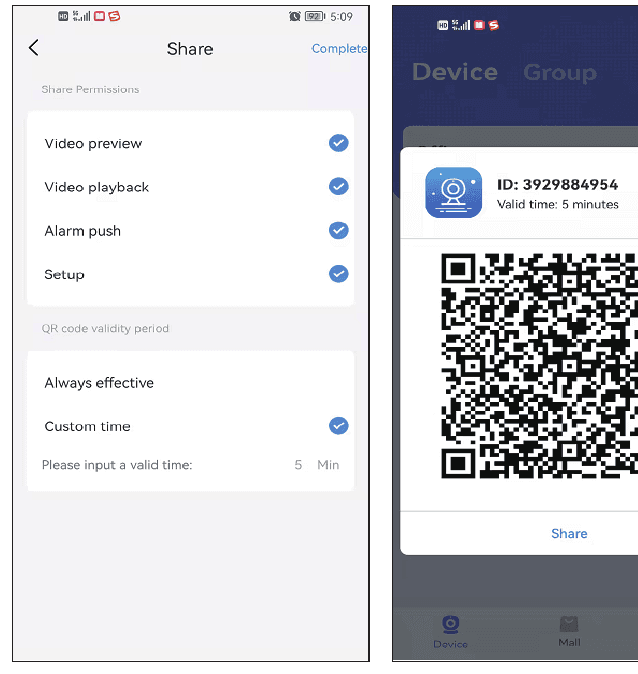
Select share permissions (Video preview, Video playback, Alarm push, Setup) and the QR code validity period (Always effective or Custom time), then generate the share QR code.
Playback
Click the Playback icon to watch the camera record, but you need to insert the SD card or purchase cloud service first.
Please note, just cloud service supports the fast forward option; SD card does not support it.
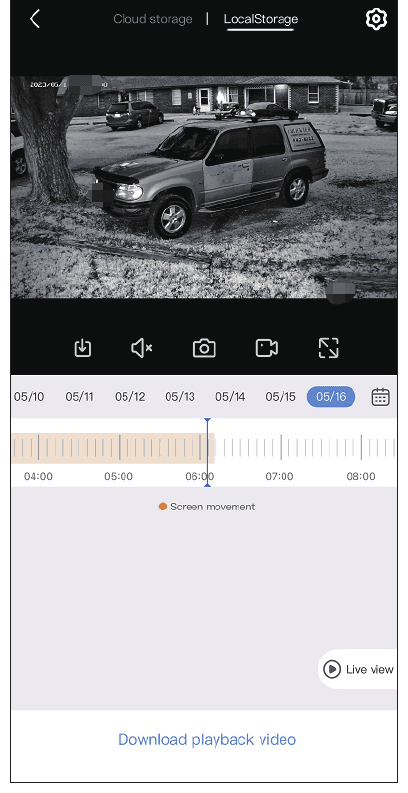
Real Time Video Recording Function
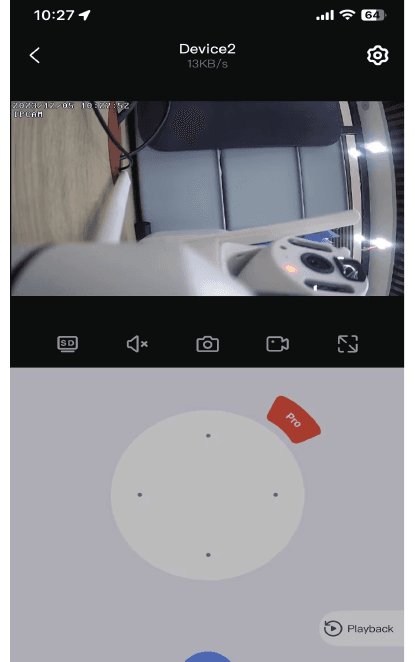
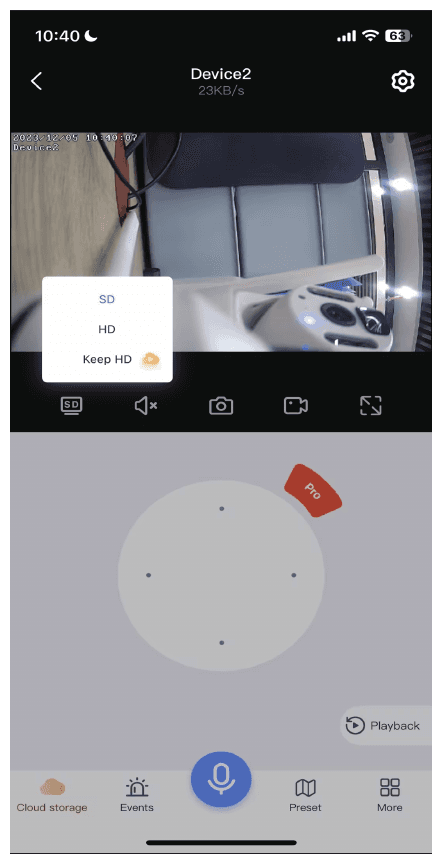
SD & HD Switch
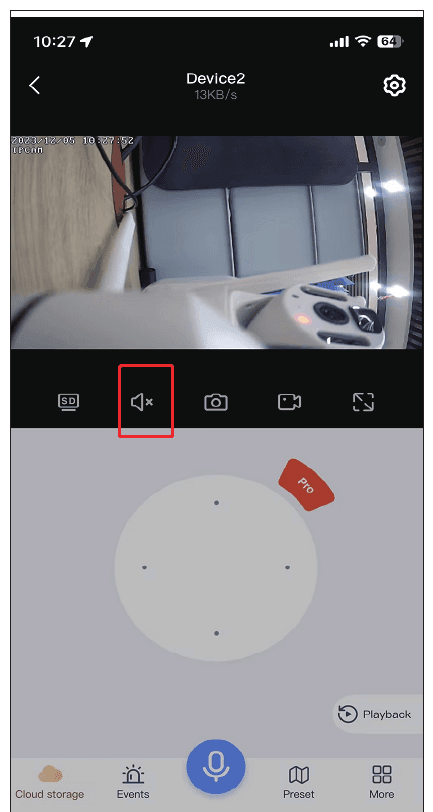
Sound
When you view the camera, please open the sound button, otherwise you can't hear anything from the camera.
Please note that you also need to turn the phone volume up.
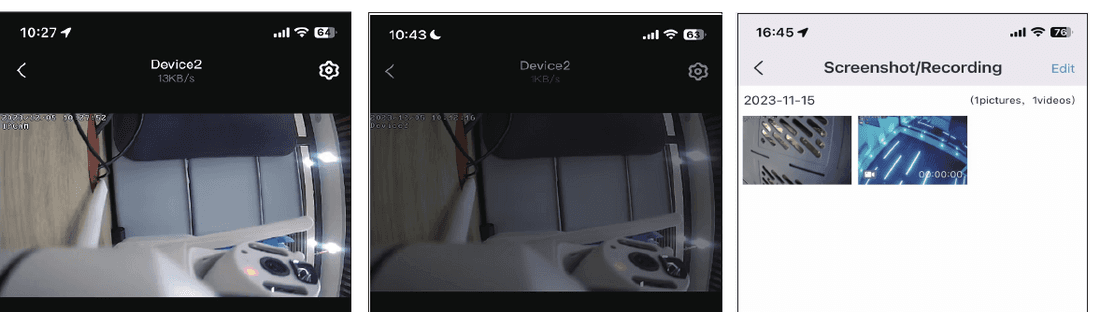
Screenshot & Recording
You can take a screenshot or record an important picture and save it on your mobile phone as evidence in the future.
After recording successfully, please click "More" → select "Photo album", you can check the video on this interface.
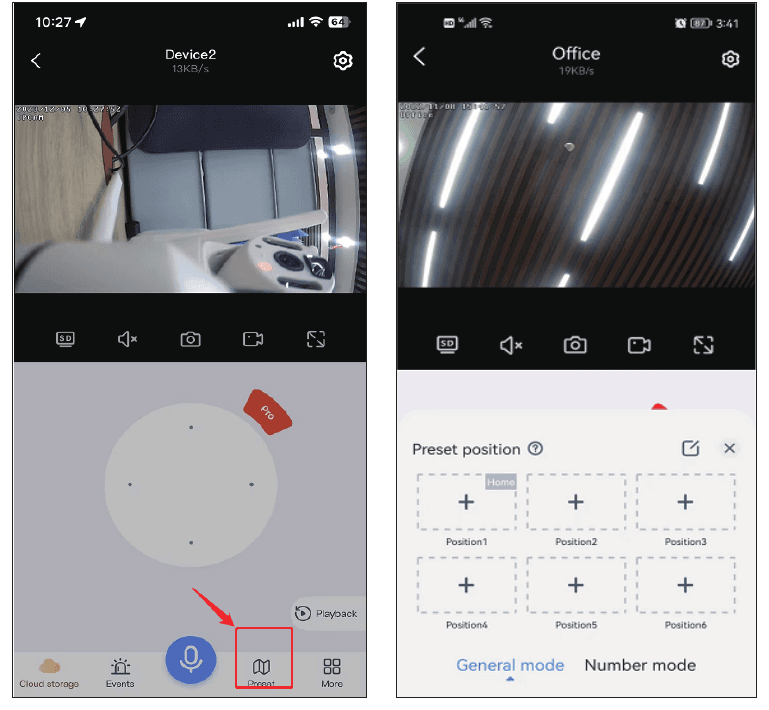
Frequently Viewed Location
You can set several positions that you viewed frequently. You just need to click the Go to button instead of moving the camera lens position manually.
a. Adjust the camera lens to a position you want, click add Preset.
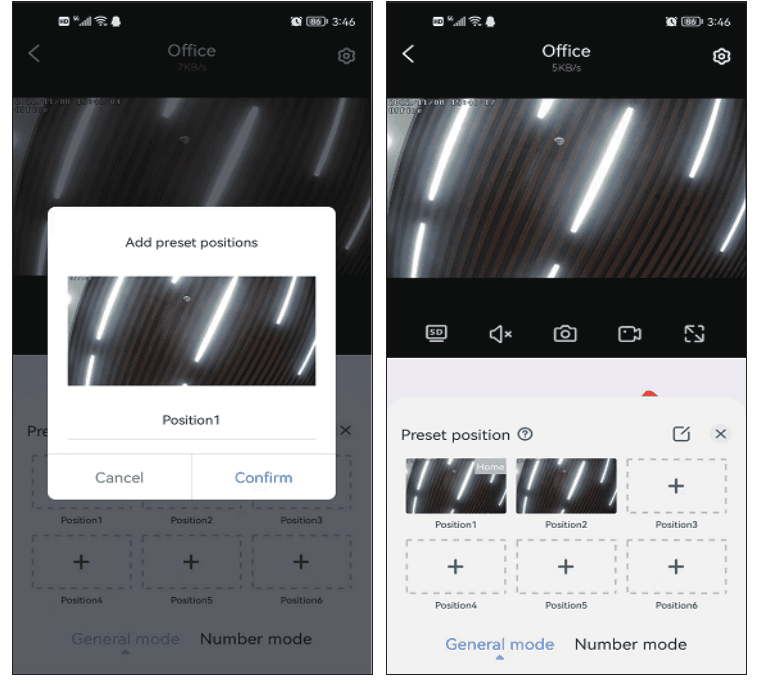
b. Name the position (e.g. Position 1), click Confirm. Directly click the image in the box and the camera will return to the position you set.
More
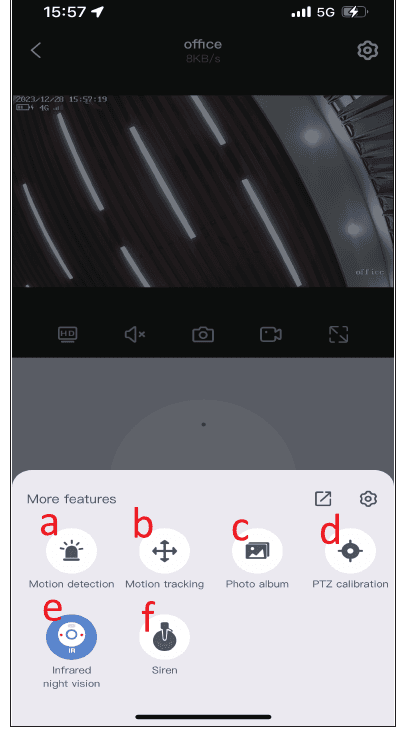
- a. Motion detection: get the alert when the camera detects motion.
- b. Motion tracking: the camera will track and follow the motion.
- c. Photo album: stores the screenshot picture or recording video.
- d. PTZ calibration: when there is a deviation in the camera position or the pan-tilt cannot rotate left and right or up and down, just click PTZ calibration, and the camera will calibrate automatically.
- e. Night vision model: night vision has three modes to choose from. Clicking the button will switch one mode.
- f. Siren: when you find someone invading, please click the alarm button, and the camera will sound the alarm for 14 seconds to scare away the intruder.
Setup Function
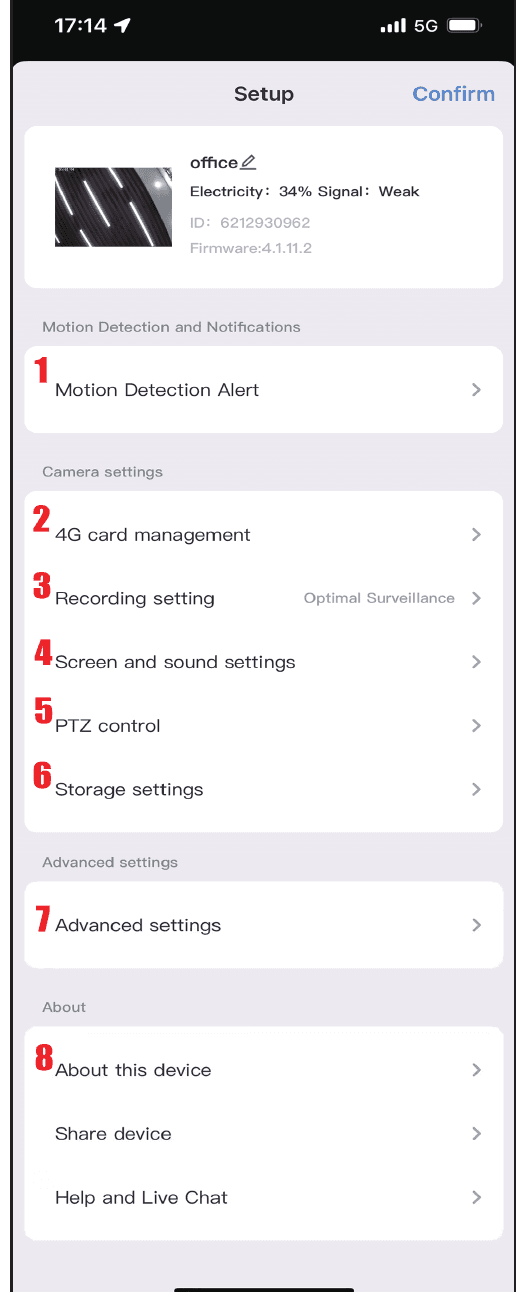
- Motion detection sensitivity: if you receive too many wrong alarm messages, please set the sensitivity of motion detection to low.
- 4G card management: check your 4G network signal strength and carrier information and your device's ICCID.
- Recording setting (see below).
- Screen and sound settings (see below).
- PTZ control (see below).
- Storage settings (see below).
- Advanced settings (see below).
- About this device (see below).
Recording Setting
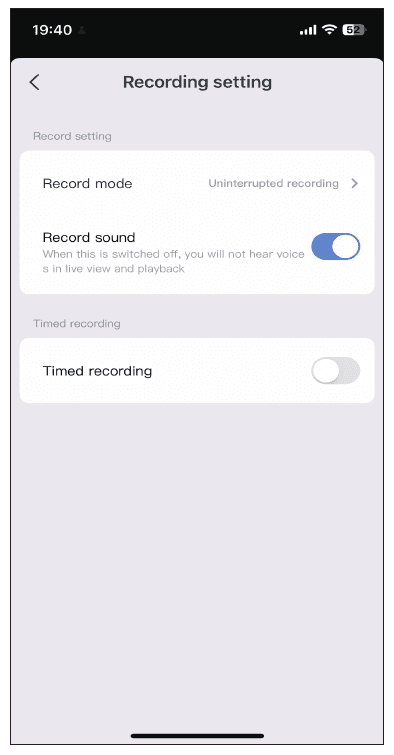
Record Mode: choose recording method.
Screen and Sound Settings
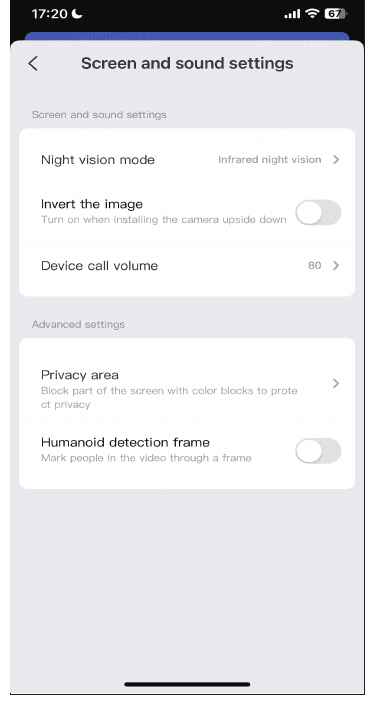
If the lighting mode cannot be set successfully in More options, you can also set it in picture settings.
Night vision mode
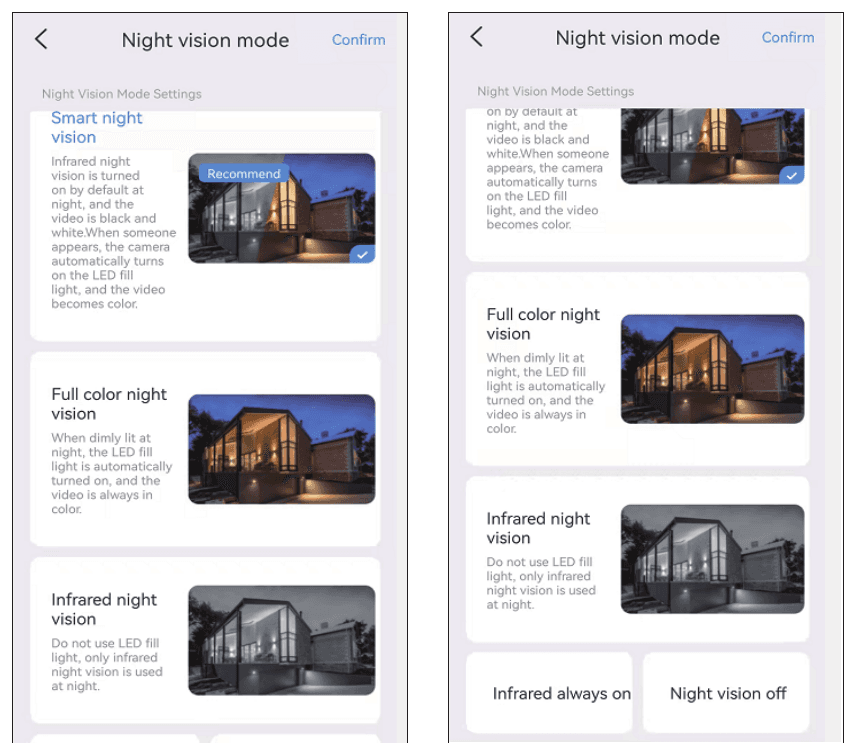
- Smart night vision: infrared night vision is turned on by default at night, and the video is black and white. When someone appears, the camera automatically turns on the LED fill light, and the video becomes color.
- Full color night vision: when dimly lit at night, the LED fill light is automatically turned on, and the video is always in color.
- Infrared night vision: does not use the LED fill light; only infrared night vision is used at night.
- Infrared always on
- Night vision off
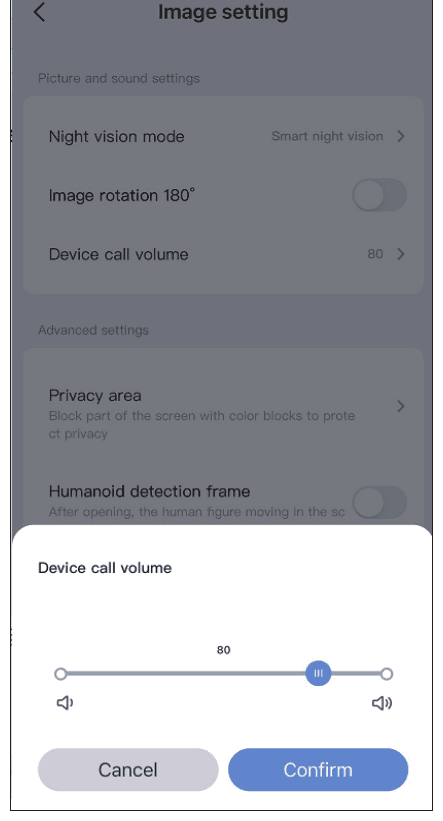
Device call volume
a. Device call volume: this option can set the volume of the two-way audio function.
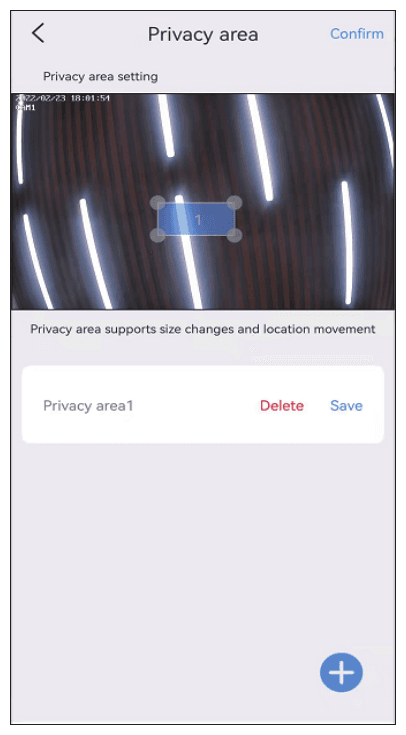
Privacy zone setting
b. Privacy zone setting: set the privacy area, and the image area you set will be covered with color boxes.
c. Humanoid detection frame: when the camera detects people, it will capture the actions of suspicious people and frame them, and quickly push the alarm notification.
PTZ control
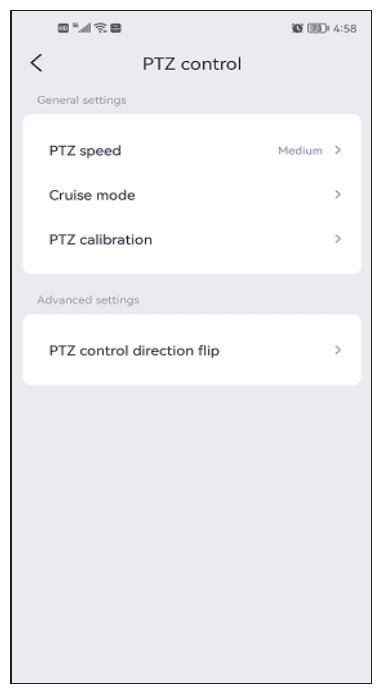
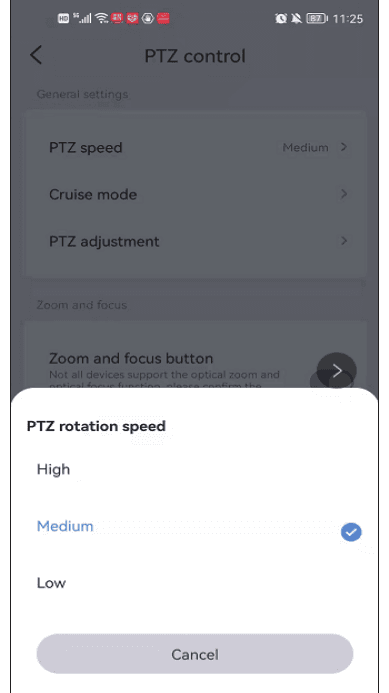
a. PTZ speed: if you think the camera rotates too fast, you can adjust speed to low at which the camera moves.
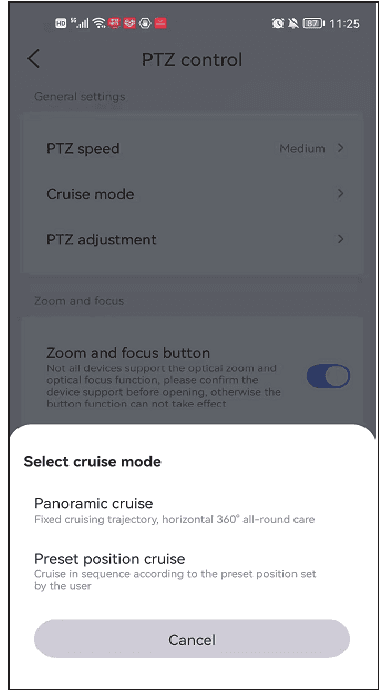
b. Cruise mode: there are two options to choose, panoramic cruise and preset position cruise. Please note, for present position cruise, the camera cruises only between the preset positions. You need to set up a preset position first, then select this mode. (Please refer to FAQ Q6.)
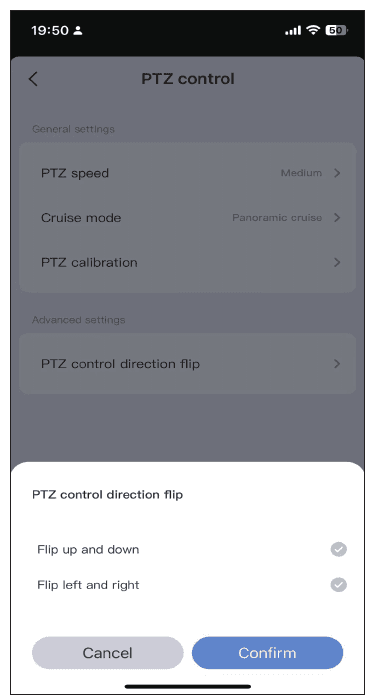
c. PTZ control direction flip: after you install the camera, if the camera direction is reversed, you can set the PTZ direction flip. After setting, the PTZ control will rotate in the opposite direction.
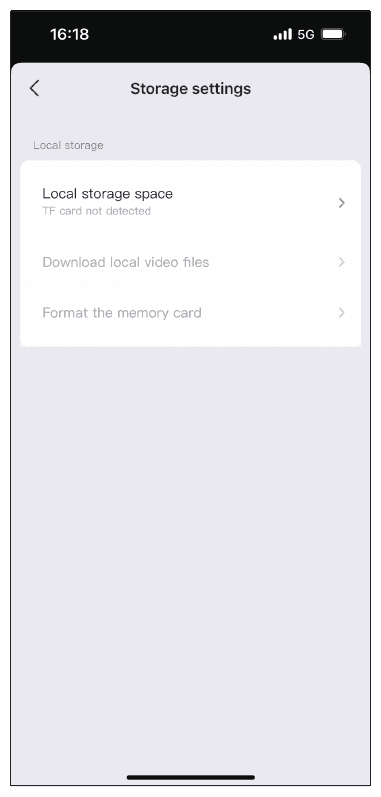
Storage Settings
View your local storage information.
Advanced settings
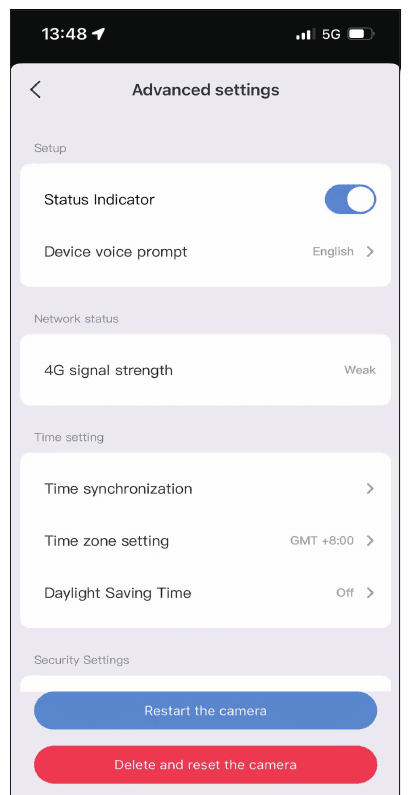
Alexa service authorization: once turned on, you can watch videos via Alexa Echo Service. Download the Amazon Alexa App, and after registering as an Amazon Alexa user, follow the steps in the app.
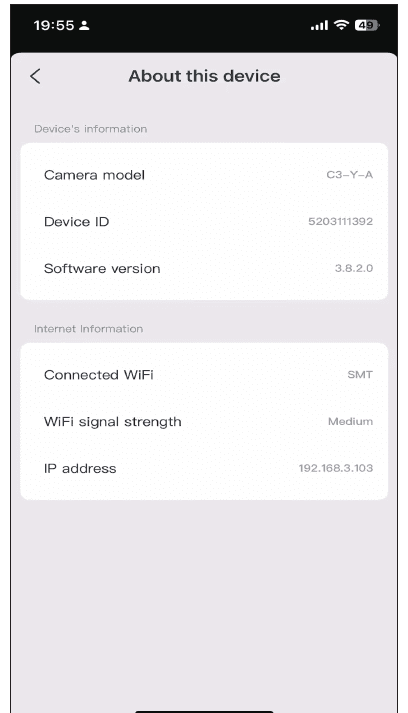
About this device
You can find your device ID, version and IP address on this interface. You can also see which Wi-Fi is connected.
4G Subscription
Data Recharge for 4G Camera Device
4G camera device management:
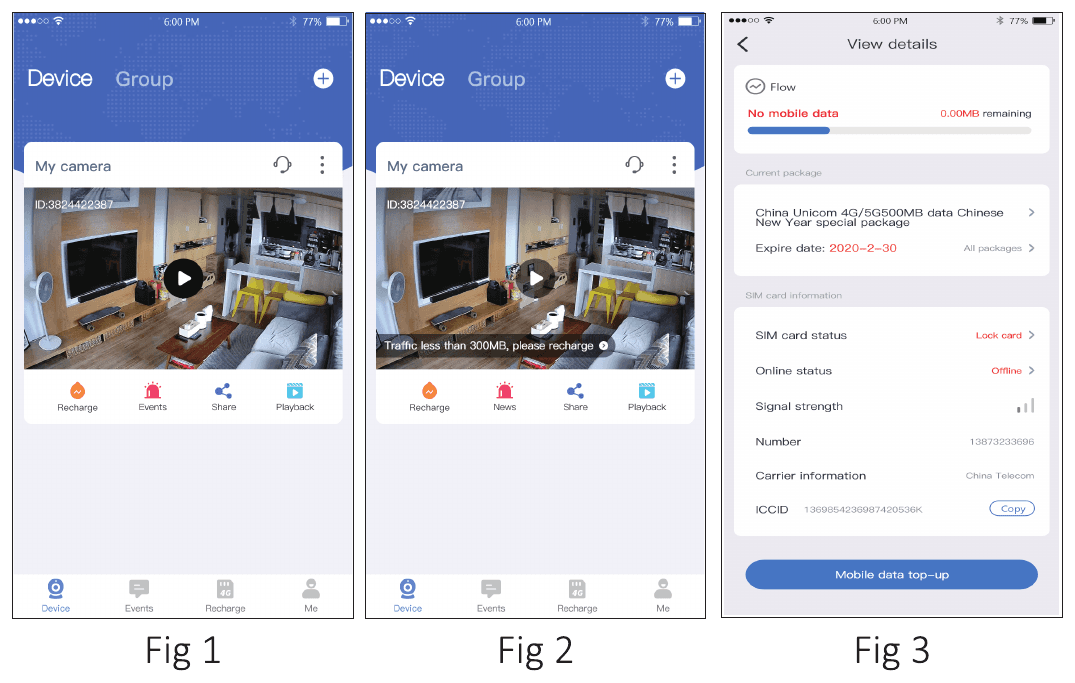
- When the flow is sufficient, the device list is displayed normally (Figure 1); when the remaining flow is less than or equal to 300M, the current remaining flow is displayed (Figure 2).
- Click on the flow warning value prompt text to jump to the 4G card management interface (Figure 3), and you can view the 4G card's flow usage, signal strength and other information on the current interface.
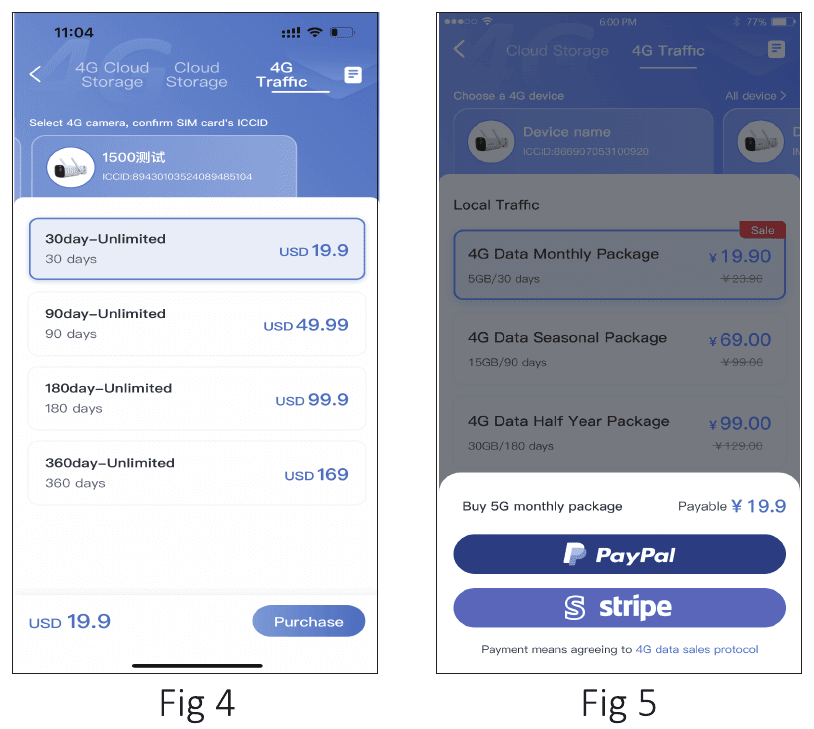
- Select the 4G data package that needs to be purchased, click Buy Now (Figure 4), and choose the payment method (Figure 5).
- After completing the payment, go back to the APP, and it will take a while to recharge to the account (Figure 6).
- After the recharge is successful, you can view the detailed information of the order (Figure 7).
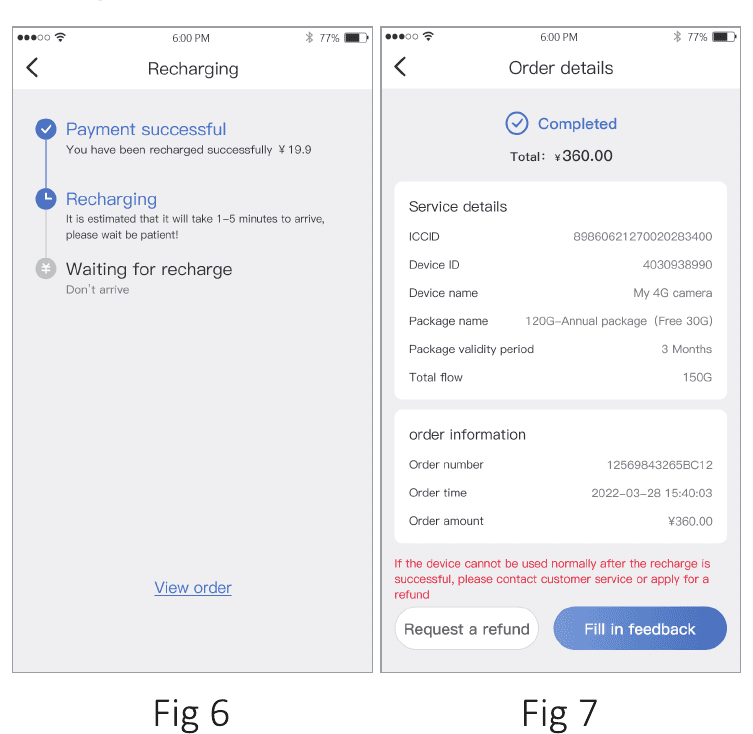
The effective time of the recharge depends on the situation of local operators, and it is expected to take effect within one hour.
Abnormality of 4G Card Device
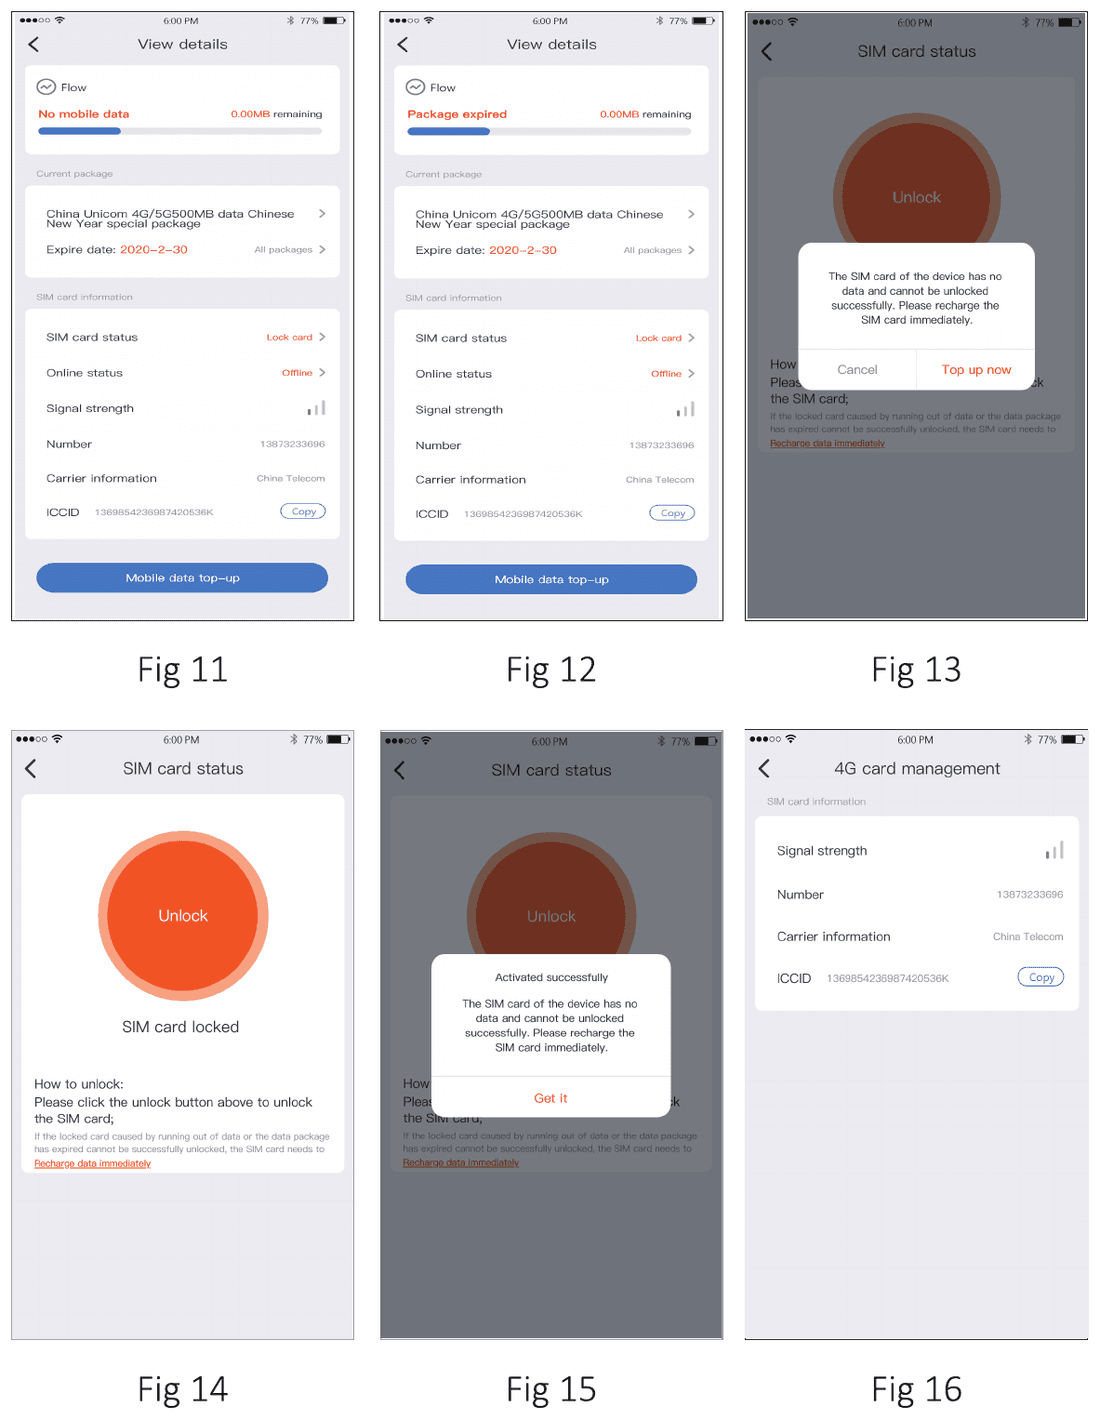
1. When the 4G card has no traffic or the package expires: the device list displays the corresponding status (Figures 8 and 9). Click View Details to enter the 4G card details interface, and display the corresponding status according to the offline reasons of the device list (Figures 11 and 12). Click traffic recharge to enter the 4G card traffic recharge.
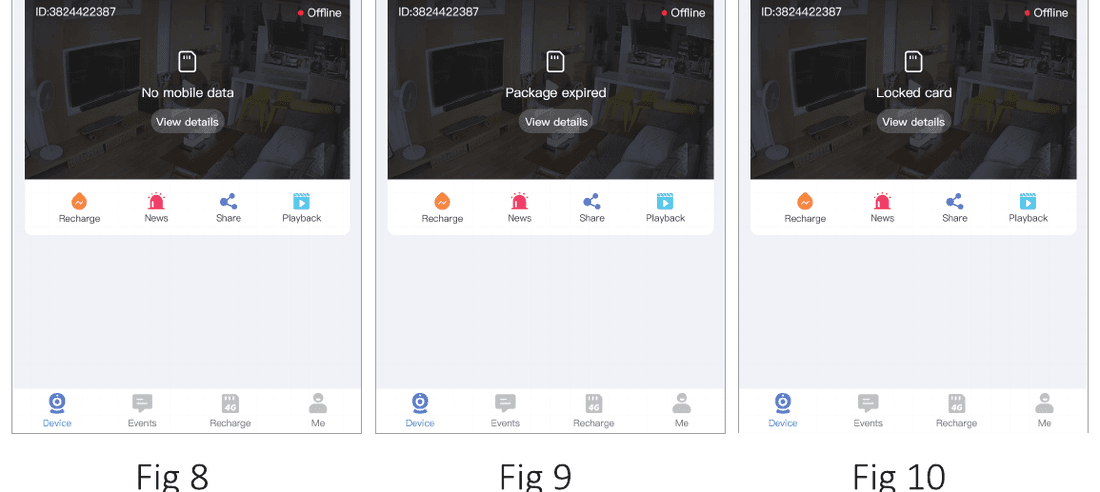
2. When the 4G card is locked: the device list will prompt that the card has been locked (Figure 10). Click to view details to enter the 4G card management page, and the SIM card status will change to locked card (Figure 11). Click the locked card to enter the SIM card status page. If the card is locked due to no traffic on the 4G card, a prompt box will pop up to recharge, and the card can only be unlocked successfully after the recharge is completed (Figure 13). If the card is locked due to other reasons, click the unlock button on the SIM card status interface to unlock (Figure 14), the unlocking time depends on the situation of local operators, and is expected to be normal within one hour (Figure 15).
If the 4G card is not provided with the device, it will not support data package recharge, traffic query, early warning and other functions (Figure 16).
FAQs
Customer Service
If there is any question, please contact us; we will solve your problem within 24 hours.
Amazon Email
[email protected] (for the United States)
[email protected] (for the United Kingdom and Europe)
Call us
917-338-1084 or 855-660-0999 (For US)
+8615879722282
Web
Battery Security Camera
User manual for the Hiseeu Battery Security Camera (C014-V2.1) — appearance, installation, app setup, PC viewing, camera functions, settings, and FAQ.
Wireless Light Bulb Camera
Quick guide for the Hiseeu Wireless Light Bulb Camera (A037) — appearance, installation, app setup, camera functions, and FAQ.