 EseeCloud Help Center
WiFi CCTV Kit
Quick guide for the Hiseeu WiFi CCTV Kits (A017) — product overview, system installation, app and PC remote viewing, camera and recording settings, and a full FAQ.
Quick Guide (A017-V5.0) for the Hiseeu WiFi CCTV Kits. Suitable for Hiseeu 4CH / 6CH / 8CH / 10CH WiFi CCTV Kits.
Please carefully read this Quick Guide before using the product and ensure that you keep it in a safe place. Our products have been certified with CE, FCC, and UL for safety. If you encounter any difficulties operating the system, please do not hesitate to contact us — we will always try our best to assist you.
Statement
The quick user guide provides an overview of the system. However, please note that due to hardware and software upgrades, the information in this user guide may not be entirely accurate. For the latest user manual, please email Johnny at [email protected].
Safety Precautions
- Do not place any fluid containers on the product.
- Use the product in a well-ventilated environment and ensure that the vents are not blocked.
- Please use the included power supply with the product to prevent damage.
- Use the product within its standard working temperature and humidity, as advised in this manual or on the distributor's website.
- Dust accumulation on the PCB may cause a short circuit. We recommend cleaning the dust from the PCB regularly to ensure proper functionality.
- Please comply with all regulations and policies in your country and area when using this product.
Out of Box Audit
Upon receiving the product, please carefully check all items included in the package according to the information provided by the distributor. If you find any missing or damaged, please email [email protected] for assistance.
- WiFi NVR
- WiFi IP Cameras
- Quick Guide
- Mouse
- DC 12V 2A Power Supply for NVR
- DC 12V 1A Power Supply for Cameras
- Network Cable
- HDMI Cable
- Screw bags
Product Overview
The kit ships in several configurations (separate NVR or all-in-one monitor NVR, and bullet, dual-lens, PT, or dome cameras). The diagrams below cover the main hardware types.
NVR (separate box)
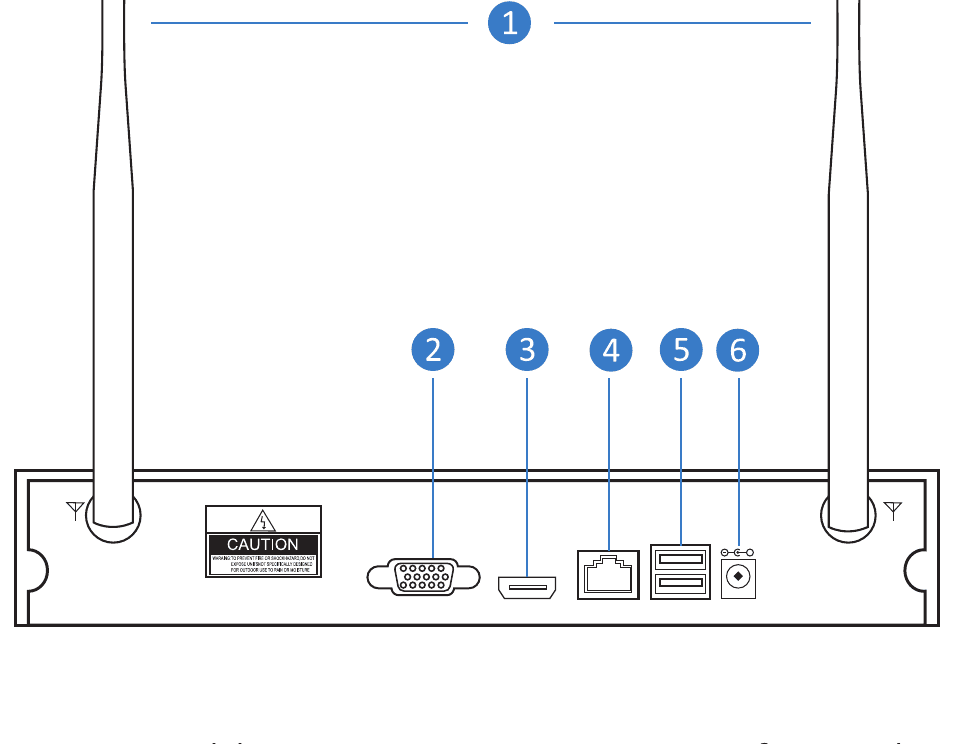
- WiFi Antenna — Double antennas to receive WiFi signal.
- VGA Port — Connect with a VGA cable to view on a VGA monitor.
- HDMI Port — Connect with an HDMI cable to view on an HDTV.
- LAN Port — Connect your NVR to the Internet or for data transmission with cameras.
- USB Ports — Connect a mouse or insert a flash drive to back up recordings.
- Power Input — Connect with the 12V 2A power adapter.
NVR with built-in monitor
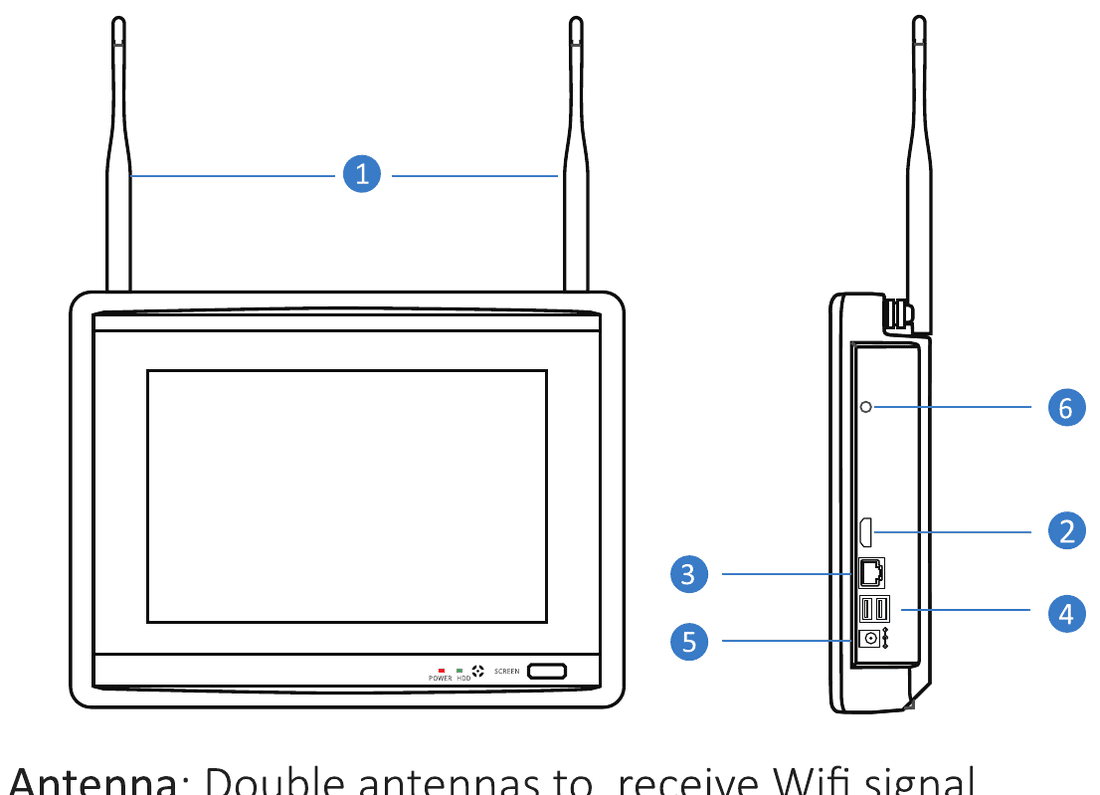
- WiFi Antenna — Double antennas to receive WiFi signal.
- VGA Port — Connect with a VGA cable to view on a VGA monitor.
- LAN Port — Connect your NVR to the Internet or for data transmission with cameras.
- USB Ports — Connect a mouse or insert a flash drive to back up recordings.
- Power Input — Connect with the 12V 2A power adapter.
- Audio output (monitor NVR) — Insert an earphone to hear the sound of the camera.
- Screen Output — Click on this to turn on/off the monitor.
Some monitor NVRs (for example WK-10V-4HD405-AT) use the side-port layout below:
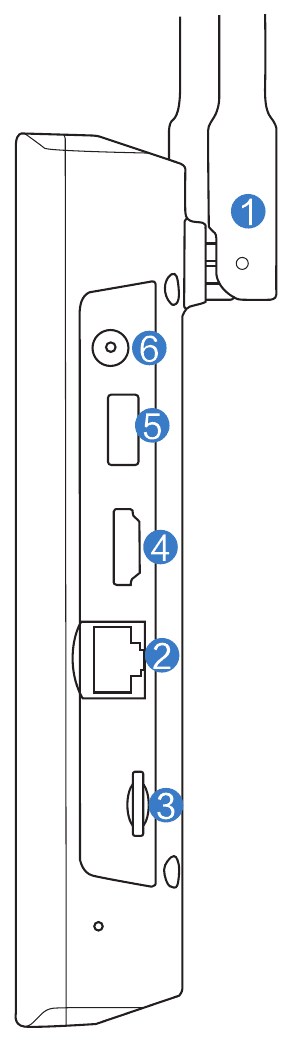
- Antenna port — Double antennas to receive WiFi signal.
- WAN port — Connect the NVR to the Internet.
- TF card slot — TF card interface.
- HDMI interface — Connect to a high-definition TV.
- USB port — Connect a mouse or insert a flash drive to back up recordings.
- Power supply — DC power input (12V 2A).
Bullet camera
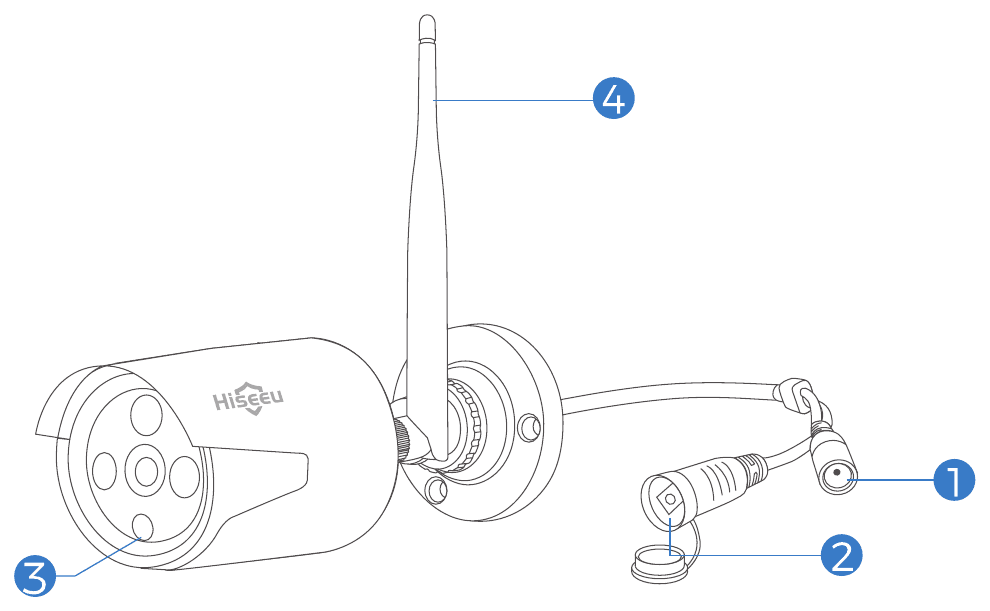
- DC Port — Input power 12V 1A.
- Reset Button — Press 6s to reset the camera to factory settings or pair with the NVR by WiFi connection.
- Photo sensitive — It can sense the light source and make the camera automatically turn on the infrared light at night.
- Antenna — Make sure the antenna is vertical when you install it outside.
Bullet camera (with RJ45 port)
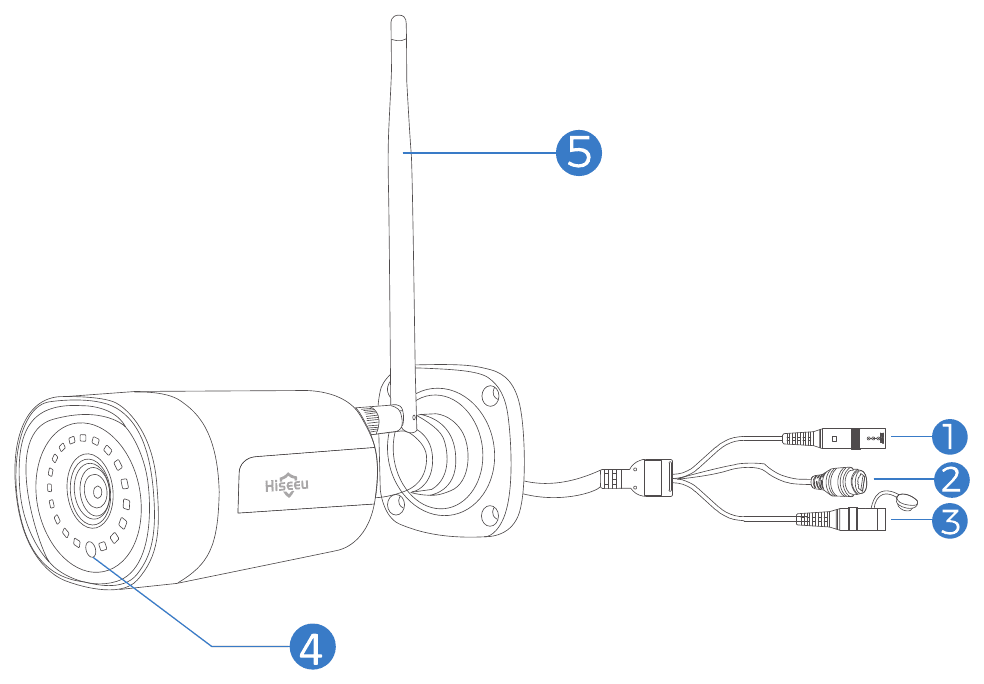
- DC Port — Input power 12V 1A.
- RJ45 Port — For pairing the camera with the NVR, or connecting the camera by wired connection.
- Reset Button — Press 6s to reset the camera to factory settings or pair with the NVR by WiFi connection.
- Photo sensitive — It can sense the light source and make the camera automatically turn on the infrared light at night.
- Antenna — Make sure the antenna is vertical when you install it outside.
Dual-lens PT camera
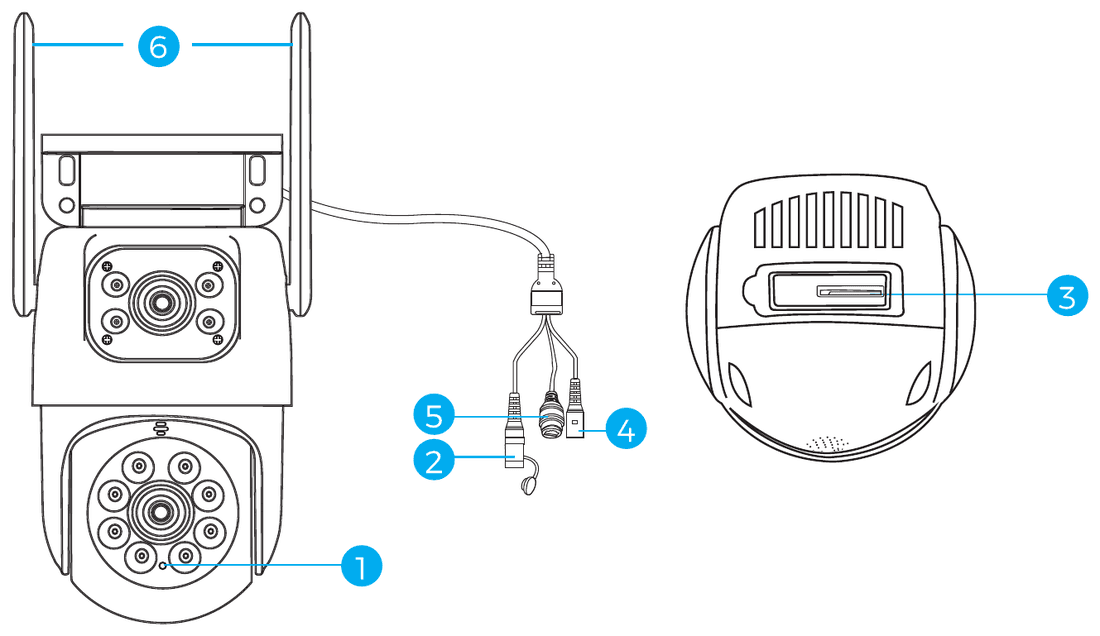
- Photo sensor — Collects the ambient luminosity value and turns on the infrared light when the current illuminance is less than 3 Lux.
- Reset button — Long press 3–5 seconds to restore the factory settings.
- SD card slot — You can install a micro SD/TF card to store video recordings (supports up to 256GB SD/TF card).
- DC power — Power input.
- Network port and indicator light — Connect the LAN cable and check the current device status indicator light.
- Antenna — Make sure the antenna is upright when you install it outside.
- Audio Port — Connect speaker with 3.5mm output cable.
There are 2 reset buttons. One is near the power port, another is near the SD card slot. Press 6s to reset the camera to factory settings or pair with the NVR by Wi-Fi connection.
PT camera
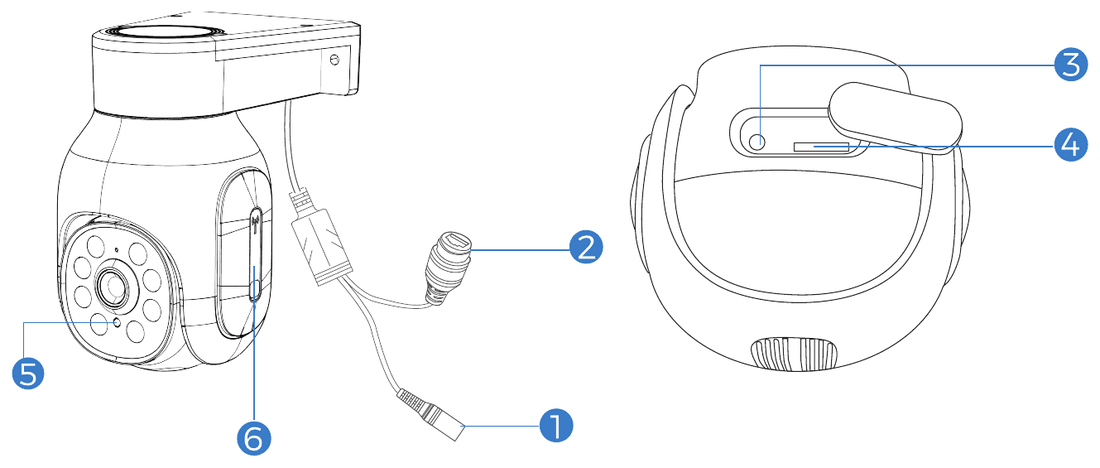
- DC Port — Input power 12V 1A.
- RJ45 Port — For pairing the camera with the NVR, or connecting the camera by wired connection.
- Reset Button — Press 6s to reset the camera to factory settings or pair with the NVR by WiFi connection.
- SD card slot — Insert an SD card to record on the SD card.
- Photo sensitive — It can sense the light source and make the camera automatically turn on the infrared light at night.
- Antenna — Make sure the antenna is vertical when you install it outside.
Dome camera
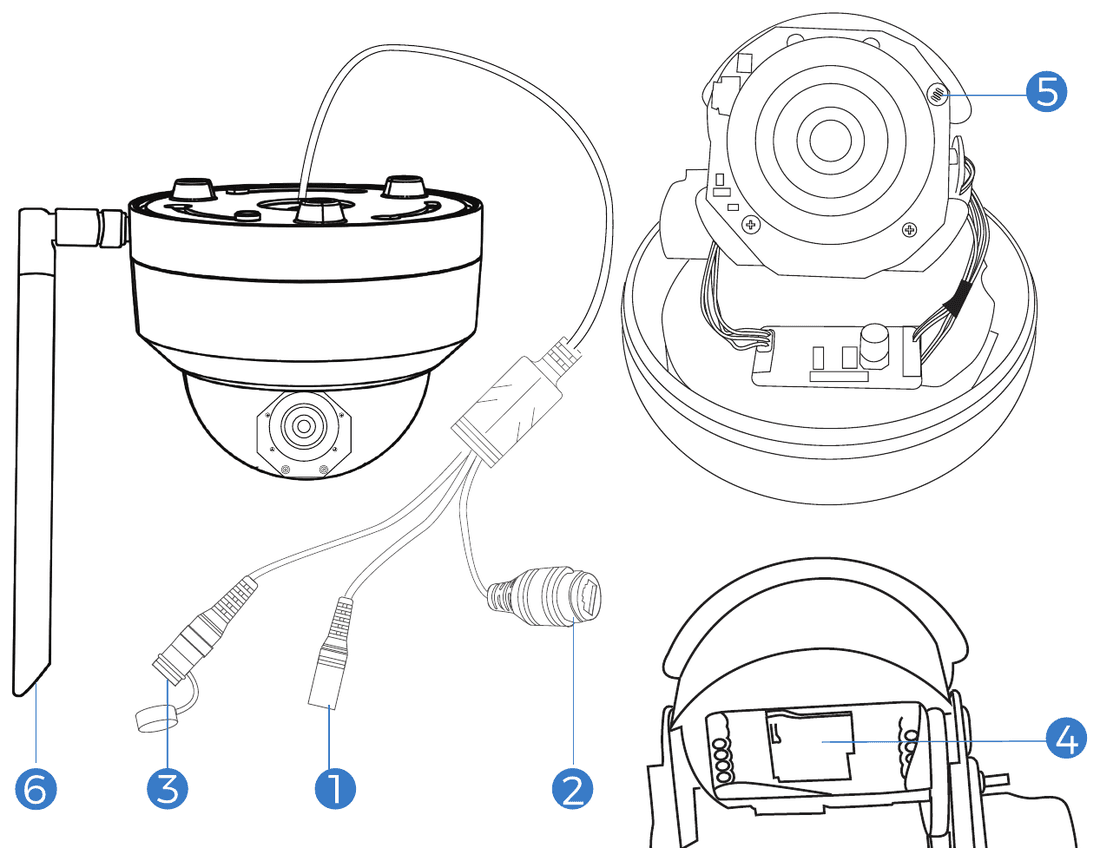
- DC Port — Input power 12V 1A.
- RJ45 Port — For pairing the camera with the NVR, or connecting the camera by wired connection.
- Reset Button — Press 6s to reset the camera to factory settings or pair with the NVR by WiFi connection.
- SD card slot — Insert an SD card to record on the SD card.
- Photo sensitive — It can sense the light source and make the camera automatically turn on the infrared light at night.
- Antenna — Make sure the antenna is vertical when you install it outside.
System Installation
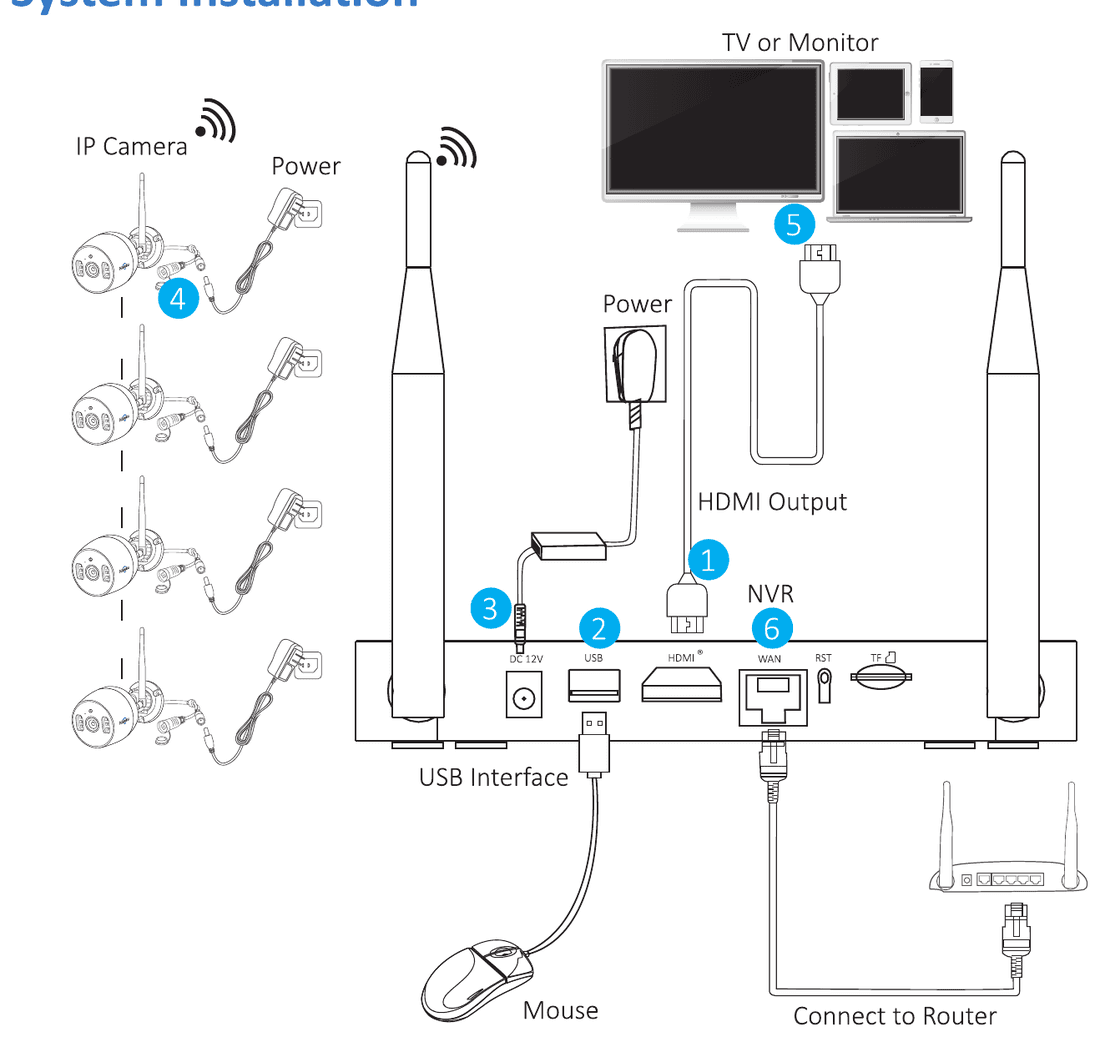
Please follow the steps below to connect the system:
- Connect the NVR to your HDTV or computer monitor with an HDMI cable. Please note that laptops and all-in-one computers cannot be used as monitors. (This is a universal-version manual for HD NVR systems; an all-in-one NVR does not need to connect an extra monitor or screen.)
- Plug a mouse into the NVR's USB port.
- Connect the NVR to a power source with the provided 12V 2A power adapter.
- Connect each camera to a power source with the provided 12V 1A power adapter.
- Turn on the NVR and ensure that all cameras are displaying images before installing them outside.
- Network connectivity is not necessary for basic function, but it helps you to view cameras remotely via your cellphone or computer. The system supports both wired and 2.4GHz WiFi connections to your home network.
Setup Wizard
After powering on, please follow the steps of the setup wizard to complete the settings.
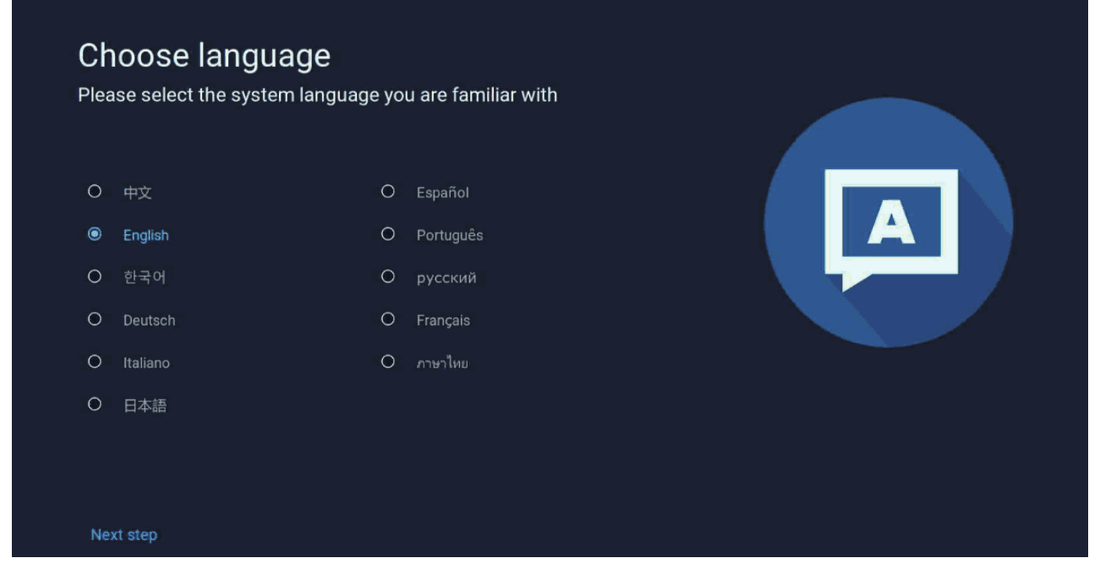
- The system provides many languages to choose from; you can select English, Spanish, Chinese, and so on.
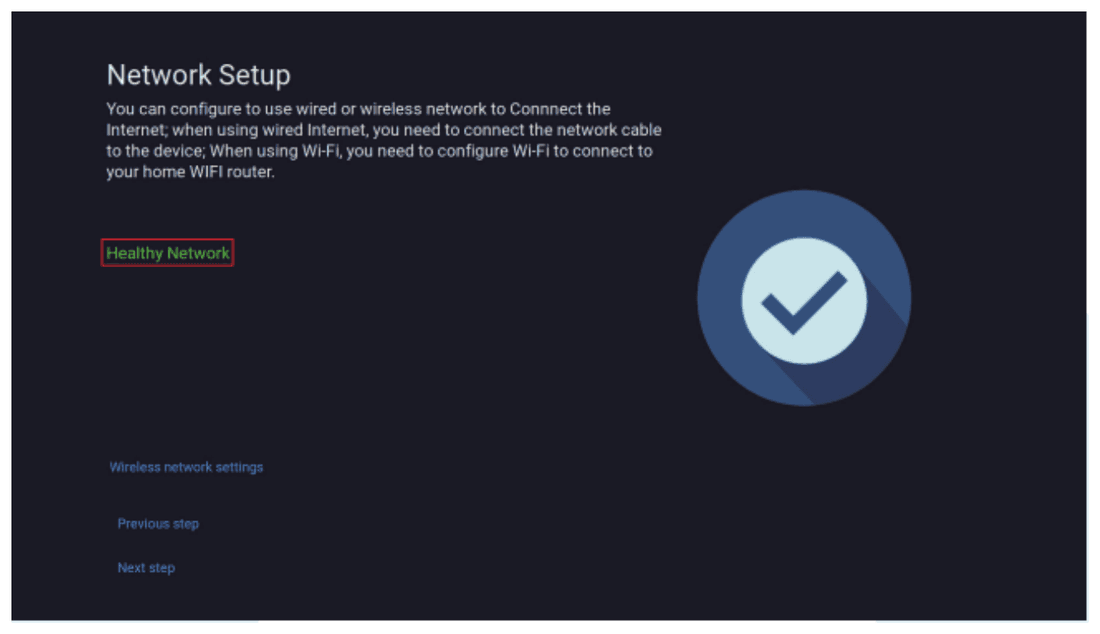
- Click Next Step to connect with your home WiFi. Click Wireless network settings, and the NVR will automatically search for WiFi near you. Select your home WiFi, enter the password, and click Connect.
The system only supports 2.4GHz WiFi; 5GHz WiFi is not supported.
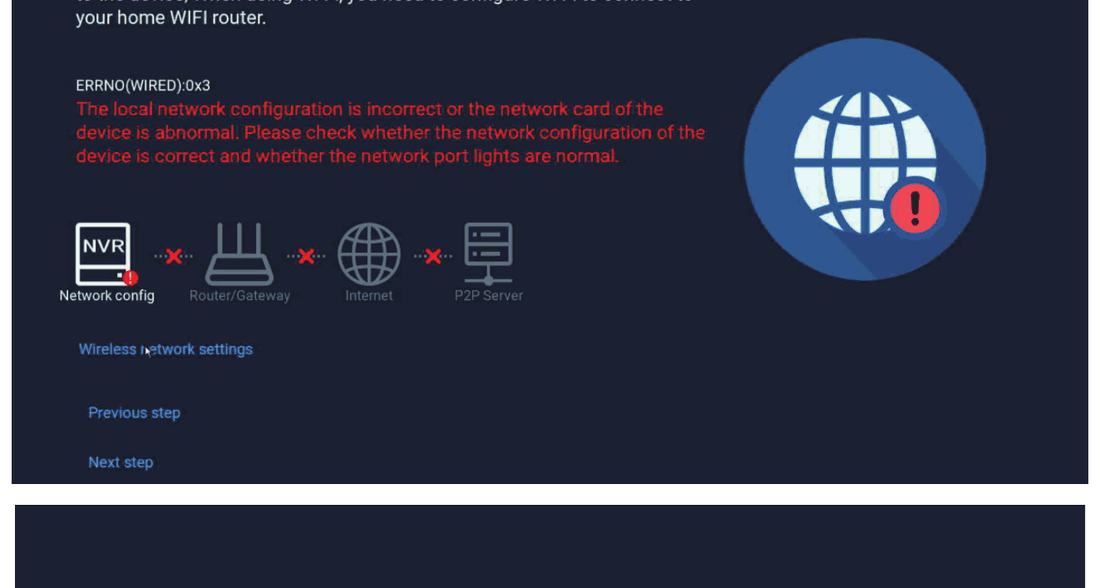
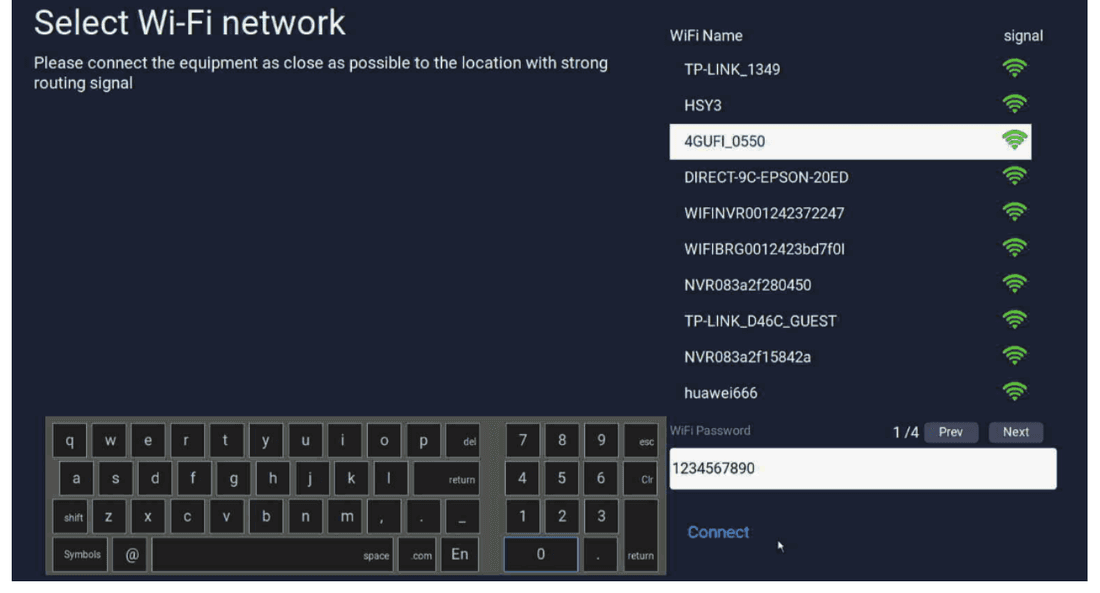
- If it shows Healthy Network, your system has been successfully connected to the Internet. Then click Next step.
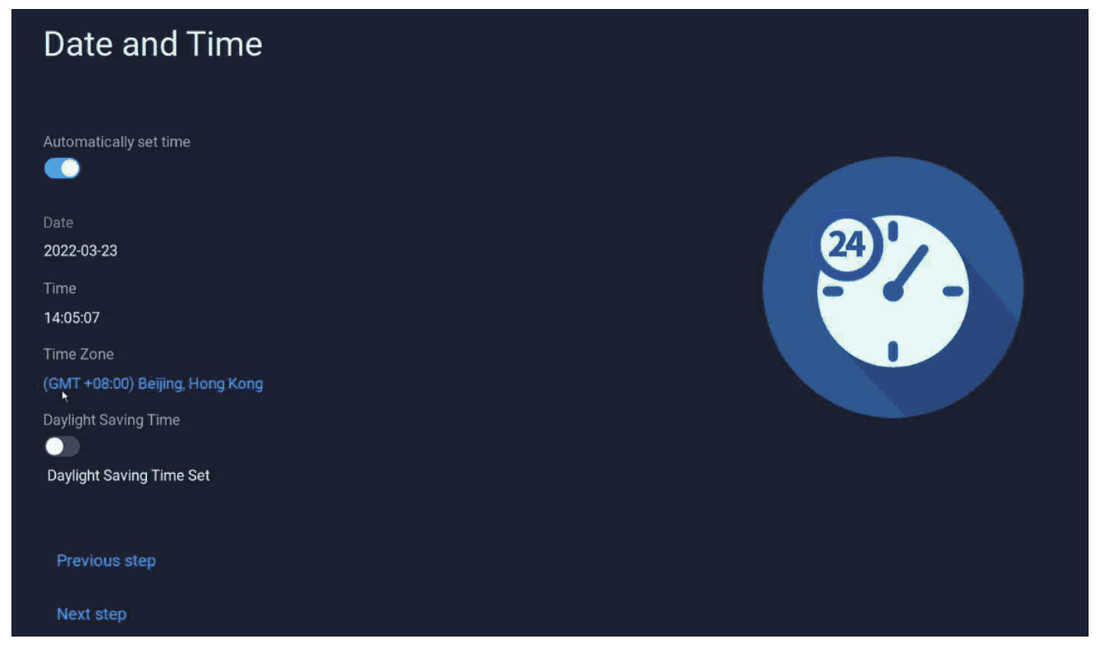
- Turn on the Automatically set time option. If the time is incorrect, please manually select your time zone.
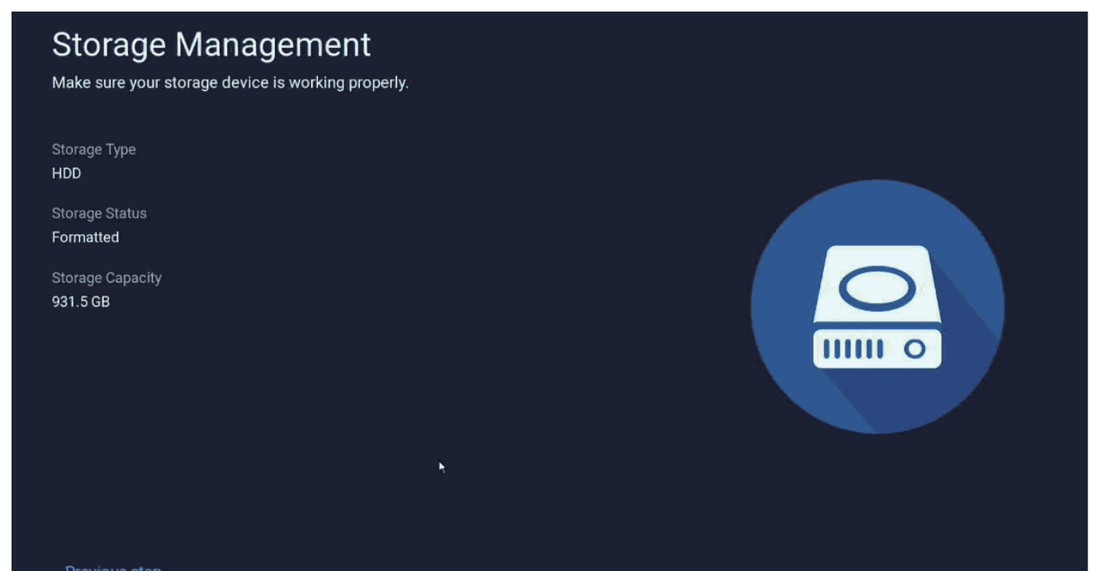
- Check whether the NVR recognizes the hard drive. If it is not recognized, the HDD information will not show up. You can refer to FAQ Q5 to troubleshoot.
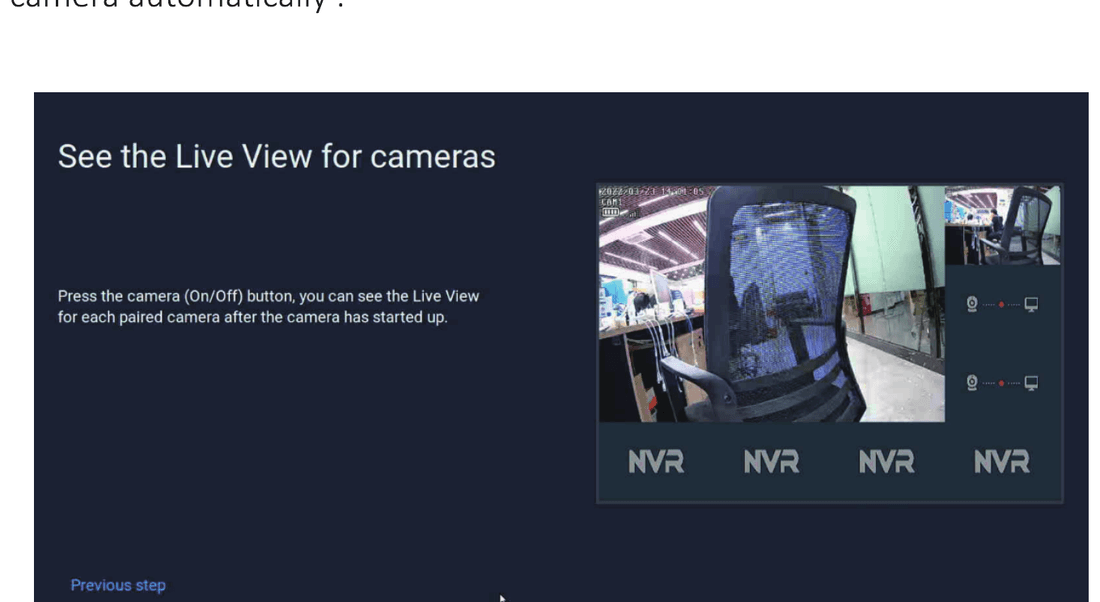
- Next step: after the cameras are plugged in, the NVR will be paired with the cameras automatically.
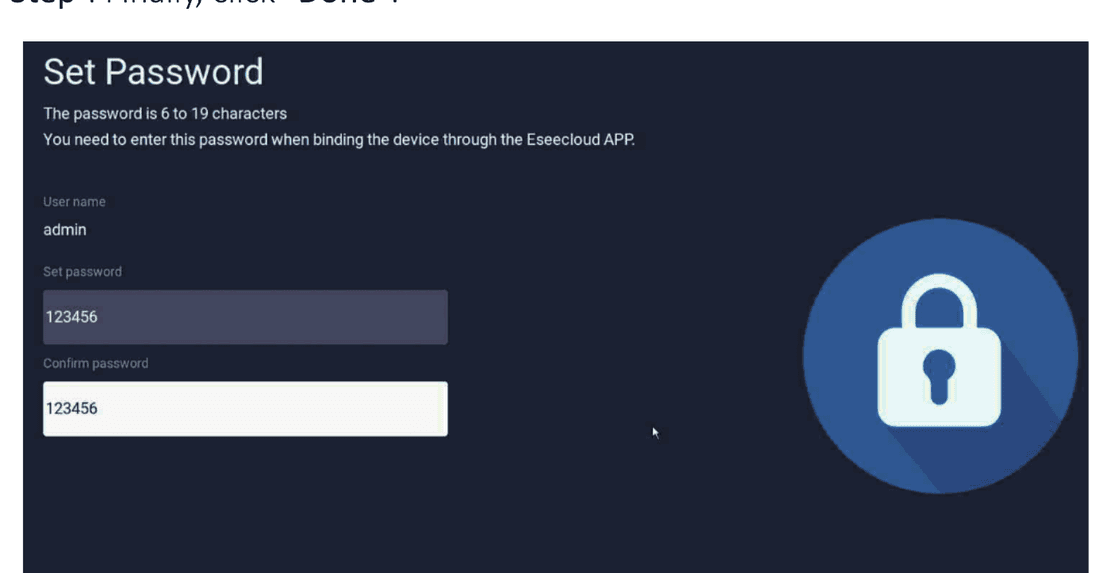
- The last step is to set up a password for your system, then click Next Step. Finally, click Done.
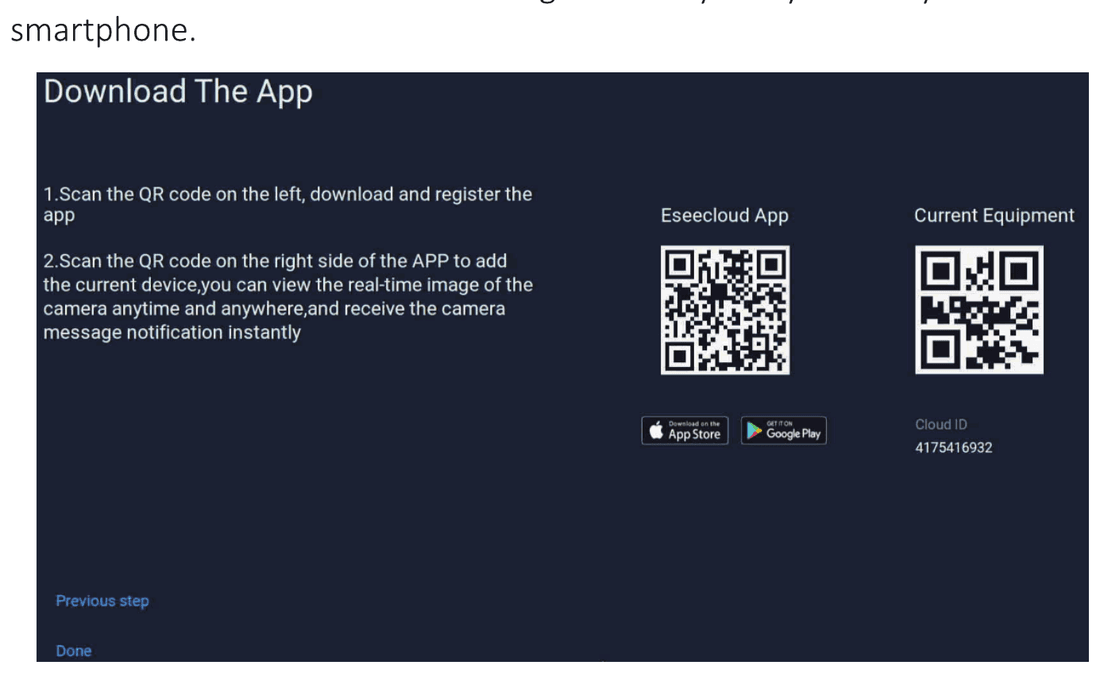
- You can scan the QR code on the left to download the EseeCloud app for remote viewing. After you download and register an account, you can use EseeCloud to scan the code on the right to add your system to your smartphone.
Setup Wi-Fi Repeater
If the distance between camera and NVR is over 30 ft, you can add a Wi-Fi repeater. Wi-Fi Repeater ASIN: B07NRBYM5C.
- Plug in the power adapter and use a network cable to connect it to the NVR.
- Press the reset button on the repeater for 15s.
- Right-click the mouse > Camera > Add camera > Manually > click Search.
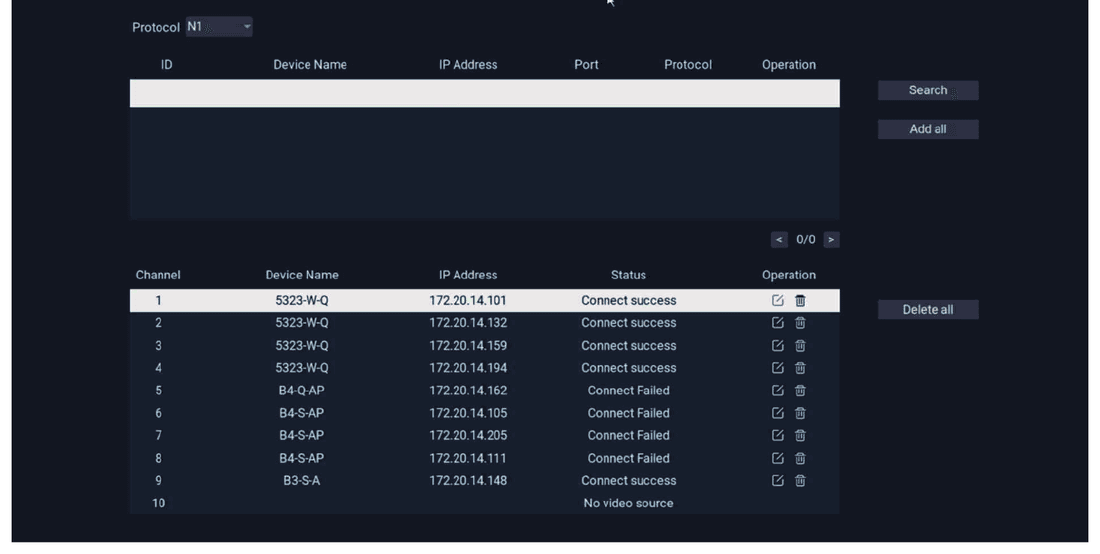
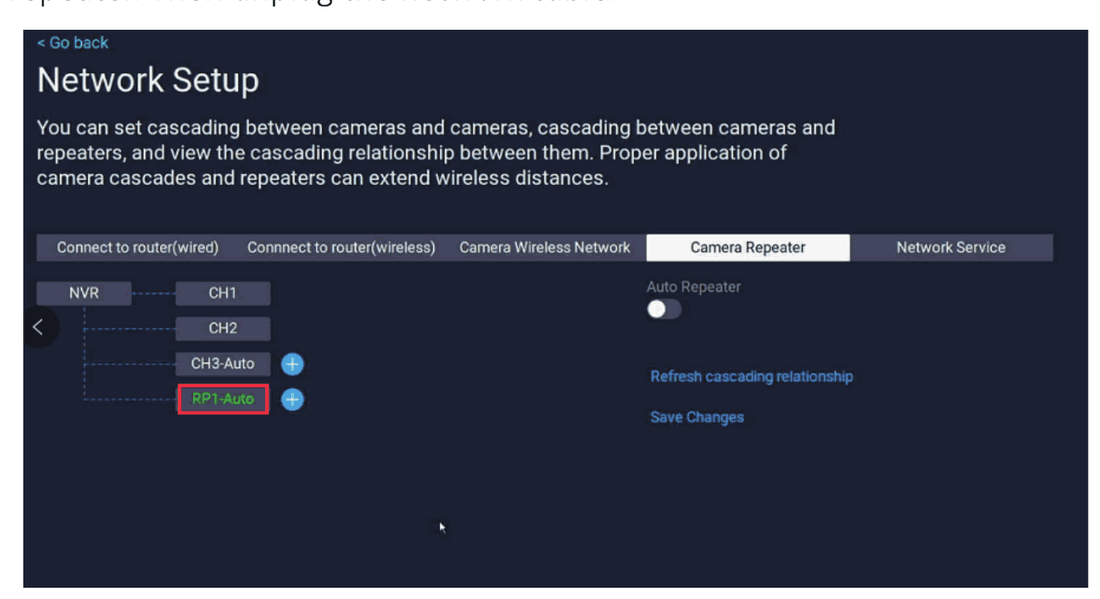
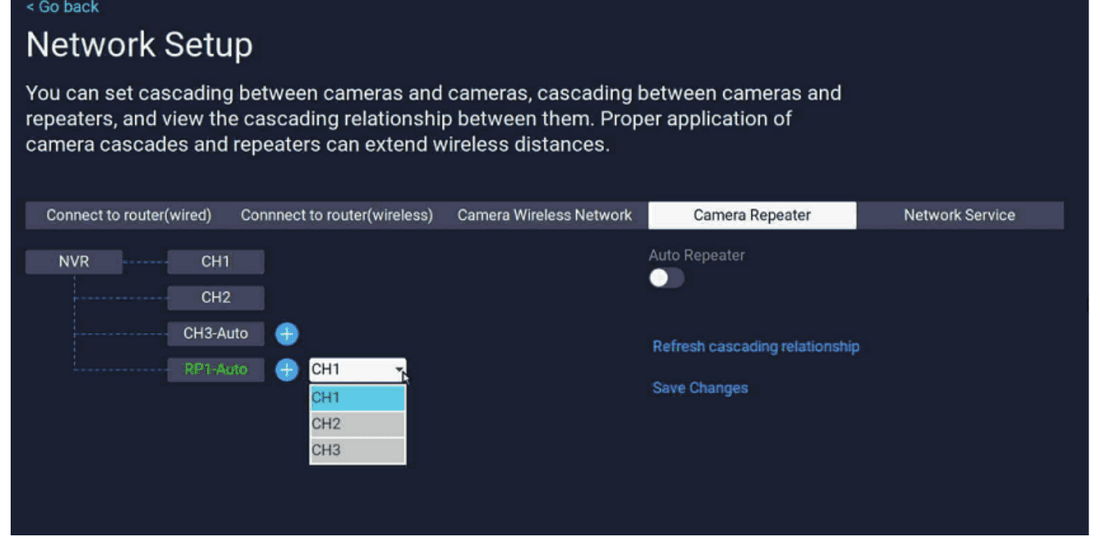
- When the repeater IP shows up, click Go back > Network > Camera Repeater > click the PR1-Auto button to pair, then unplug the network cable.
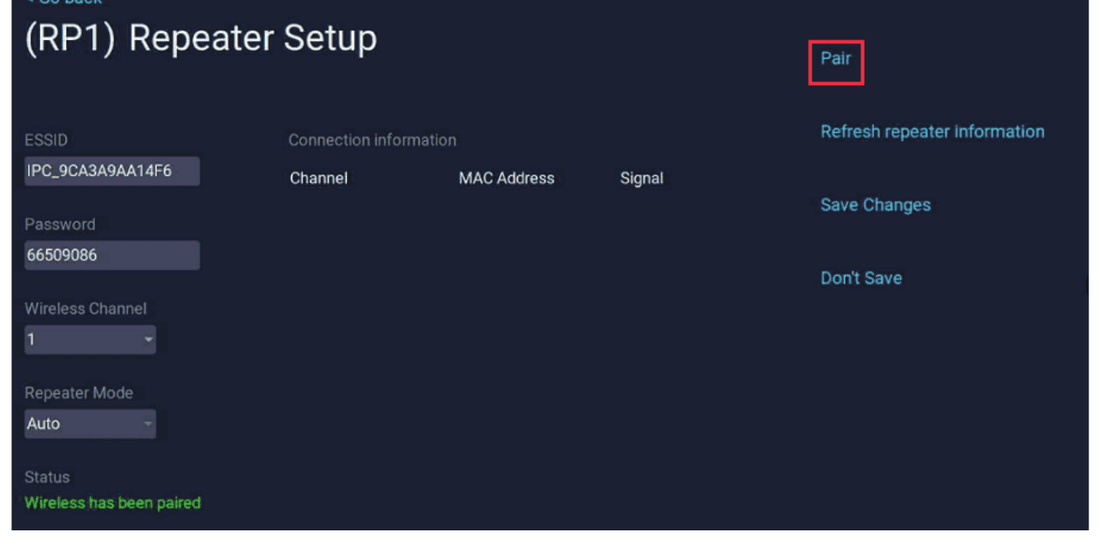
- Click Save Changes, then add the camera to the Wi-Fi repeater.
App Remote View
You can also search EseeCloud on the App Store or Google Play. For a detailed walkthrough, see the EseeCloud App User Guide.
For iOS, it requires iOS 9.0 or above. For Android, Android 5.0 or above.
Register an Account
Method 1
- Go to the login interface and click phone number.
- Choose the region and input the phone number.
- Manually press and hold the tennis ball, drag it through the red dot, and then drag it to the tennis racket to go to the next step.
- You'll receive a verification code and input the verification code.
- Input the code and register successfully.
Method 2
- Go to the login interface and click account.
- Click register, then input the phone number or email address.
- Manually press and hold the tennis ball, drag it to the red dot, and then drag it to the tennis racket to go to the next step.
- You'll receive a verification code and input the verification code.
- Input the verification code and input the password, then click confirm.
Method 3 — More login methods
- Apple ID login — Click on this and it will automatically link to your Apple ID account.
- Google login — Click on this and it will automatically link to your Google account.
- Line login — Click on this and it will automatically link to your Line account.
- WeChat login — Click on this and it will automatically link to your WeChat account.
Add a Device to your Smartphone
Method 1: Scan the NVR QR code to add
On the NVR's right bottom corner you will see the QR code icon — click on this to show up your device Cloud ID and QR code. When your cloud ID shows online, you can scan the code to add to your phone. If it shows offline, please check your network.
Click Add camera on your EseeCloud app, then choose Scan to add and scan the code on your monitor that comes with the cloud ID. (Bluetooth connection is designed for single battery cameras.)
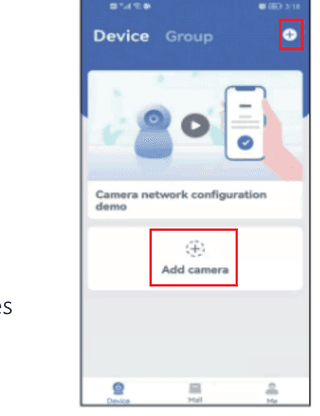
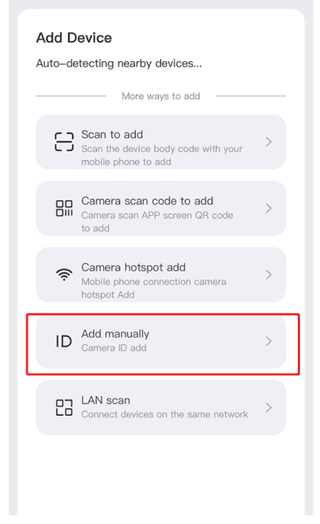
Method 2: Add manually
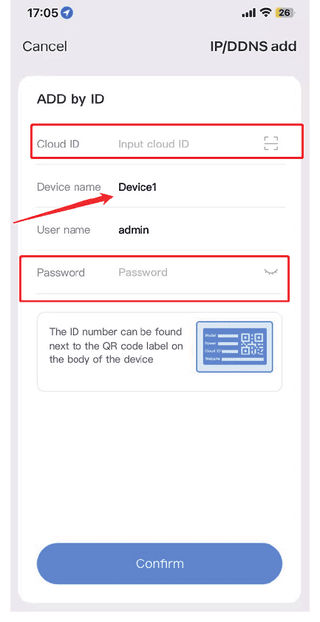
- Go to the NVR and click the QR-code icon to view a QR code and the device Cloud ID.
- Click Add manually on the EseeCloud app (+ device), then input the Cloud ID and the NVR password you set.
- Set the device name, click Confirm, and then it is complete.
Camera Setting
Camera Setup
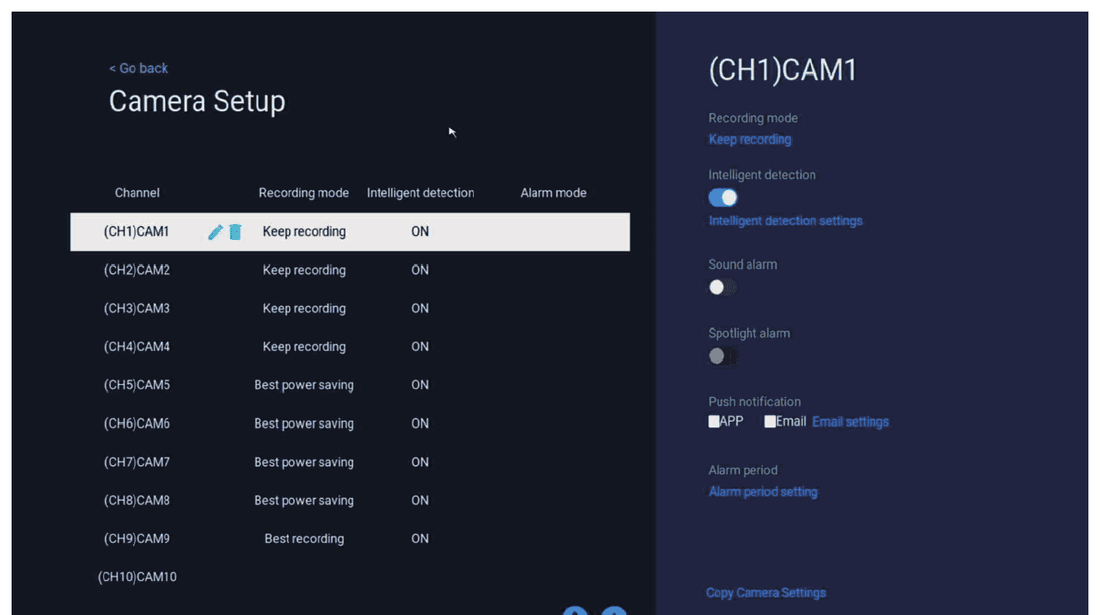
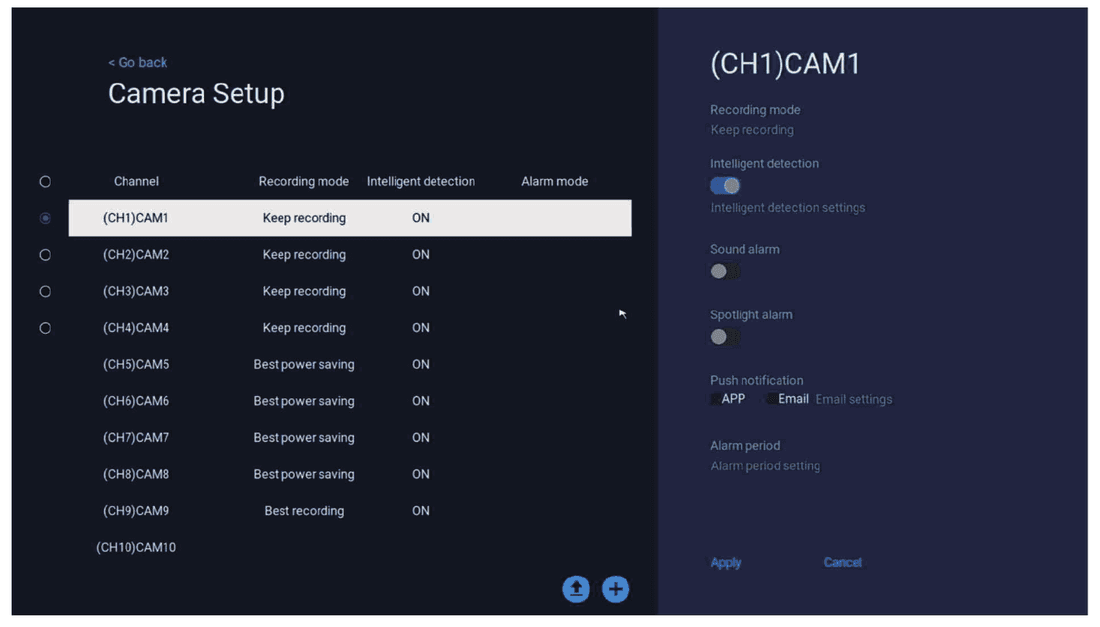
On the Camera Setup screen you can rename or delete a camera, upgrade firmware, and add a camera:
- Pencil icon — Name the camera.
- Trash icon — Delete the camera.
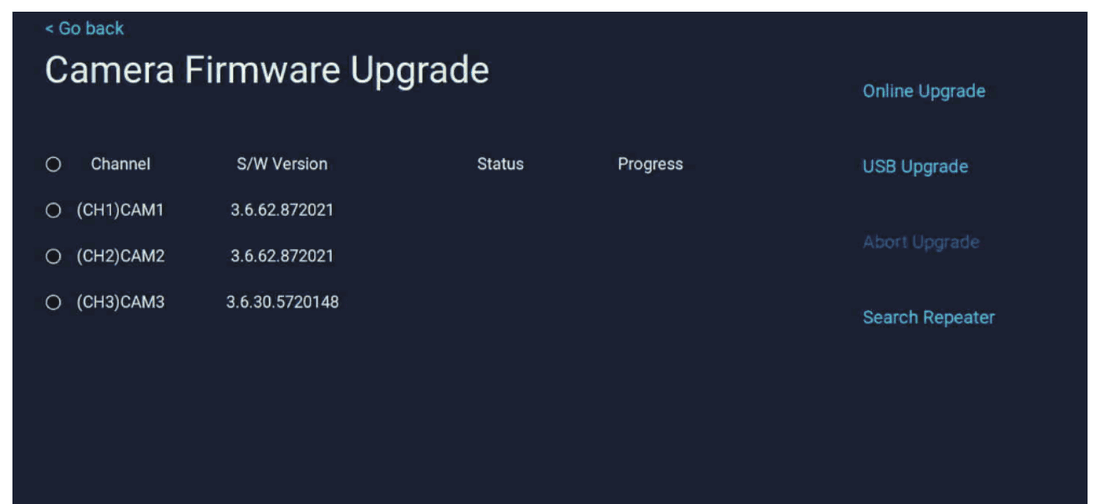
- Upload icon — Camera upgrade: select the camera you want to upgrade; you can select Online upgrade or USB Upgrade.
Please remember, when the camera works normally, do not upgrade the camera at will.
Add camera — After connecting the camera to power and resetting the camera for 6s, click Add camera; the NVR will search the camera automatically.
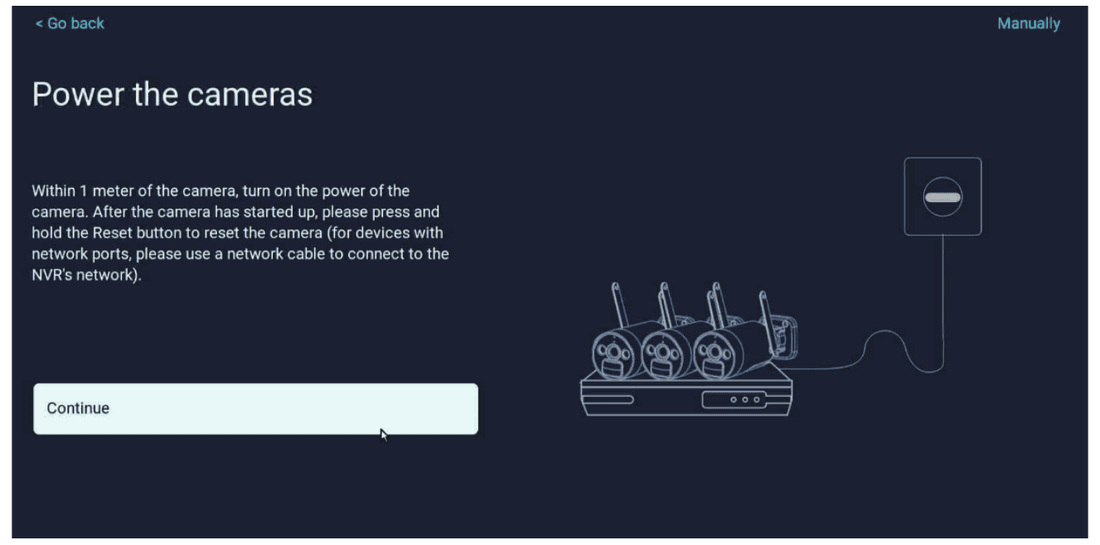
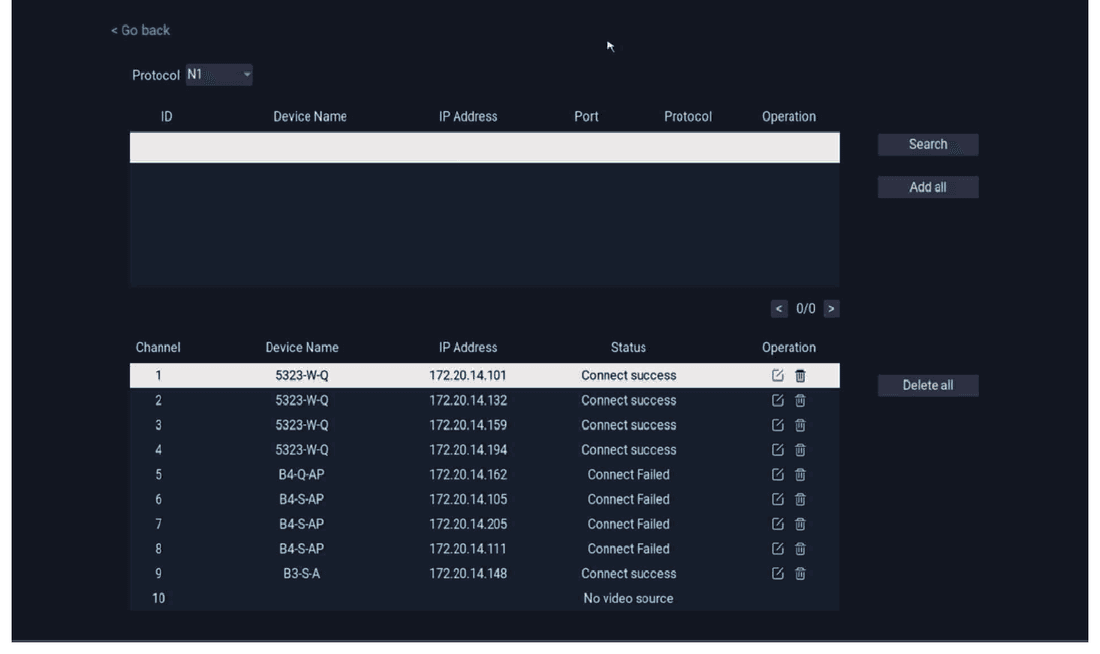
Manually — You can see the camera IP address on this interface.
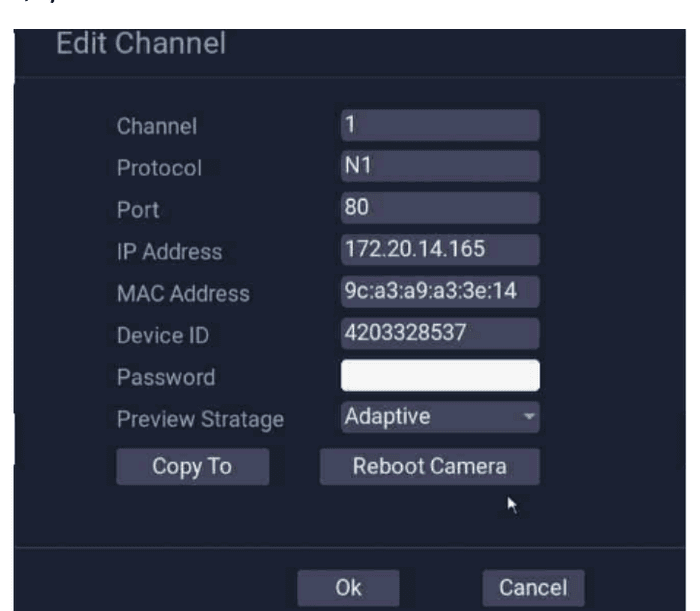
Click the Edit icon to see more information about the camera.
Setup Record Plan
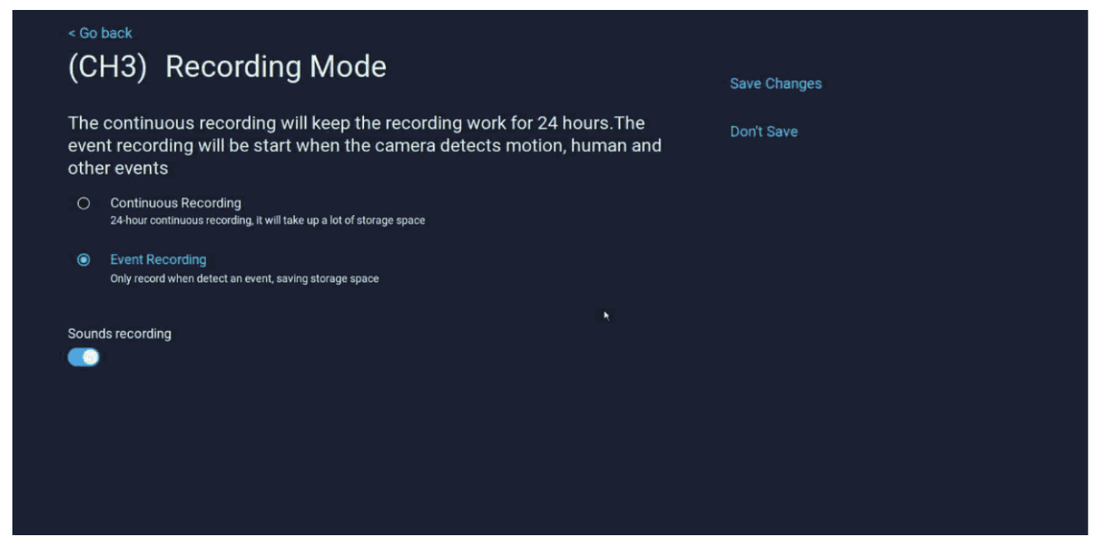
Two record modes are provided:
- Continuous Recording — The camera will record 24/7.
- Event Recording — Normally, the camera will enter sleep mode. When movement is detected, it will record.
Please remember to check the Sound Recording option, otherwise the camera will only record video, not record sound.
Motion Detection
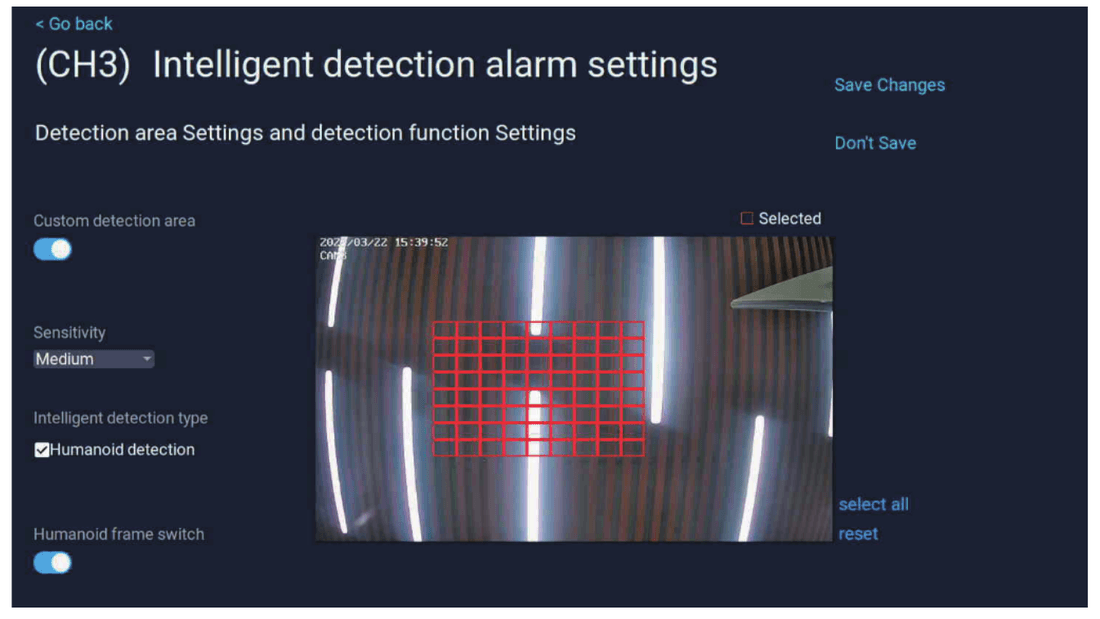
Click Intelligent detection alarm settings on the camera settings interface to set up motion detection.
- Custom detection area — Set the motion detection area. If you get much motion detection, please narrow the area. The default setting selects all of the area, which shows red frames.
- Sensitivity — If you get much false motion detection notification, you can select "lower". If it can't detect motion, you can select "higher".
- Humanoid detection — Turn on human detection to decrease false detection.
- Humanoid frame switch — When a person is detected, the target will be framed. After finishing this setting, please remember to click save, and then return to the camera settings interface.
- Push notification — Open this option; the system will push a notification to your mobile phone. Please notice you need to add the device to your smartphone first.
Email Settings
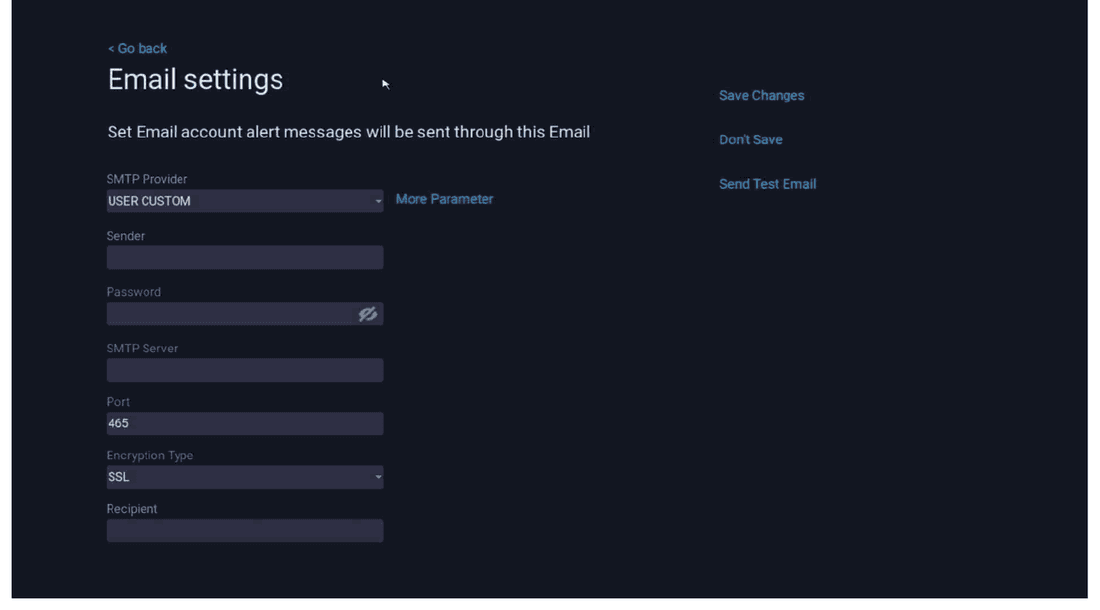
Log in to your email account and enable the SMTP service, then go to the NVR Email settings page.
Gmail turned off the "Allow Less Secure App Access" function on 2022-5-31, so Gmail can't be set up successfully.
- SMTP Provider — Select your email provider.
- Sender/Recipient — The email which will get the motion detection.
- Password — Some email providers will generate a password after you turn on the SMTP service; input this password. If it does not generate a new password, use your email password.
- SMTP Server/Port/Encryption Type — When you choose the SMTP provider it will sync manually.
After all setup, click Send Test Email to test whether the email setting is successful or not.
Alarm Period Settings
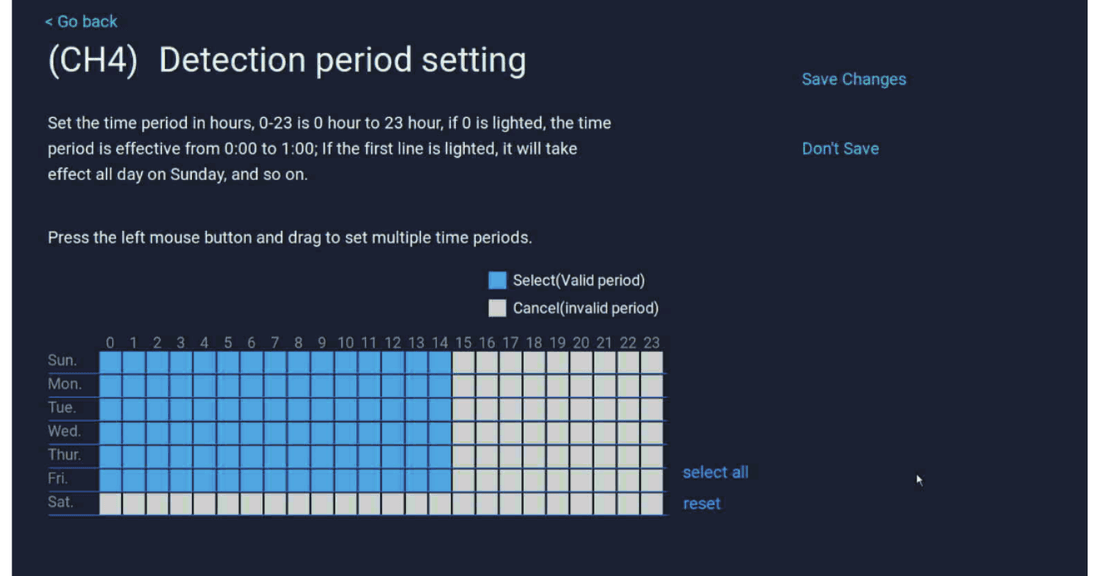
You can select different alarm time periods to reduce the time of frequent alarms.
Copy Camera Settings
After setting up the camera, click Copy camera settings to directly copy it to other cameras, which is very convenient.
Light Control
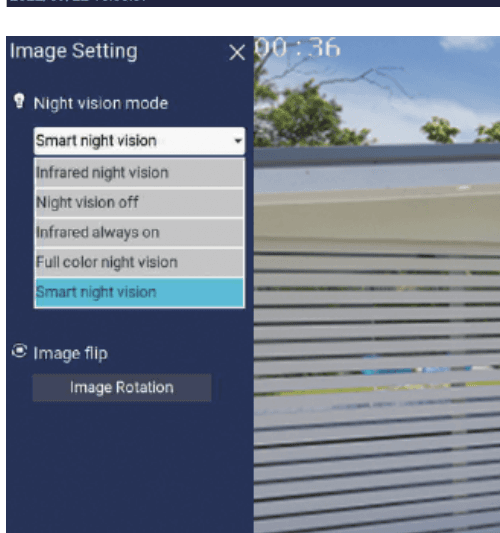
The Night vision mode menu offers the following options:
- Infrared night vision — The camera switches to a black-and-white image automatically at night.
- Night vision off — Both infrared mode and floodlight mode will be turned off.
- Infrared always on — The image will remain black and white no matter day or night.
- Full color night vision — When it is detected that the surrounding environment has begun to dark, the floodlights will automatically turn on and display a color image.
- Smart night vision — When the camera detects a person or object, it will turn on the floodlight, and the image will be switched to full color. Normally, it is a black-and-white image at night.
- Image Flip — Turn the image upside down.
Sound
If you want to hear the sound of the camera, please enable this option.
Digital Zoom
On the left bottom corner, scroll the mouse to zoom the image; you will see a red frame — move it to anywhere you want to zoom, then click "+", "-" to zoom. If you only scroll the mouse, it only zooms the right top corner.
Microphone
Click Talking to speak some words on the NVR monitor. The system without a monitor doesn't support talking through the NVR directly, but you can talk through the EseeCloud app.
If you want to hear the sound from the camera, please hang up first.
PTZ Control (Only for PTZ camera)
If the camera system you purchase is a bullet camera, the PTZ function cannot be used. However, you can add another PTZ camera of our brand.
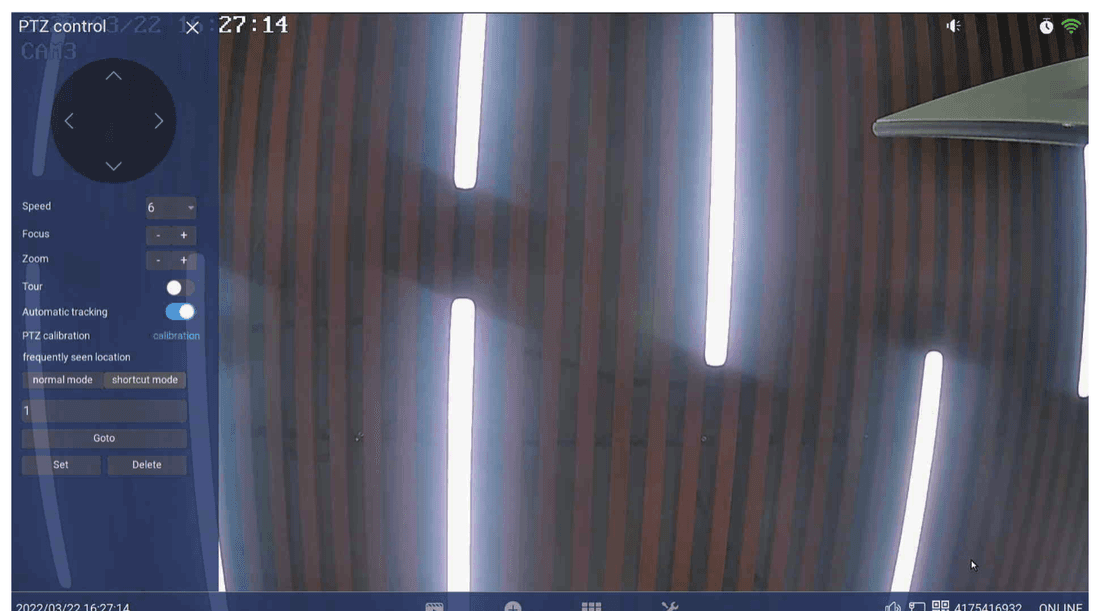
- PTZ Control — Drag the direction key to move the camera lens up and down, left and right.
- Speed — Set the camera moving speed.
- Focus (only for optical zoom camera) — When zooming in/out, if the camera image is not in focus, click this option to focus manually. However, if the image is normal, do not click it, because it will damage the image definition of the camera.
- Zoom — Zoom in or out the camera image (only for optical zoom camera).
- Tour — Enable this option; the camera will rotate 360° and end in 4 hours.
- Automatic tracking — When the camera detects an object, it will follow the movement of the object.
- PTZ calibration — When there is a deviation in the camera position or the pan-tilt cannot rotate left and right or up and down, click PTZ adjustment; the camera will calibrate automatically.
Frequently seen location
- Normal mode — Adjust the camera lens to a position as you want, then click add; the first is a homepoint.
- Shortcut mode — This option can only be used by optical zoom cameras. Some functions of the optical zoom camera need to input the command code to start, such as WHD602Z and WHD103Z.
App Function Settings
The EseeCloud app gives you remote access to all the functions below.
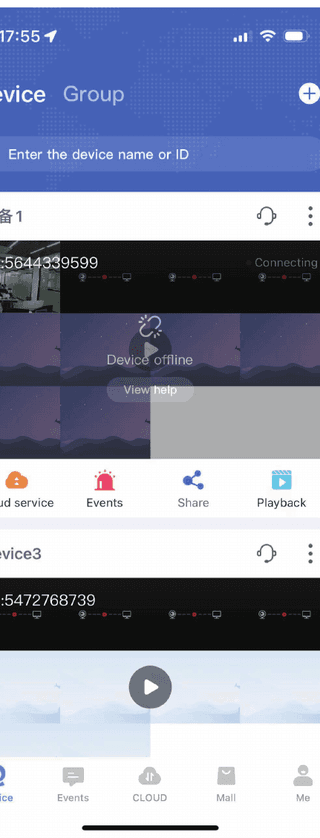
Cloud Service
Click the Cloud service icon to buy cloud storage — no need to buy Cloud storage if your NVR includes an HDD. You can buy only one type of Cloud storage for one channel at a time.
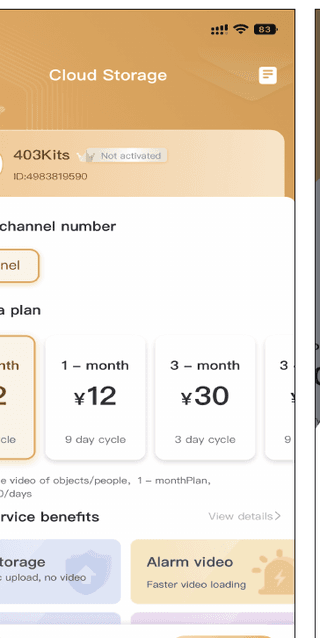
Events
Check the motion detection message and photo. Click the photo to check the motion video. If it shows no playback, please kindly confirm whether the HDD is working fine or not on the NVR box.
Share
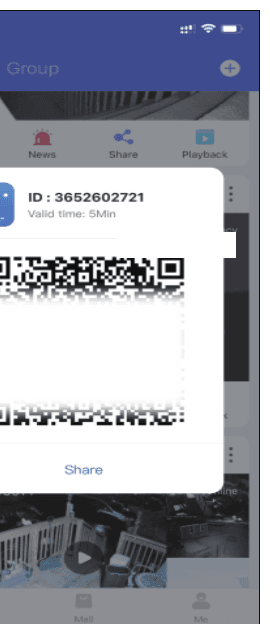
Click the Share icon to share the device to your family members.
- Share Permissions — Set the permissions that you allow others to check.
- QR code validity period — The valid time of the QR code.
After finishing all setup, click Complete to generate the QR code; others' phone need register a new account of EseeCloud APP, then scan this QR code to add it.
Playback
Click the Playback icon to see device playback, select the date icon to select the channel; fast forward is supported by subscribed cloud storage, and you can use fast forward function on the NVR monitor. Click the download icon to download the playback on the phone.
Real Time Recording Function Options
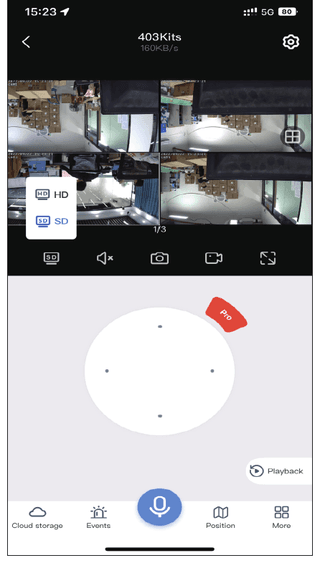
SD & HD mode — Click the icon to switch SD to HD mode. The camera is set to SD mode by default; for a clearer image please switch to HD mode.
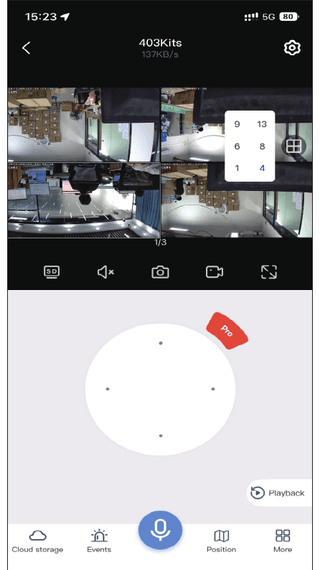
View More Camera — Click the grid icon to switch the view by x1, x4, x6, x8, x9, x13 cameras.
Volume ON/OFF — Click the volume icon to turn on the volume of the camera. Please note that you also need to turn the phone volume up.
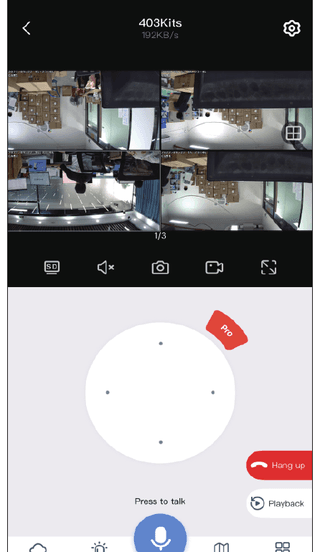
Two Way Audio — If your camera supports two-way audio, please press and hold the mic icon to communicate. One-way audio cameras don't support this function. If you want to talk with someone you can buy a two-way audio camera on Amazon (search ASIN: B07FVSK6BY).
Screenshot & Recording — Take a screenshot or manually record an important video and save it on the mobile phone as evidence in the future. After recording successfully, click more icon > select Photo album icon; you can check the video on this interface.
Landscape View — Click the icon to switch the vertical screen view to landscape view.
Pan Tilt (only for PTZ camera) — Click the icon to use the pan and tilt function; drag the direction key to move the camera lens up and down, left and right.
Zoom and Focus — If your camera supports digital zoom (WHD303, WHD902A, FJ2C, WHD203), please manually zoom in and out by horizontal view. Click Pro to set the optical zoom function for camera WHD103Z.
- Zoom — This function can only be used by an optical zoom camera.
- Focus — When zooming in/out, if the camera image is not in focus, click this option to focus manually. However, if the image is normal, do not click it, because it will damage the image definition of the camera.
Cloud Storage — Click the Purchase now icon to view videos saved by cloud storage, but you need to buy cloud storage services first. If your system has a hard drive, you can click on playback and choose local to play the record.
Alarm Message — Click the Events icon to see motion detection information.
Frequently Viewed Location — This function can only be used by a PTZ camera; click the Position icon to set several positions that you viewed frequently.
- Adjust the camera lens to a position you want, click add Preset position.
- Name the preset position, click confirm. Click the image in the box and the camera will return to the position you set.
To View on MAC and Windows Computer
Please email [email protected] to get the software download. Select English to install the software.
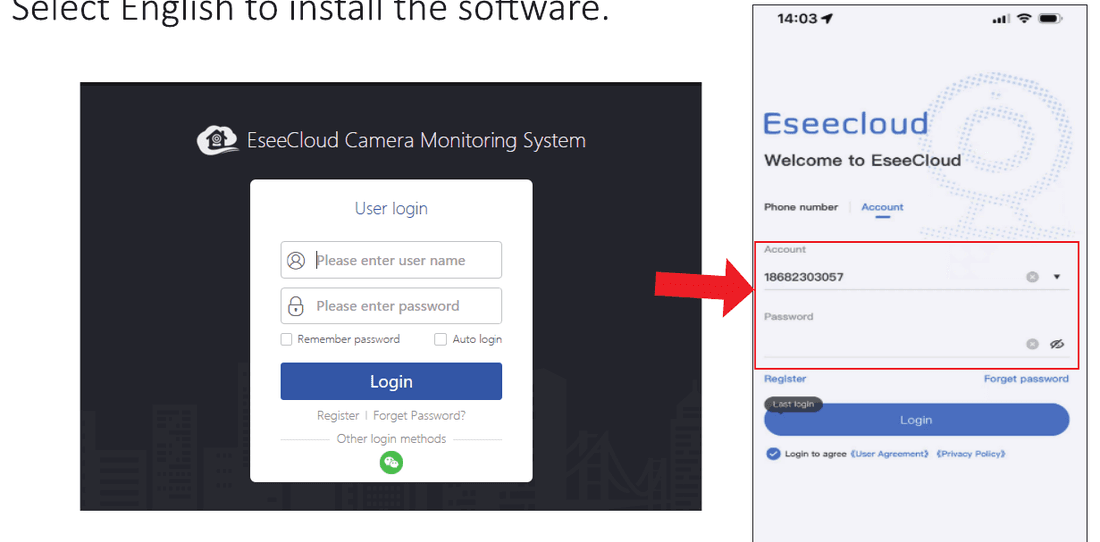
Please notice that you need to add the cameras to your mobile phone first, then use the same user name (only support phone number and email address) and password to log in to your PC account and view videos on PC. After you log in successfully, the camera system will automatically synchronize on the computer.
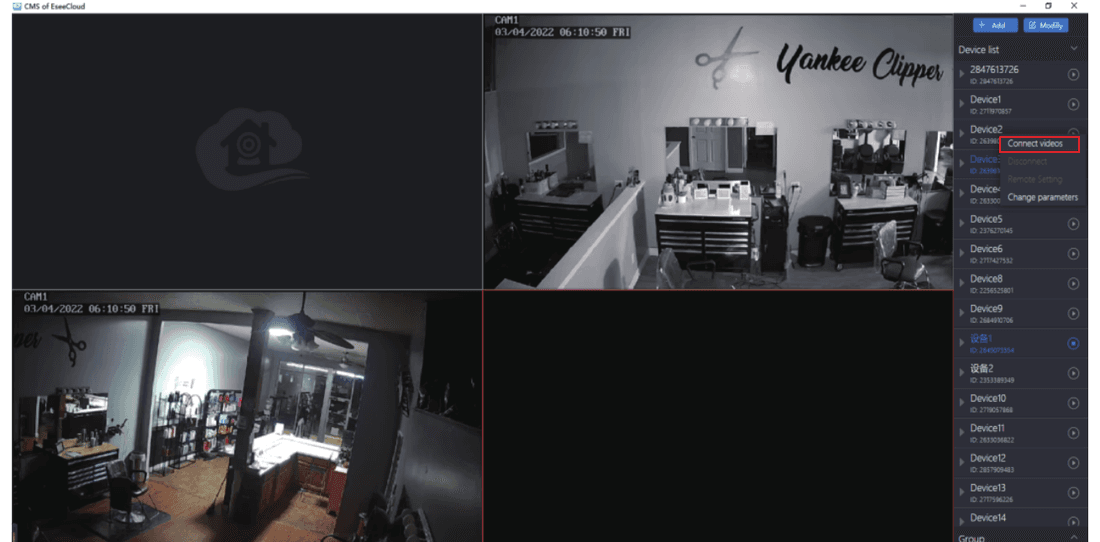
- Select the Connect videos icon to see the live stream on the computer.
- Click the Playback icon to see the playback.
- Click the Screen Number icon to change the view channel from 1–64.
- Click the More Function icon to see the EseeCloud software version and motion detection message.
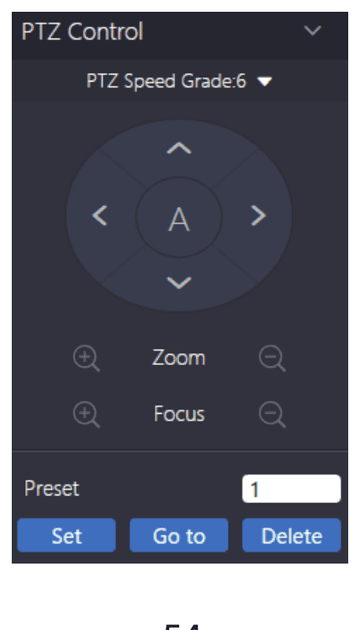
- Click the PTZ Control icon to control the PTZ camera. Zoom and Focus only work on an optical zoom camera.
Frequently Asked Questions
Customer & Technical Support
For any questions, please contact us:
Email us
Call us
- US/CA Toll Free Number: +1 855-660-0999
- +1 917-338-1084
- WhatsApp number: +86 15361562950
You can also browse our Help Center. The EseeCloud app provides one-on-one online support — for any questions, please contact us directly through the app to get your problem solved.
Hiseeu
User manuals and quick guides for Hiseeu security cameras, kits, and the mobile app.
Wireless Battery CCTV Kit
User manual for the Hiseeu Wireless Battery CCTV Kits (A031) — out-of-box audit, product overlook, installation, NVR setup wizard, app remote view, NVR menu options, camera and system settings, computer viewing, and FAQ.