 EseeCloud Help Center
OOSSXX Solar Wireless Camera Manual
Solar Wireless Security System Manual for the OOSSXX solar bullet camera — first charge, packing list, camera and port interfaces, network diagram, EseeCloud / IP PRO app setup, remote view and direct connection pairing, preview and playback, installation, charging, troubleshooting and FAQ.
This is the Solar Security Camera Manual for the OOSSXX solar wireless bullet camera — a battery-powered camera with an adjustable solar panel that connects to your Wi-Fi router and stores video on a TF card. It covers the first charge, packing list, the camera and port interfaces, the working network diagram, app installation and login, adding the camera to the app, notification, preview and playback, installation and placement, charging, troubleshooting and a short FAQ.
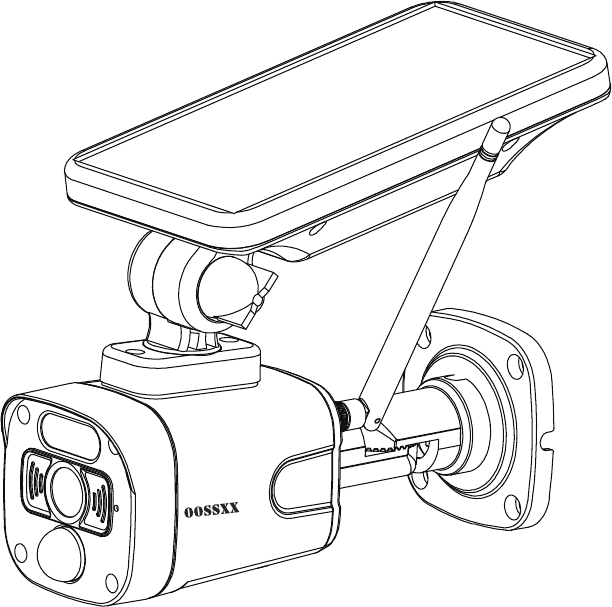
1. The First
Please charge cameras before start.
- Please charge before the first use of the device.
- on/off Button — hold on 3s to power on/off.
2. Setup Demo Video
Scan the QR code below to view the setup demo on YouTube.
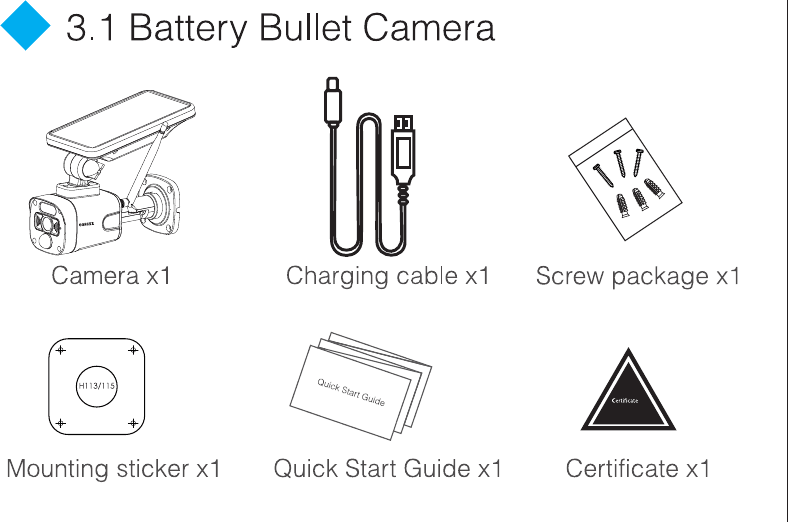
3. Packing List
Product sales configuration is different. Please refer to the actual product.
3.1 Battery Bullet Camera
| Item | Quantity |
|---|---|
| Camera | x1 |
| Charging cable | x1 |
| Screw package | x1 |
| Mounting sticker | x1 |
| Quick Start Guide | x1 |
| Certificate | x1 |
4. Interface Description
4.1 Solar Bullet Camera
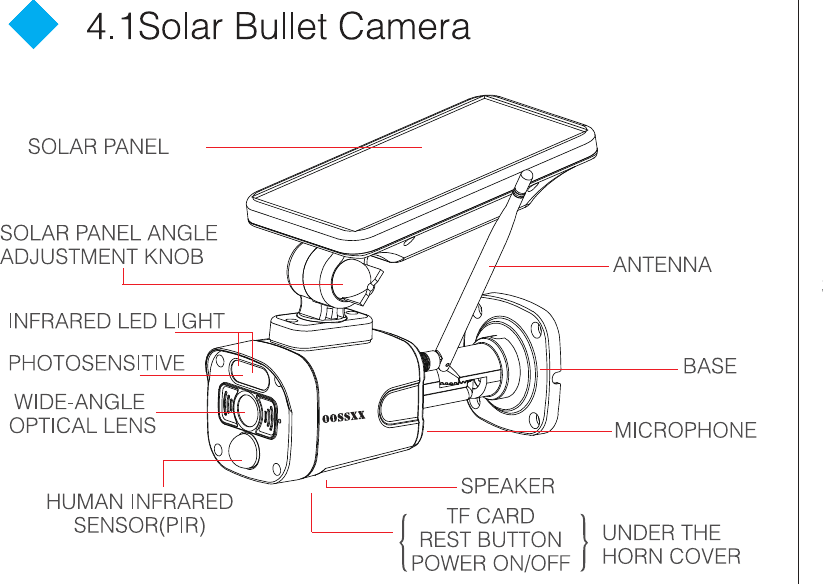
The solar bullet camera includes the following parts:
- Solar Panel
- Solar Panel Angle Adjustment Knob
- Infrared LED Light
- Photosensitive
- Wide-Angle Optical Lens
- Human Infrared Sensor (PIR)
- Antenna
- Base
- Microphone
- Speaker
- TF Card, Reset Button and Power On/Off (under the horn cover)
The TF card slot, reset button, charging port and power on/off button are located under the horn cover at the bottom of the camera:
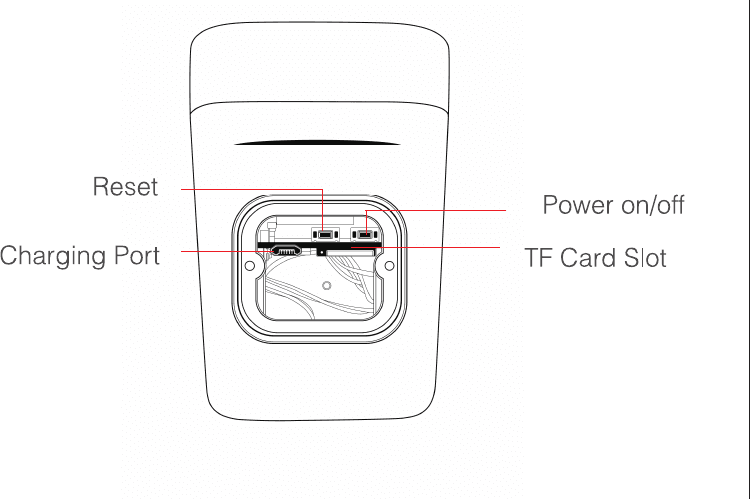
- Reset
- Charging Port
- Power on/off
- TF Card Slot
Button operation for Two-button model:
- Press the on/off button and hold for 3s: Turn on
- Press the on/off button 3 continuously: Power off
- Press the reset button and hold for 5s in the power-on state: Reset
5. Working Network Diagram
- Remote view by connecting the router (as the picture shows).
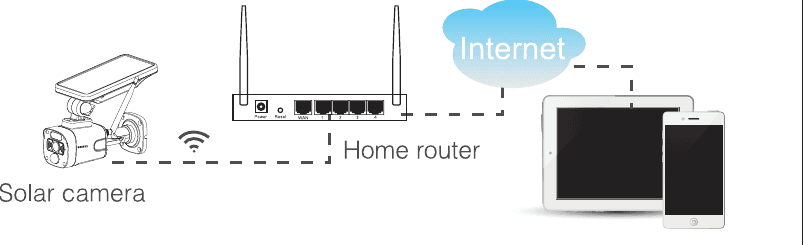
When remote view by connecting the router, the camera's WIFI should be connected to the router and the video is stored on the TF card of the camera.
5.1 App Installation
5.1.1 APP Download and Installation
Users can search EseeCloud on the APP store or IP PRO on Google Play, or scan the QR code below to install the APP.
For iOS system, it requires iOS 9.0 version or above. For Android, Android 5.1 or above.
For more on the mobile app, see the ESeeCloud App User Guide.
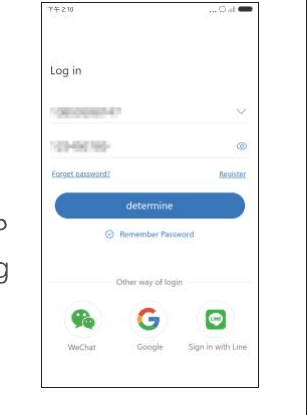
5.1.2 Account login
- Account Register / Login: Please click the Register on the interface, input phone number/email and password to Register, then login.
- Third-party login: APP supports third-party login. Click the third-party social software icon, jump to the APP to complete the authorization and log in.
5.2 Add Camera to APP
Adding method: Open the APP and scan the QR code on the camera.
- Put both your mobile phone and camera near the router, about 1-3 FT.
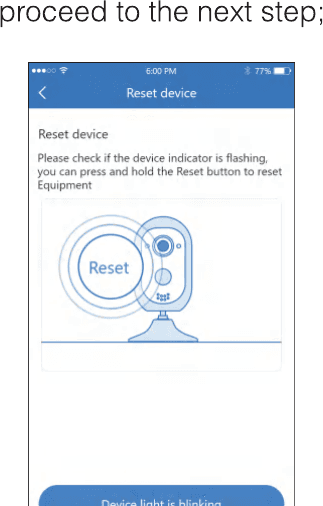
- After the battery camera is power-on, there is a voice prompt start match code and the red LED light is flashing. (Otherwise please press the RESET button on the camera for 8 seconds, it will be available after the voice prompt reset successfully.)
- Open the APP and click on the + in the upper right corner to enter the scan code interface.
- Scan the QR code on the device.
- On the search device interface, click Add.
- Reset the device and wait for the device indicator to flash and proceed to the next step.
- To view and use via WiFi or other networks, please select Remote View. If there is no network, if you connect to the camera at close range, please select Direct Connection.
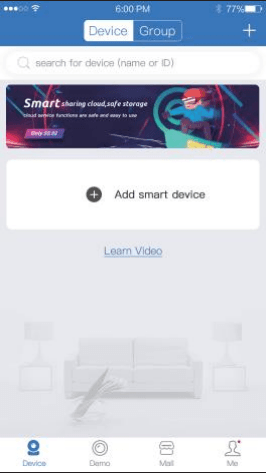
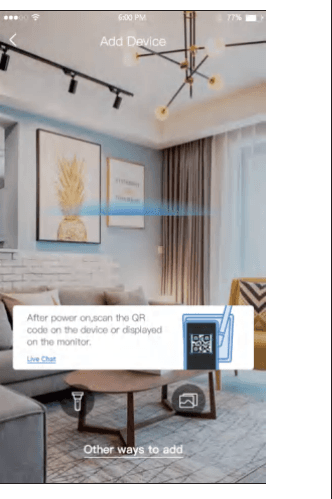
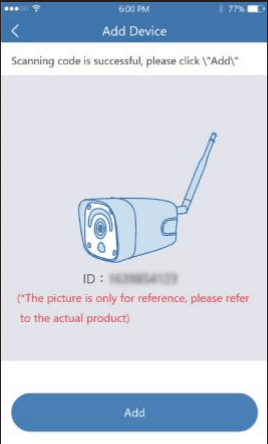
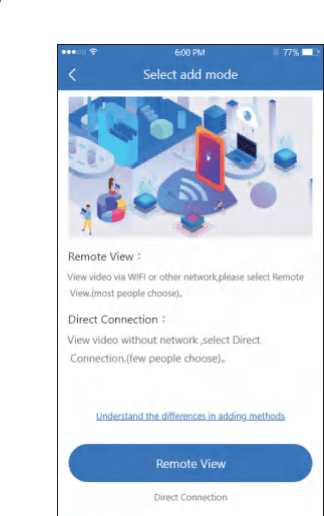
Adding mode when remote view
- Click Remote View, choose your WIFI and put the WIFI password. Then click NEXT STEP.
- Use the camera to scan the QR code on the mobile phone according to the operation the figure shows, then proceed to the next step after hearing the prompt tone or seeing the light status.
- After the network configuration is successful, set the name for the device to add successfully.
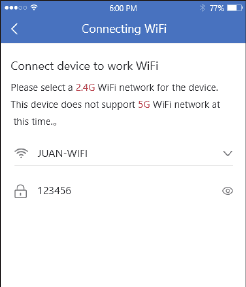
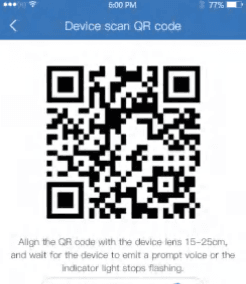
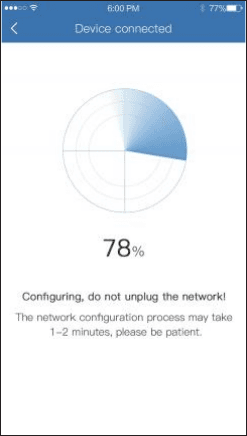
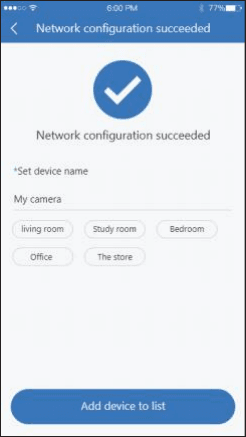
Select a 2.4G WiFi network for the device. This device does not support a 5G WiFi network at this time.
Adding mode of local direct connection
- Click local direct connection, set a password for the WIFI of the device itself and proceed to the next step.
- Use the device to scan the QR code on the mobile phone according to the operation the figure shows, then proceed to the next step after hearing the prompt tone or seeing the light status.
- After connecting with its own WiFi according to the guiding interface, return to the APP.
- Set the name and password for the camera, then you can add it to the device list.
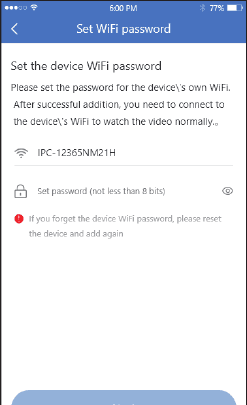
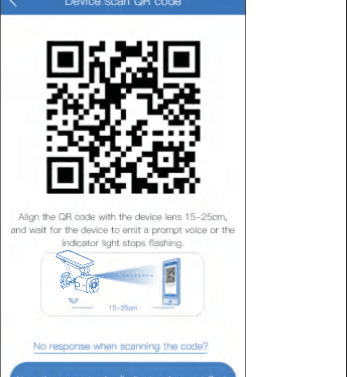
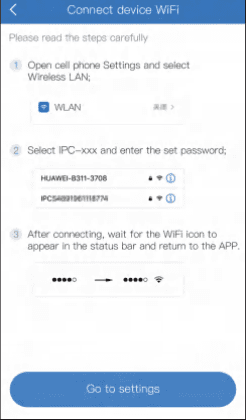
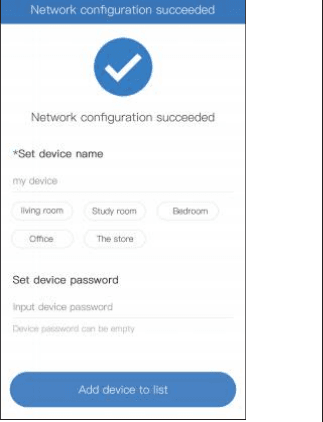
The direct connection needs to be maintained with the device's own WiFi connection in order to preview the video of the camera normally.
5.3 Notification, Preview and Playback
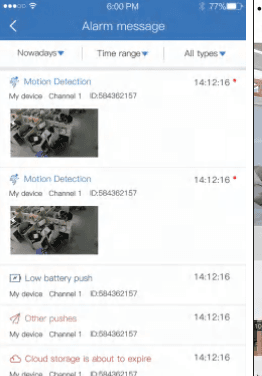
- Click the push information or info button to view the alarm information of the camera.
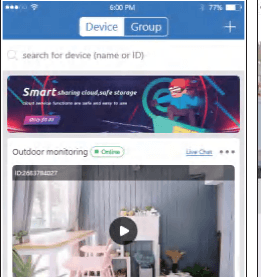
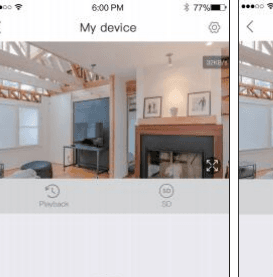
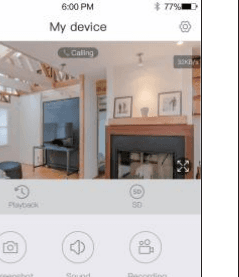
- Click the corresponding play icon on the device list to enter the preview interface to view real-time video and have voice intercom.
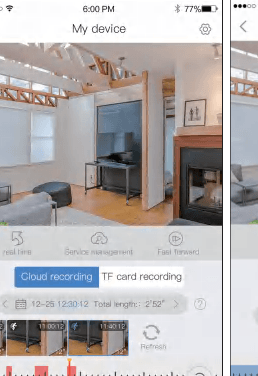
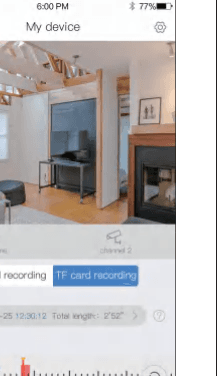
- Click the playback to view the video which is on the device.
5.4 Installation and placement
5.4.1 Solar Bullet Camera
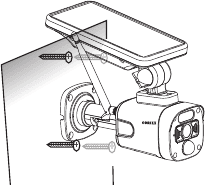
- Use the mounting sticker to locate and bore holes, and the cement wall must be nailed into the rubber plug.
- Fix the base with screws.
- Adjust the camera's pitch angle to a proper position and tighten the fixing screws.
PIR is sensitive to temperature, please note that:
- Avoid to install the cameras at spots where strong air flow passing. For example, air conditioner ceiling diffuser, and ect.
- Please install it 8-10 feet above the ground.
- When installing, avoid direct access to personnel. It is best to install it on the side of the access route or maintain an angle. Do not flip the camera upside down (infrared body sensor on top, lens on bottom).
- Please do not install the camera facing glass or mirror.
6. Charging Instructions
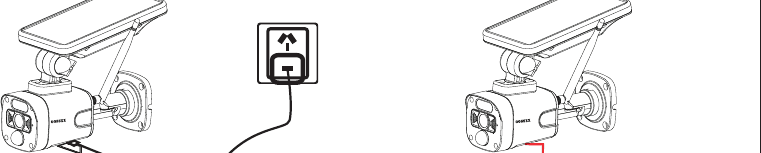
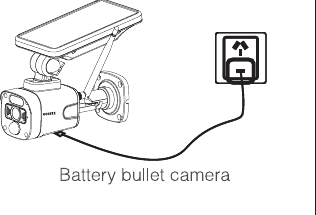
During use, if it is found that the APP pushes a low battery message or the camera has a low battery warning indicator, you need to charge the camera, as shown in the figure.
- Connect the USB power supply to the battery camera.
7. Troubleshooting
| Trouble | Solution |
|---|---|
| Unsuccessful network configuration | Make sure your phone, camera, and router are close enough. Note that the camera cannot support connection to a 5G router. Check that the router name and password are correct. Check the Internet settings of the wireless NVR. |
| Device is offline | Check your router's Internet connection. Check the connection between the camera and the router. If you change the router or change the WiFi password, you need to reset the camera and reconfigure the network. |
| No preview | The server may be congested, try restarting the app. |
| No push notification | Make sure the app has notification permissions. Please confirm that the alarm message push switch is turned on in the App Personal Center settings. Please confirm that the alarm message push switch is turned on in the camera settings. |
| No recording | For direct connection to the router, please insert the TF card before booting. Make sure the camera PIR (monitering) switch is turned on. Please make sure the camera recording switch is turned on. Please check recording settings on the gateway and APP. Please check whether the TF card status is normal in the App. If it is abnormal, try to format the TF card. |
8. FAQ
Q: Why does the battery run out quickly?
A: The App will count the daily recording time when playing back video. Please check if there are more videos every day. If there are many false triggers, please try to lower the trigger sensitivity setting. Check if the WiFi signal between the camera and router is weak. You can adjust the position of the router or camera to improve the signal transmission.
Q: How to confirm that the network connection between the camera and the router or wireless NVR is normal?
A: Actively trigger PIR in front of the camera and wait for about 10s. The blinking of the indicator indicates that the base station and the battery camera have been disconnected.
Q: What should I do if I forget my password?
A: If you have forgotten the login password of the App account, please reset the password through the Forgot Password option in the login interface as instructed.
Here For You 24/7
Have an issue?
Before you return your product or write a review please contact our dedicated customer service team directly. We guarantee a professional service that can fix your issue in a faster, more efficient manner.
| Contact | Details |
|---|---|
| Phone | 1-352-900-4656 |
| Website online chat | Mon-Fri 9:00-5:00 EST(US) |
| [email protected] | |
| Address | 2668 SW Brigantine Place, Port St. Lucie, Florida 34953 USA |
Looking for more help? Visit the Help Center or see the ESeeCloud App User Guide.
OOSSXX Solar PTZ Wireless Camera Manual
Solar Security Camera Manual for the OOSSXX solar PTZ dome camera — first charge, packing list, camera interface, network diagram, EseeCloud / IP PRO app setup, remote view and direct connection pairing, preview and playback, ceiling/wall and pole installation, charging, troubleshooting and FAQ.
Battery-Powered Security Camera (Kit)
Quick guide for the EZETAI Battery-Powered Security Camera (Kit) — interface, networking, setup and installation, EseeCloud app pairing, charging, match code, app functions, troubleshooting, and FAQ.