 EseeCloud Help Center
OOSSXX HD Video Security System Manual
Full manual for the OOSSXX HD-Analog DVR system — packing list, DVR and AHD camera specs, connection diagrams, app and CMS setup, Cloud ID remote access, e-mail alerts, recording, motion detection and FAQ.
This is the OOSSXX HD Video Security System Manual for an HD-Analog (AHD) DVR kit — a multi-channel DVR paired with 2MP / 3MP / 5MP analog bullet cameras. Each camera connects to the DVR with a Power & Video 2-in-1 cable (a BNC video connector plus a DC power connector). This manual covers the packing list, DVR and camera specifications, connection diagrams, the EseeCloud / IP PRO mobile app, the EseeCloud PC software (CMS), Cloud ID remote access, e-mail alerts, recording, playback, backup, motion detection and a full FAQ.
Please scan the QR code on the back cover and register within 7 days.
Dear Valued Customer
How are you? Thank you again for your purchase and trust. Please note,
- Do not attempt to install your cameras until you are able to view camera images on your TV or PC monitor first.
- Please find the video link of connecting the system for your reference: http://www.oossxx.com/index.php/list/index/id/73.html
- Cannot get any display on home monitor from the NVR system. There is NO Picture if All-in-One Computer or Laptop is connected to NVR Box directly. Please DON'T do that. The default output resolution of the NVR is 1280*1024, which may not be compatible with some monitor screens. There are a few options you can try to fix it:
- a. Connect PC/TV monitor with NVR box by VGA cable first. On the monitor, make sure the input is set to VGA. If no VGA cable, try another monitor with HDMI cable until getting video on the monitor screen. Don't forget to change the input to HDMI on a TV.
- b. When you see the video on another monitor, right-click the mouse → System setup → General setup & Screen setup, adjust the VGA resolution to 1024x768, click OK finally. Change to connect system with the first TV monitor, check if you can see the video once connected.
- To make sure the safety of your system, please change the password on your monitor screen. Right click on the home screen of your monitor, navigate to System setup → System admin, click User on the left menu bar → Set password → Create a password and type it in the field (keep it short, 8 characters max.) → repeat new password → click OK. Be sure to remember your password.
Any problems, please do feel free to contact us. Thank you for your purchase and trust.
Best Regards, OOSSXX Customer Care Team
| Service Tel | +1 (352) 900-4656 (Eastern time, Monday–Friday 9:00am–5:00pm) |
| [email protected] (reply in 24 hours) |
System Components
- DVR Recorder × 1
- Power supply for Recorder and 4 pcs Camera × 1
- Camera × 4pcs / 8pcs / 16pcs
- Power & Video 2-in-1 Cable × 4pcs / 8pcs / 16pcs
- Ethernet Cable × 1
- USB Mouse × 1
- Hard Drive (pre-installed in DVR box) × 1 (Only kit with hard drive)
- Manual × 1
- Sticker × 4pcs / 8pcs / 16pcs
Product Parameters
DVR Recorder Specification
| Name | OOSSXX DVR Recorder |
|---|---|
| Video input | 8ch / 16ch HD 5.0MP / 8.0MP (4K) |
| HDMI Output | 1ch. Resolution: 1024x768, 1280x1024, 1366x768, 1440x900, 1920x1080 |
| VGA Output | 1ch. Resolution: 1024x768, 1280x1024, 1366x768, 1440x900, 1920x1080 |
| Resolution | HD 1080P / 3.0MP / 5.0MP |
| Playback | 4ch |
| Recording | Manual, time, motion detection, alarm |
| Storage | 1 SATA |
| Storage capacity | MAX 6TB for each HDD |
| Network interface | 1 RJ45 10M/100M, 2 WIFI connector |
| USB interface | 1 USB2.0 |
| Power consumption | ≤5W without hard drive |
| Working temperature | −4°F — +140°F |
| Working humidity | 10%–90%RH |
| Dimension (mm) | 258mm×210mm×42mm |
| Power consumption | ≤5W |
| Power | DC 12V 2A |
Camera Specification
| Model | 2.0 Megapixel | 3.0 Megapixel | 5.0 Megapixel |
|---|---|---|---|
| Sensor | 1/3" Progressive Scan Sensor | 1/3" Progressive Scan Sensor | 1/3" Progressive Scan Sensor |
| Signal System | PAL/NTSC | PAL/NTSC | PAL/NTSC |
| Resolution | 1920 X 1080 16:9 High Definition | 2048X1536 4:3 High Definition | 2560 x 1960 16:9 High Definition |
| Minimum illumination | Color: 0.1 Lux; B/W: 0.01 Lux | ||
| Shutter | 1/25s to 1/25,000s | ||
| Lens | 3.6mm | ||
| OSD | Date Time & Title (NVR system can change Title name) | ||
| White Balance | Auto | ||
| Day & Night | IR cut filter with auto switch |
Technical Parameters
| 2.0 Megapixel | 3.0 Megapixel | 5.0 Megapixel | |
|---|---|---|---|
| 3D-DNR | Auto | ||
| Mirror/Flip | On / Off (NVR system setup) | ||
| Smart Stream | Dual-stream: 1920x1080@15fps, 640x360@15fps | Dual-stream: 1920x1080@15fps, 640x360@15fps | Dual-stream: 1920x1080@15fps, 640x480@15fps |
| Signal /noise rate | > 39.1 Db | ||
| Interface | RJ45 / WIFI 802.11b/g/n | ||
| Anti-thunder Level | Standard IEC61000-4-5 |
General Specification
| Working Temperature/Humidity | −4°F to +140°F / 30% to 80% RH |
| Storage Temperature/Humidity | −20°F to +180°F / 20% to 90% RH |
| Power Input | DC12V-1A |
| Power consumption | ≤6W |
| Size | 66*180mm |
| Weight | 500g |
| Level of Protection | IP66 |
Before start setup camera system, please visit our website to watch demo videos, and you can scan the QR code below to access customer service for guidance. www.oossxx.com

Connect Setup
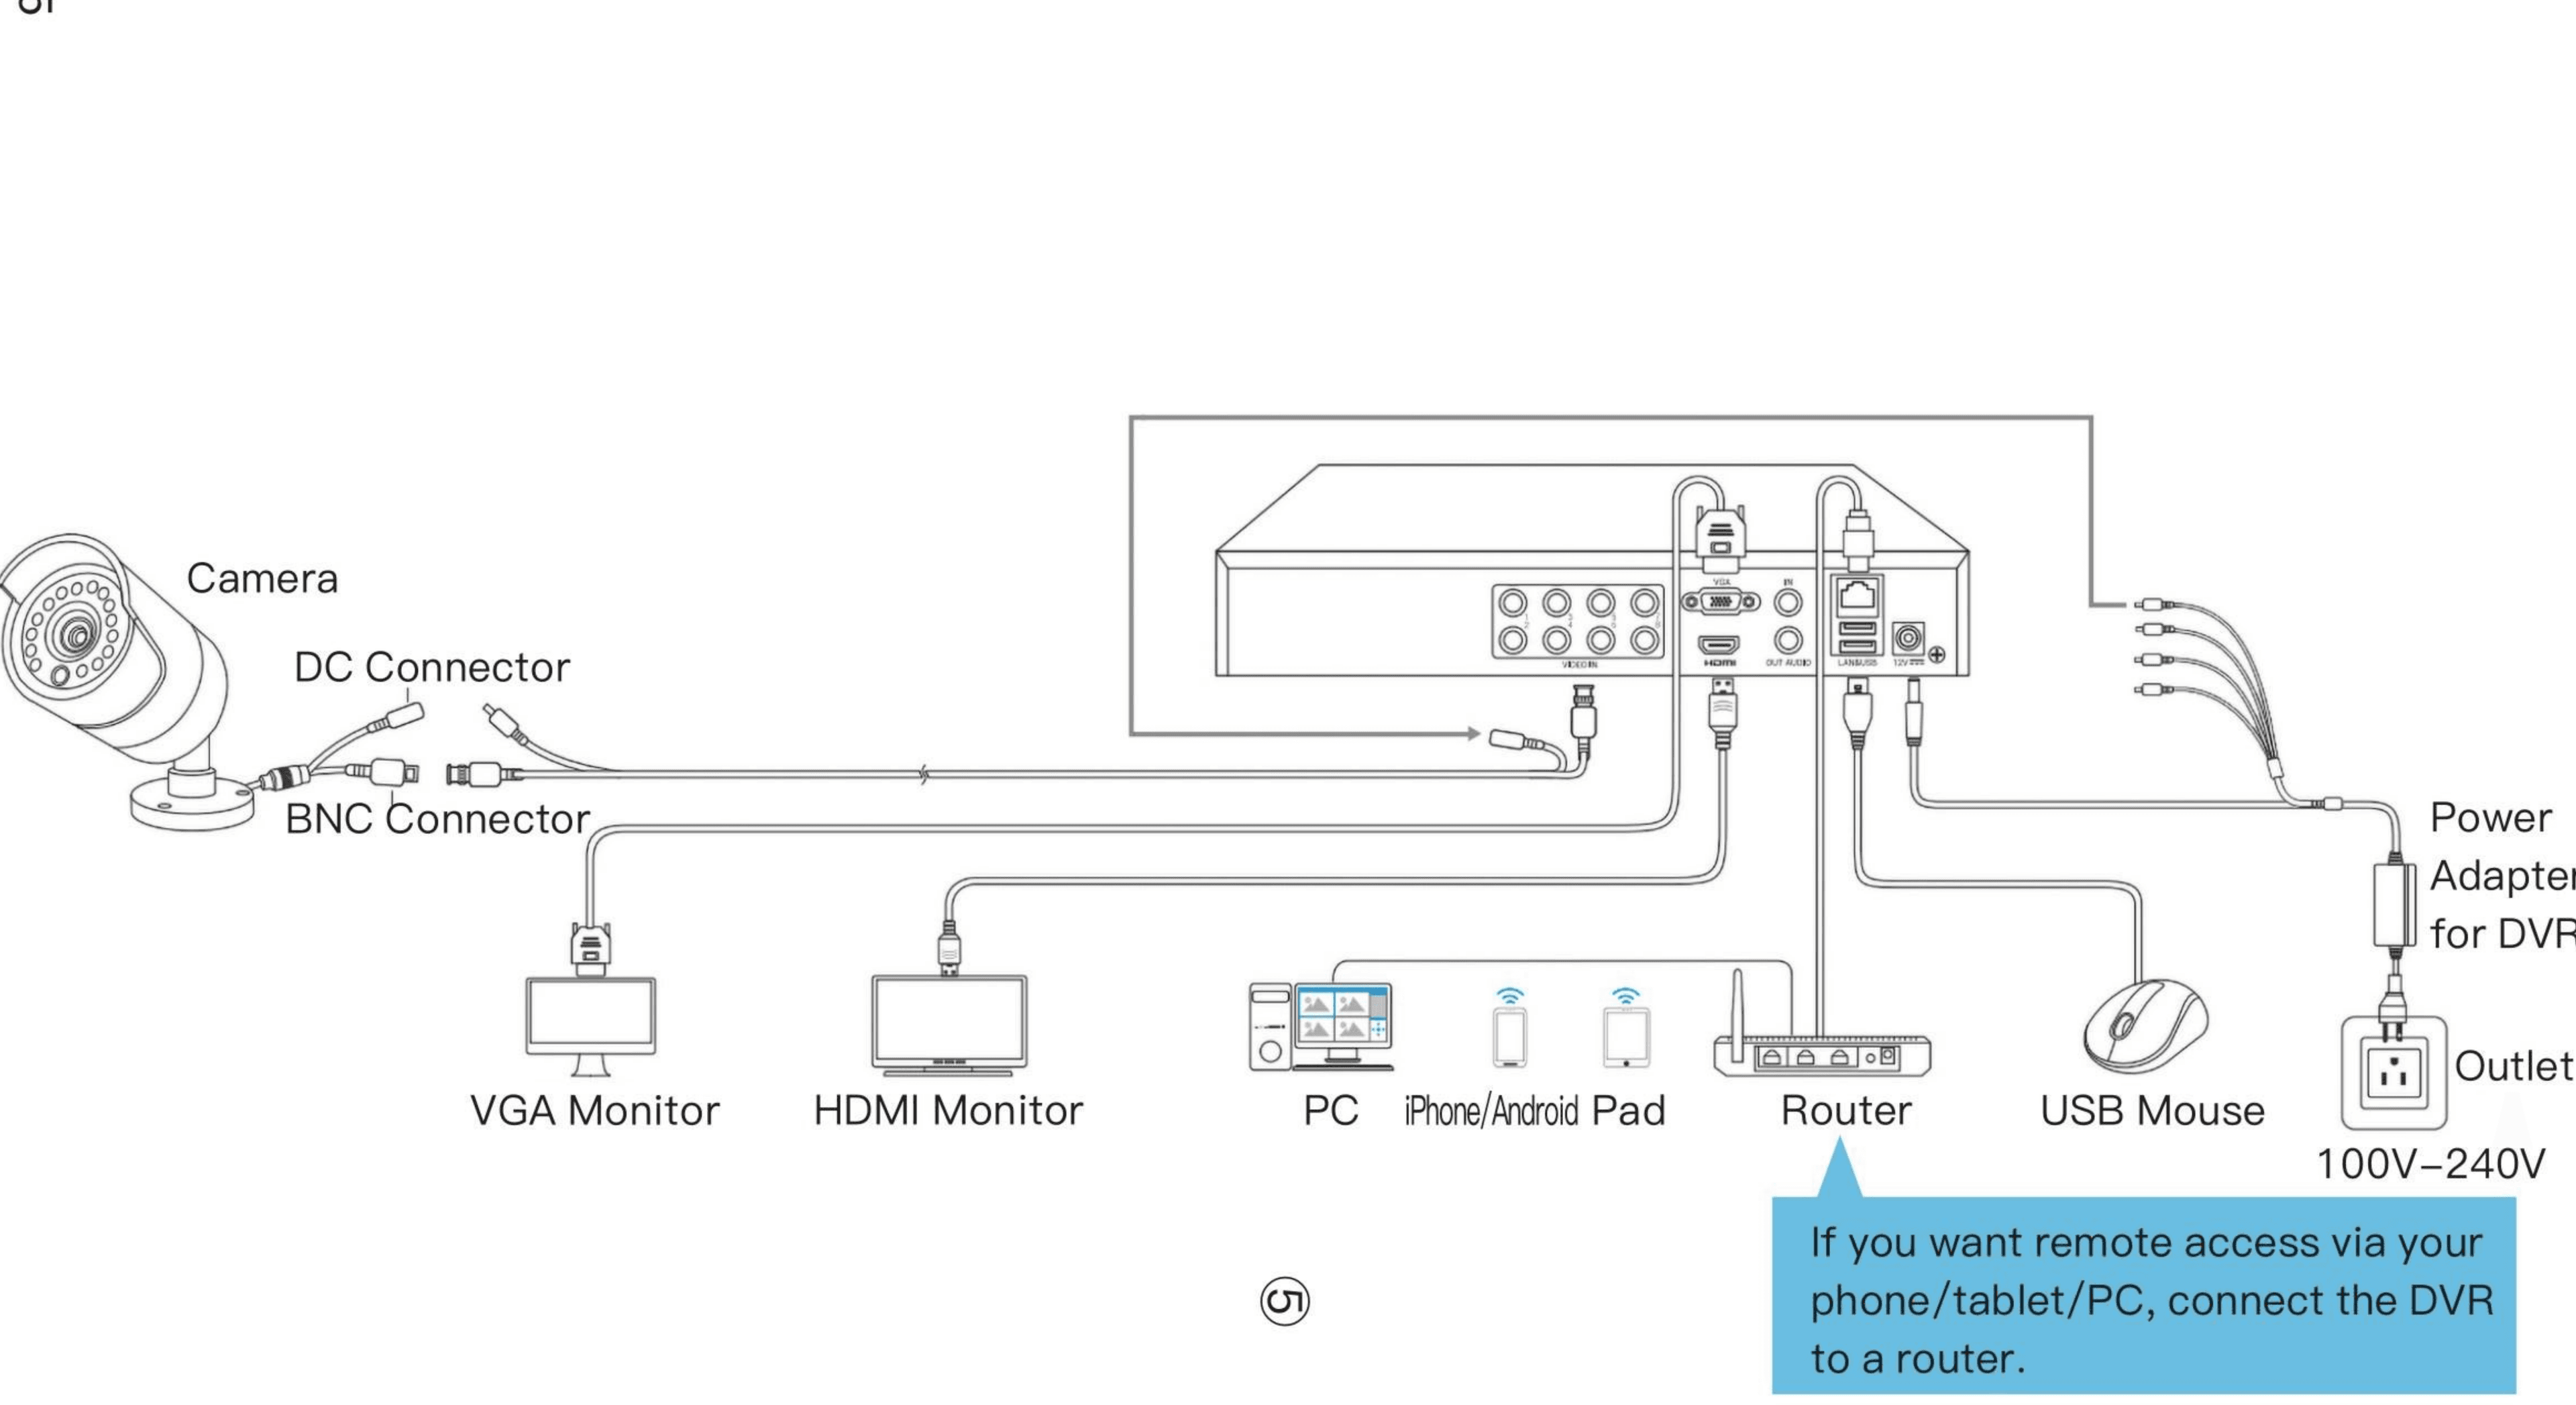
1. Connect the video cable's BNC port to the DVR's BNC video in port.
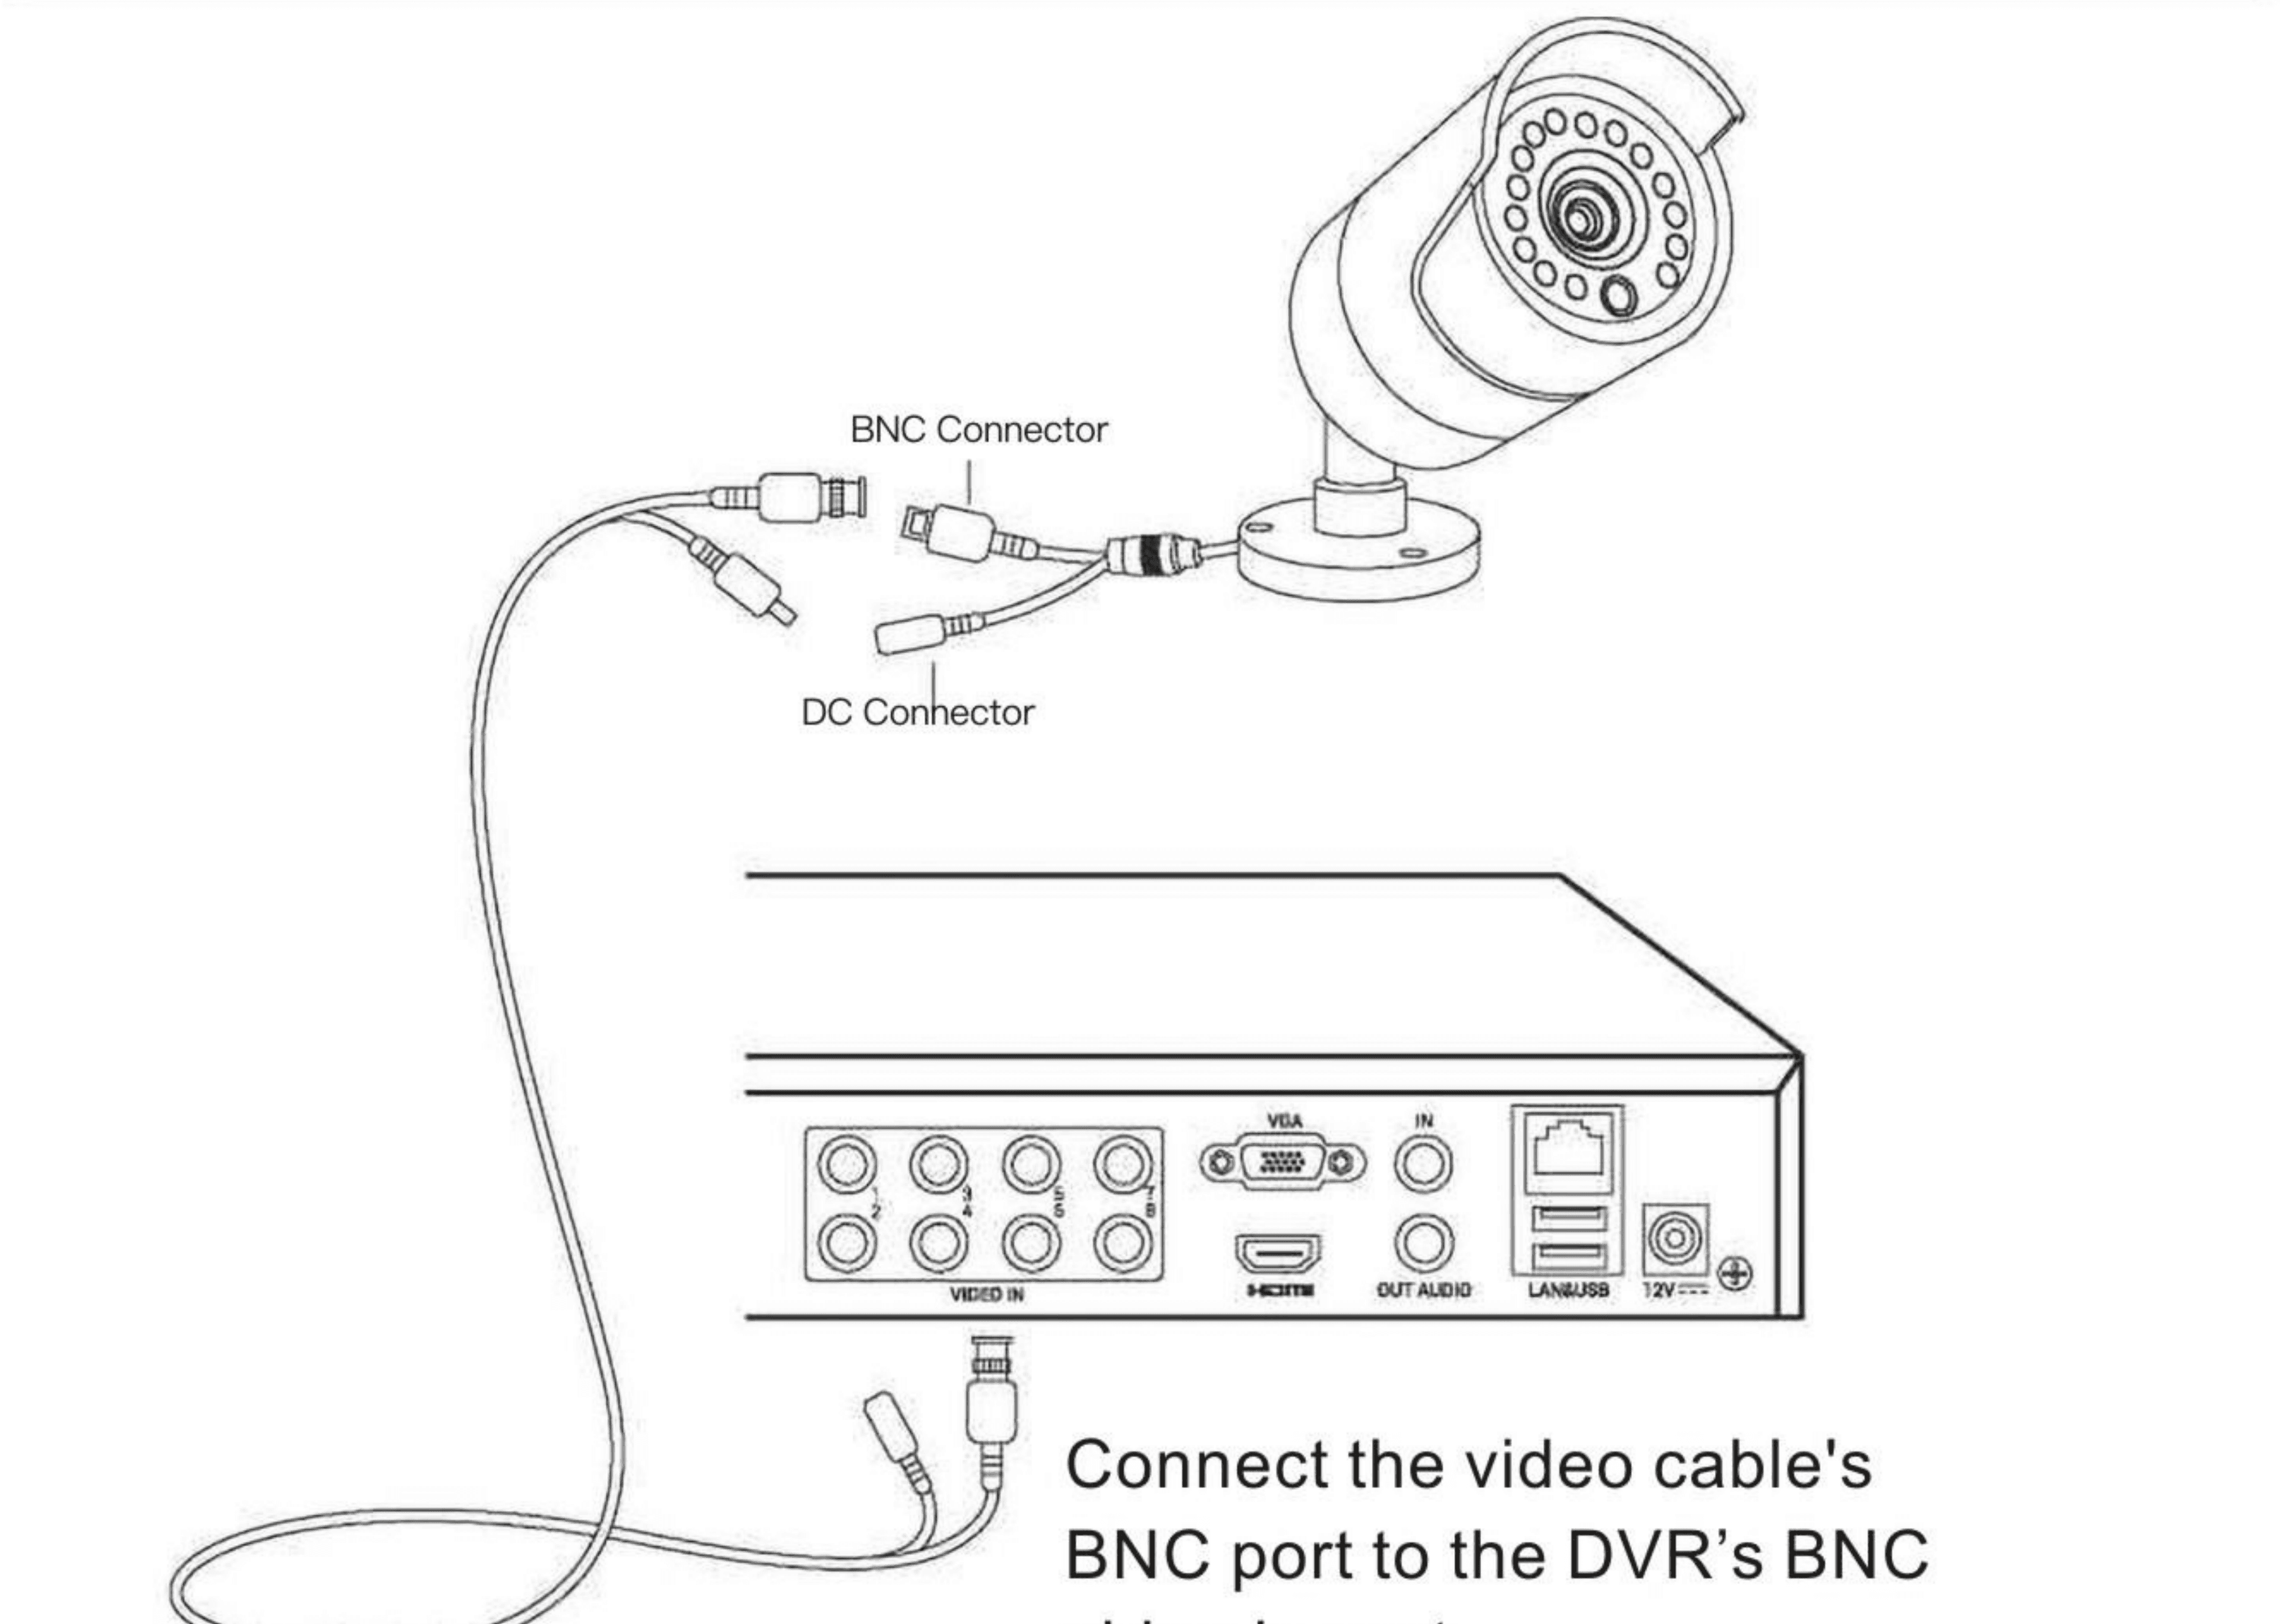
2. Connect your DVR's RJ-45 port to the router's LAN by network cable.
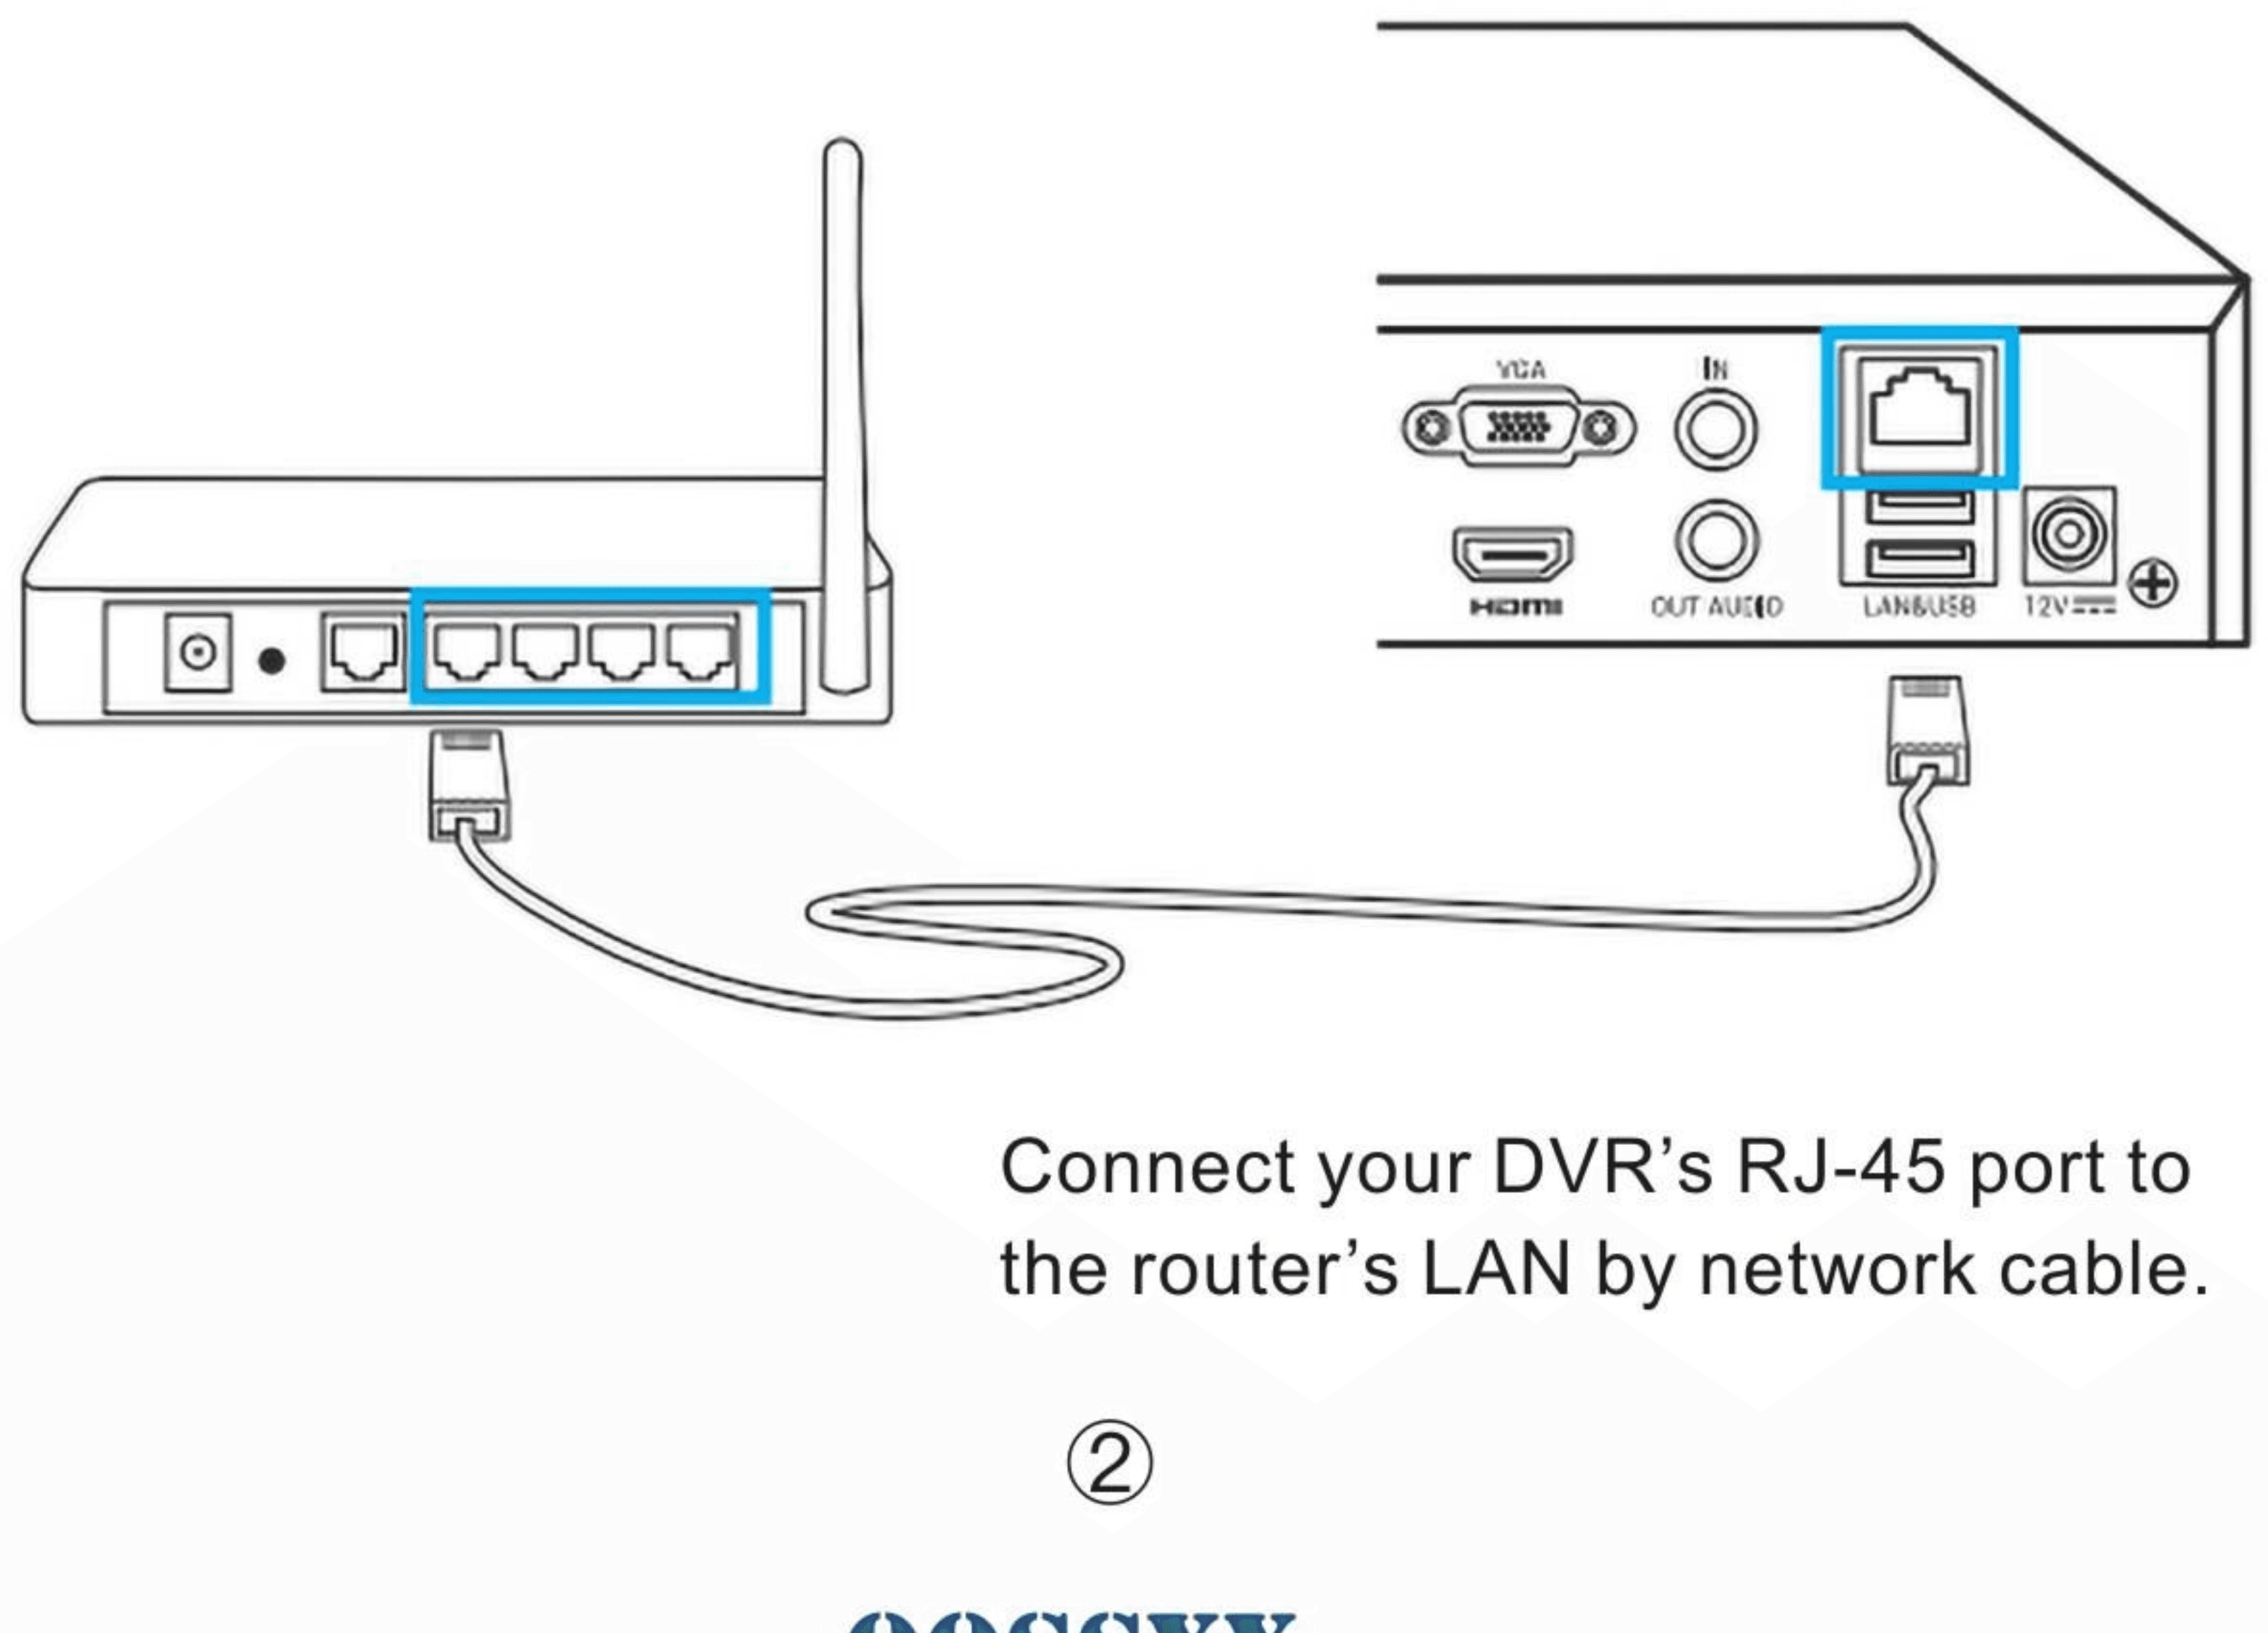
3. Connect your DVR to a HD TV / monitor via a HDMI or VGA cable for live view.
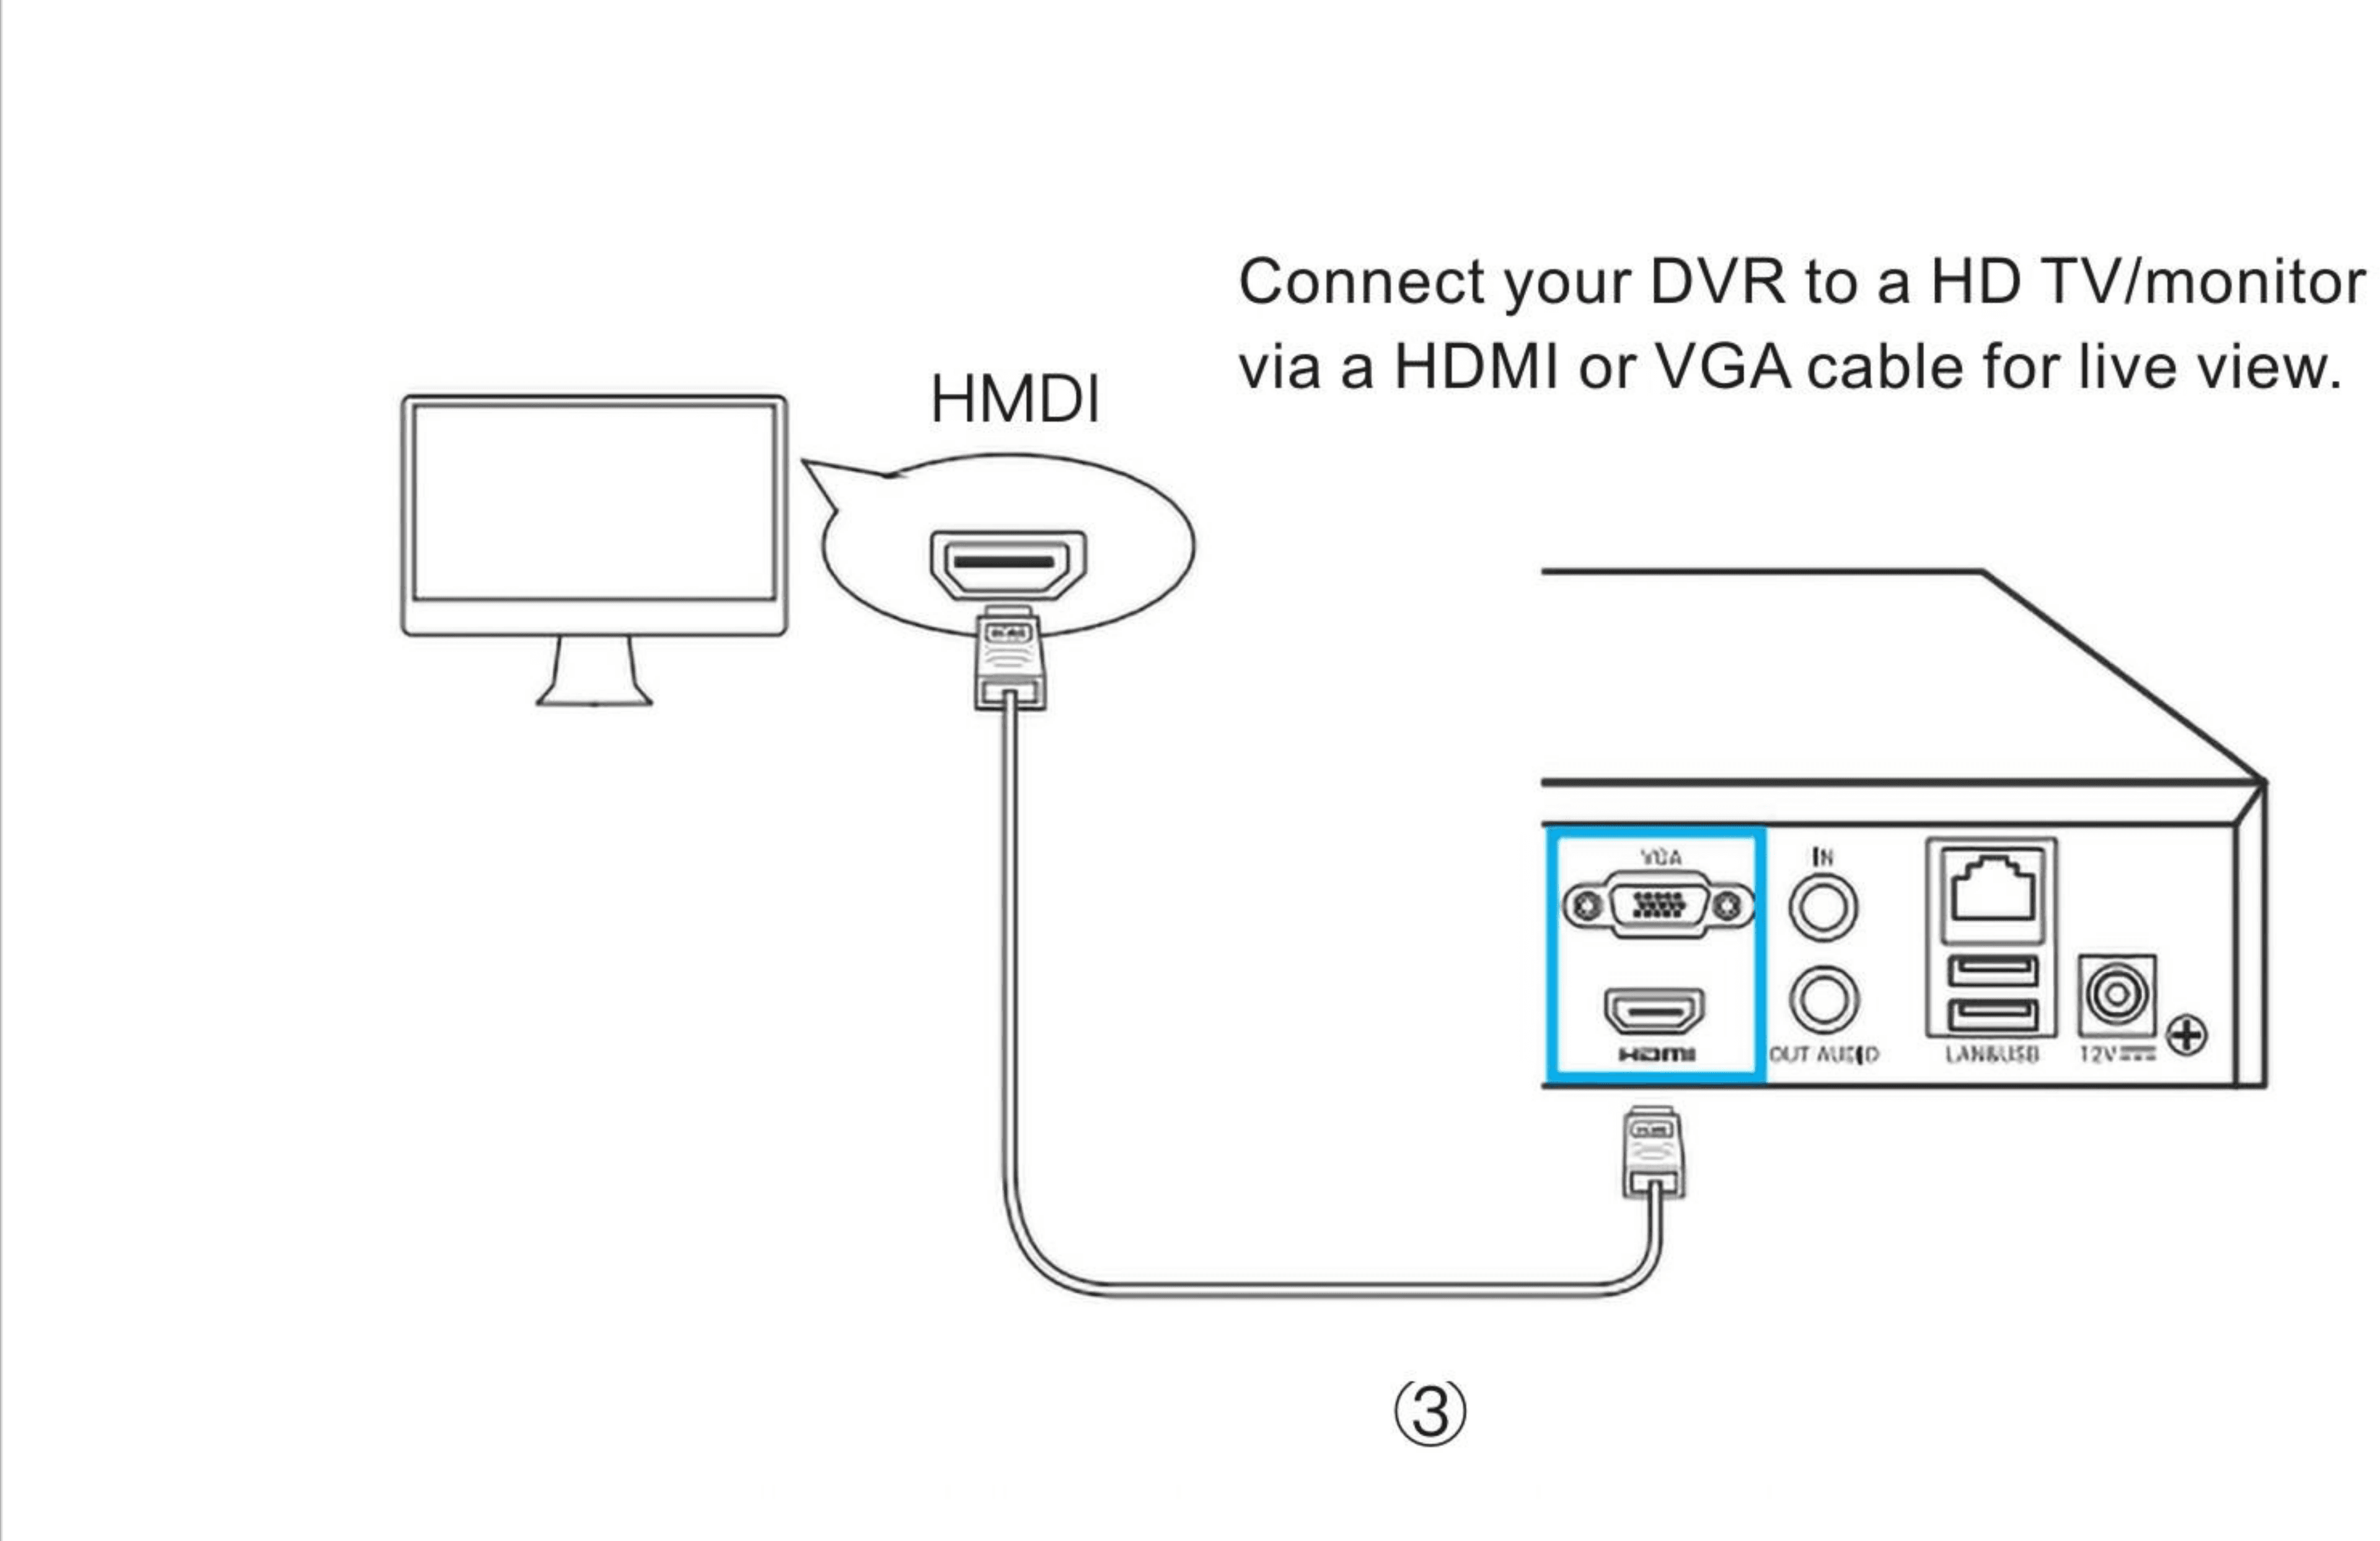
4. Connect the video cable's DC port to the 1-to-5 power splitter cable's DC female port. Connect the 1-to-5 power splitter cable's DC male port to the camera's power DC port.
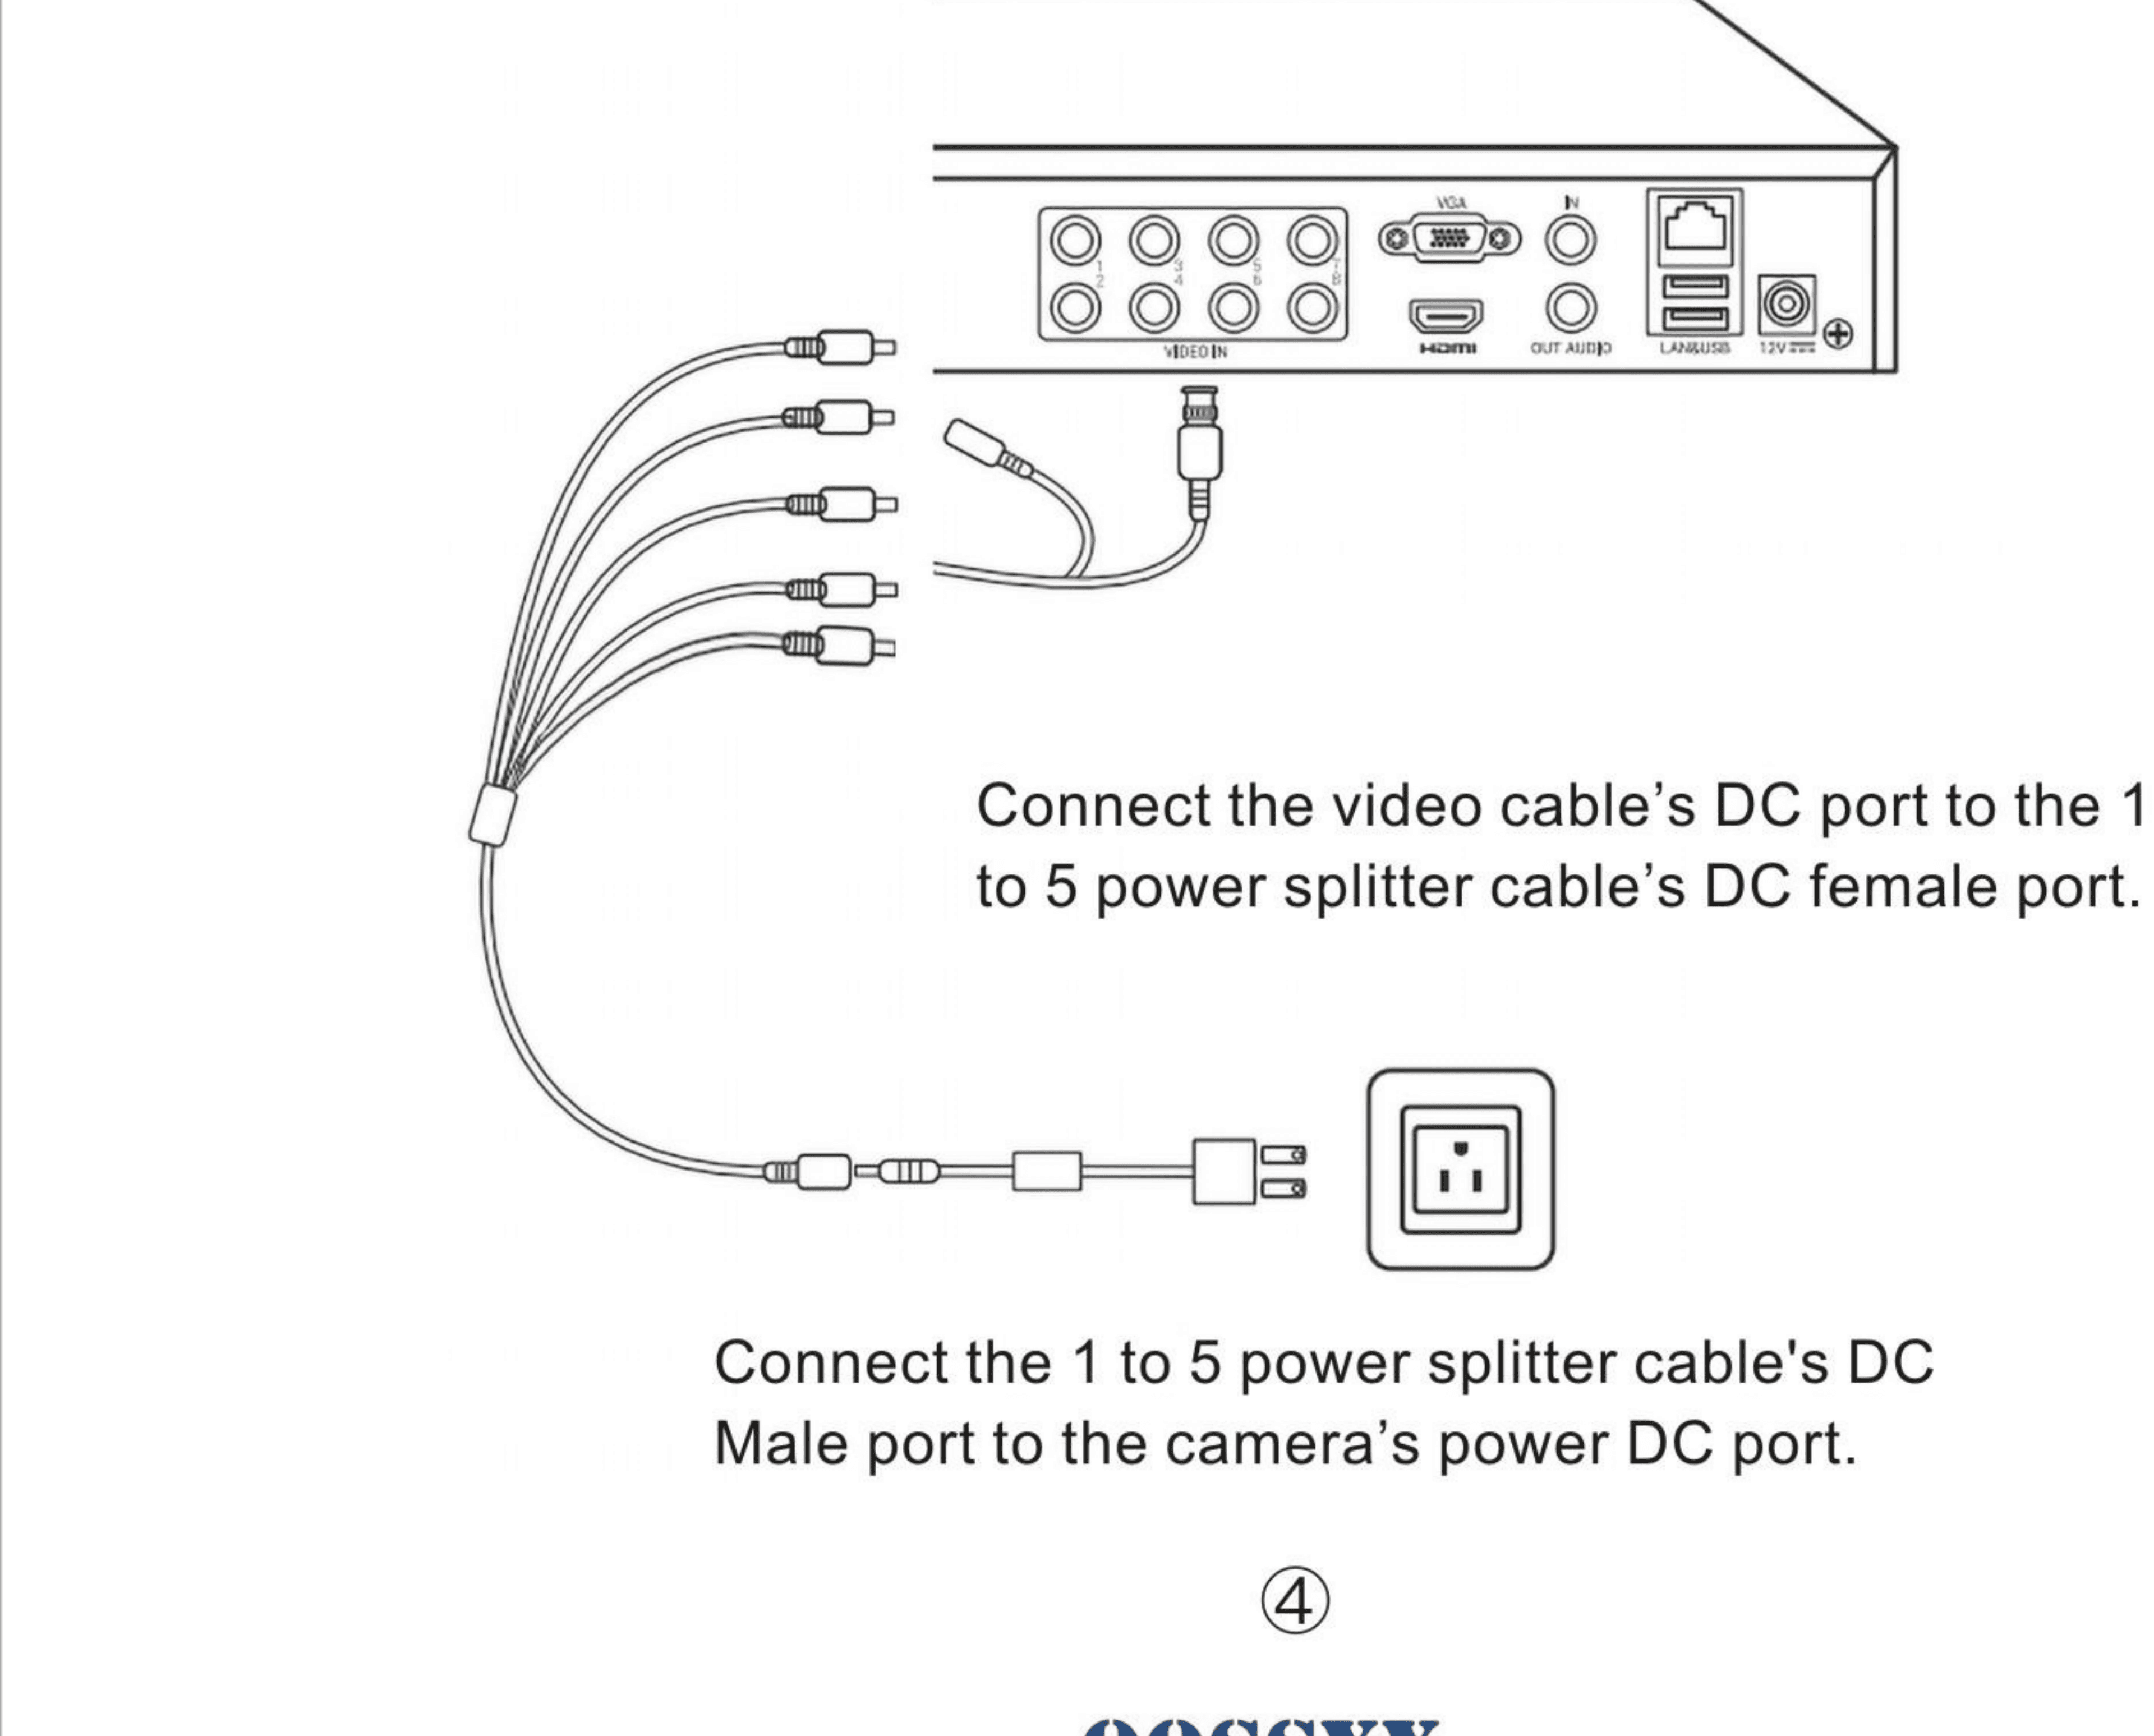
Connect Setup Steps
1. Connect DVR to AC power adapter.
Power adapter support input from AC110-230V.
2. Connect DVR to monitor.
Please do not use laptop monitor or all-in-one PC as camera system monitor. TV or PC monitor would be a perfect choice. Please use a HDMI cable or a VGA cable to connect NVR to monitor. Switch TV to HDMI mode or VGA mode.
3. Connect the mouse to the USB port at the back of DVR.
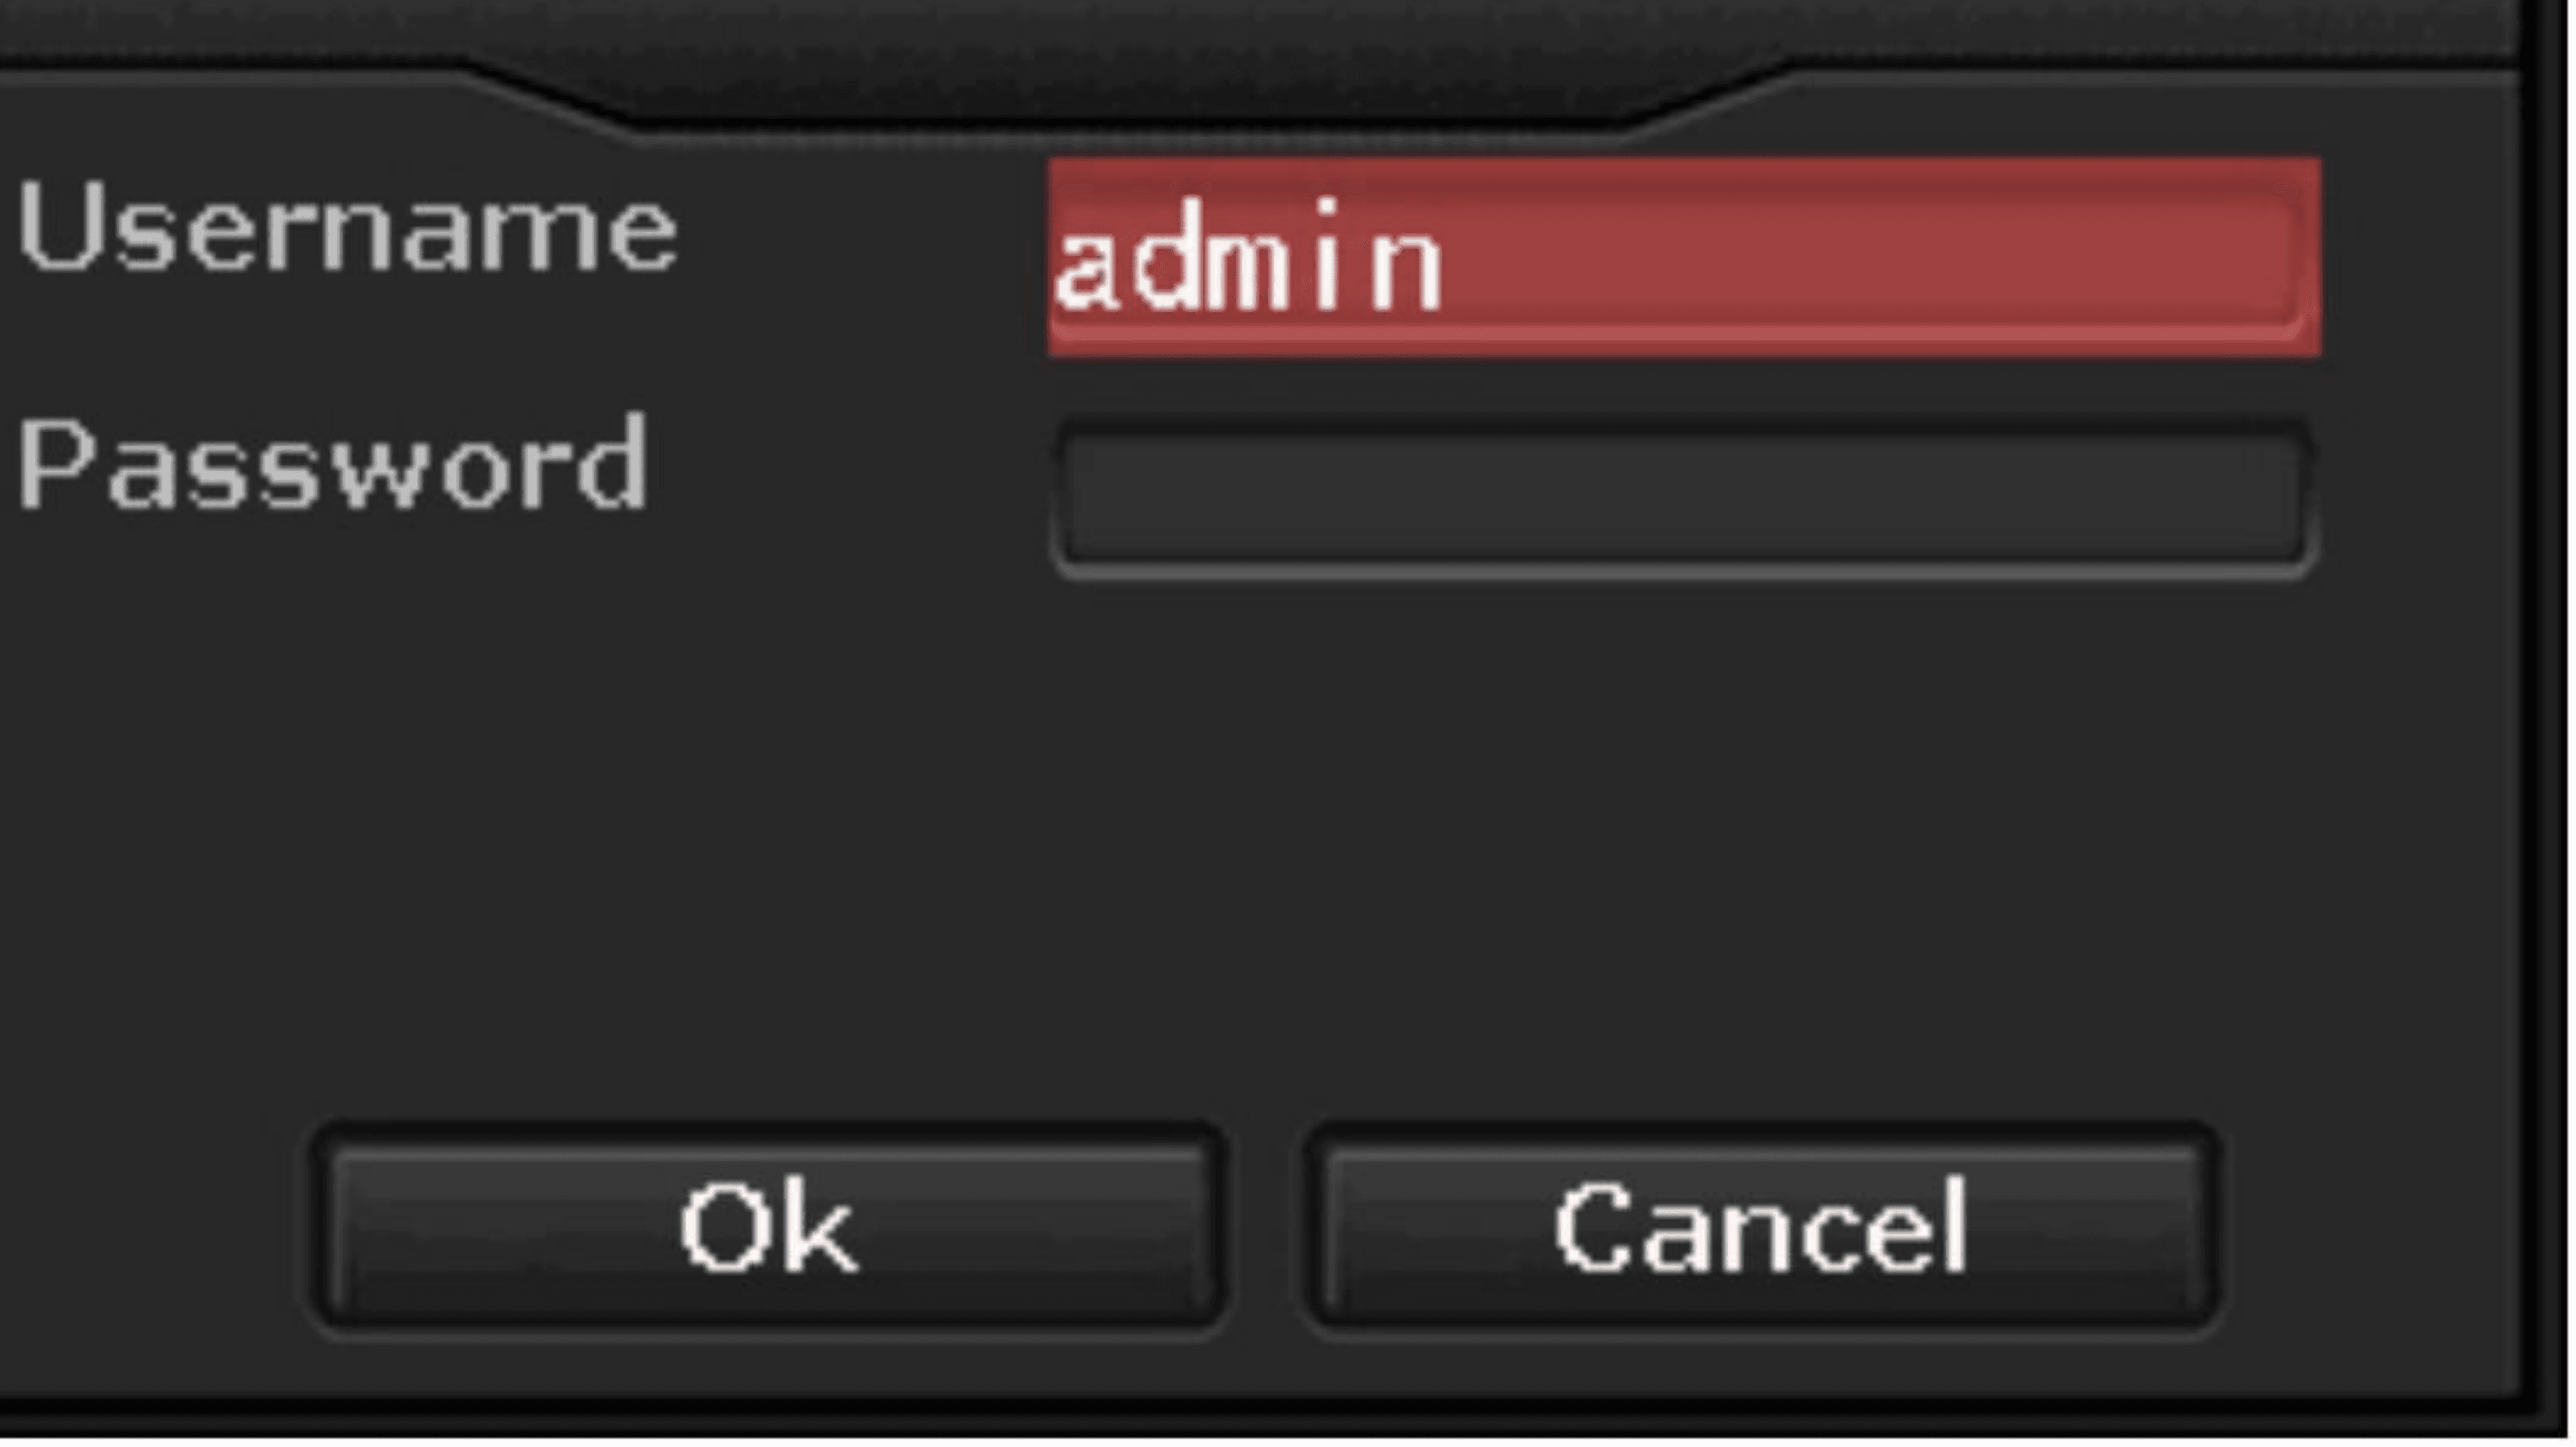
4. Log in your account.
No password is required for first time log in, as shown below. Please change your password after initial system setup.
| Username | admin |
|---|---|
| Password | (blank) |
APP Setup
Please connect NVR to Router in your property by Ethernet cable. To remote access your camera system, Internet support is required.
1. Please download EseeCloud on your cellphone
Scan the QR code below to download the APP.
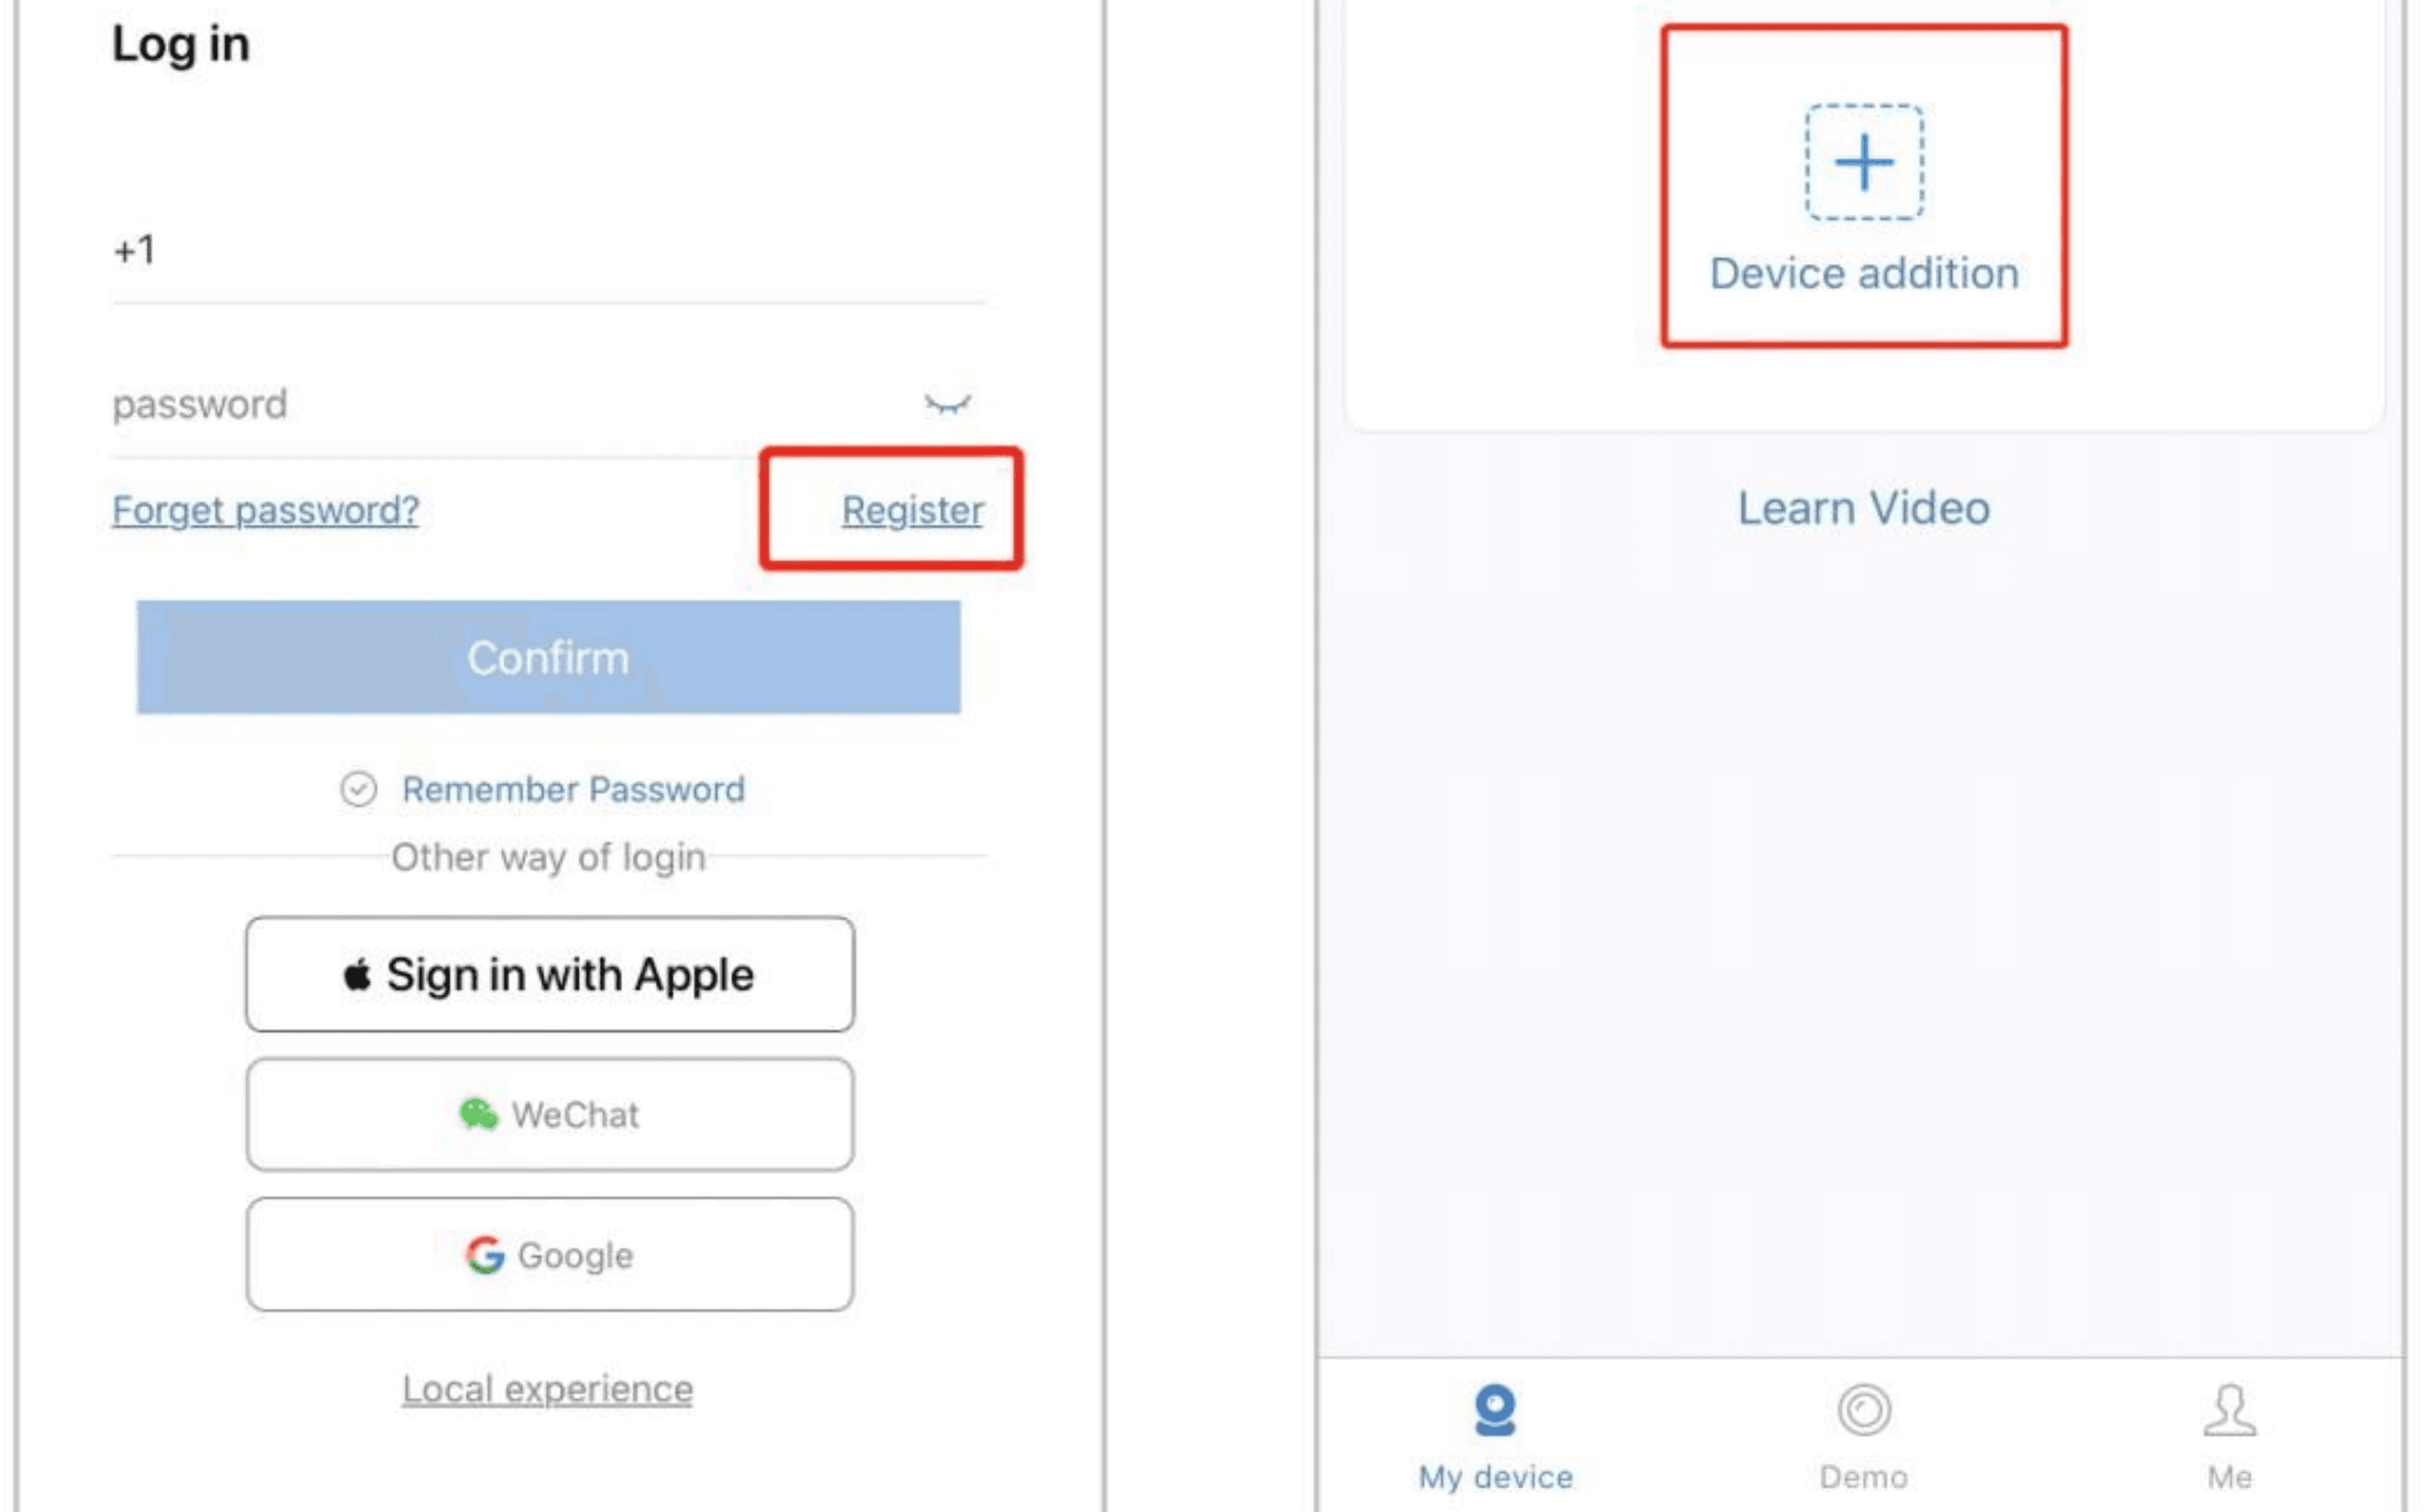
2. Register your account and add your camera system to EseeCloud
Please use either your cellphone number or email to register your account for EseeCloud. You will get a confirmation code to verify.
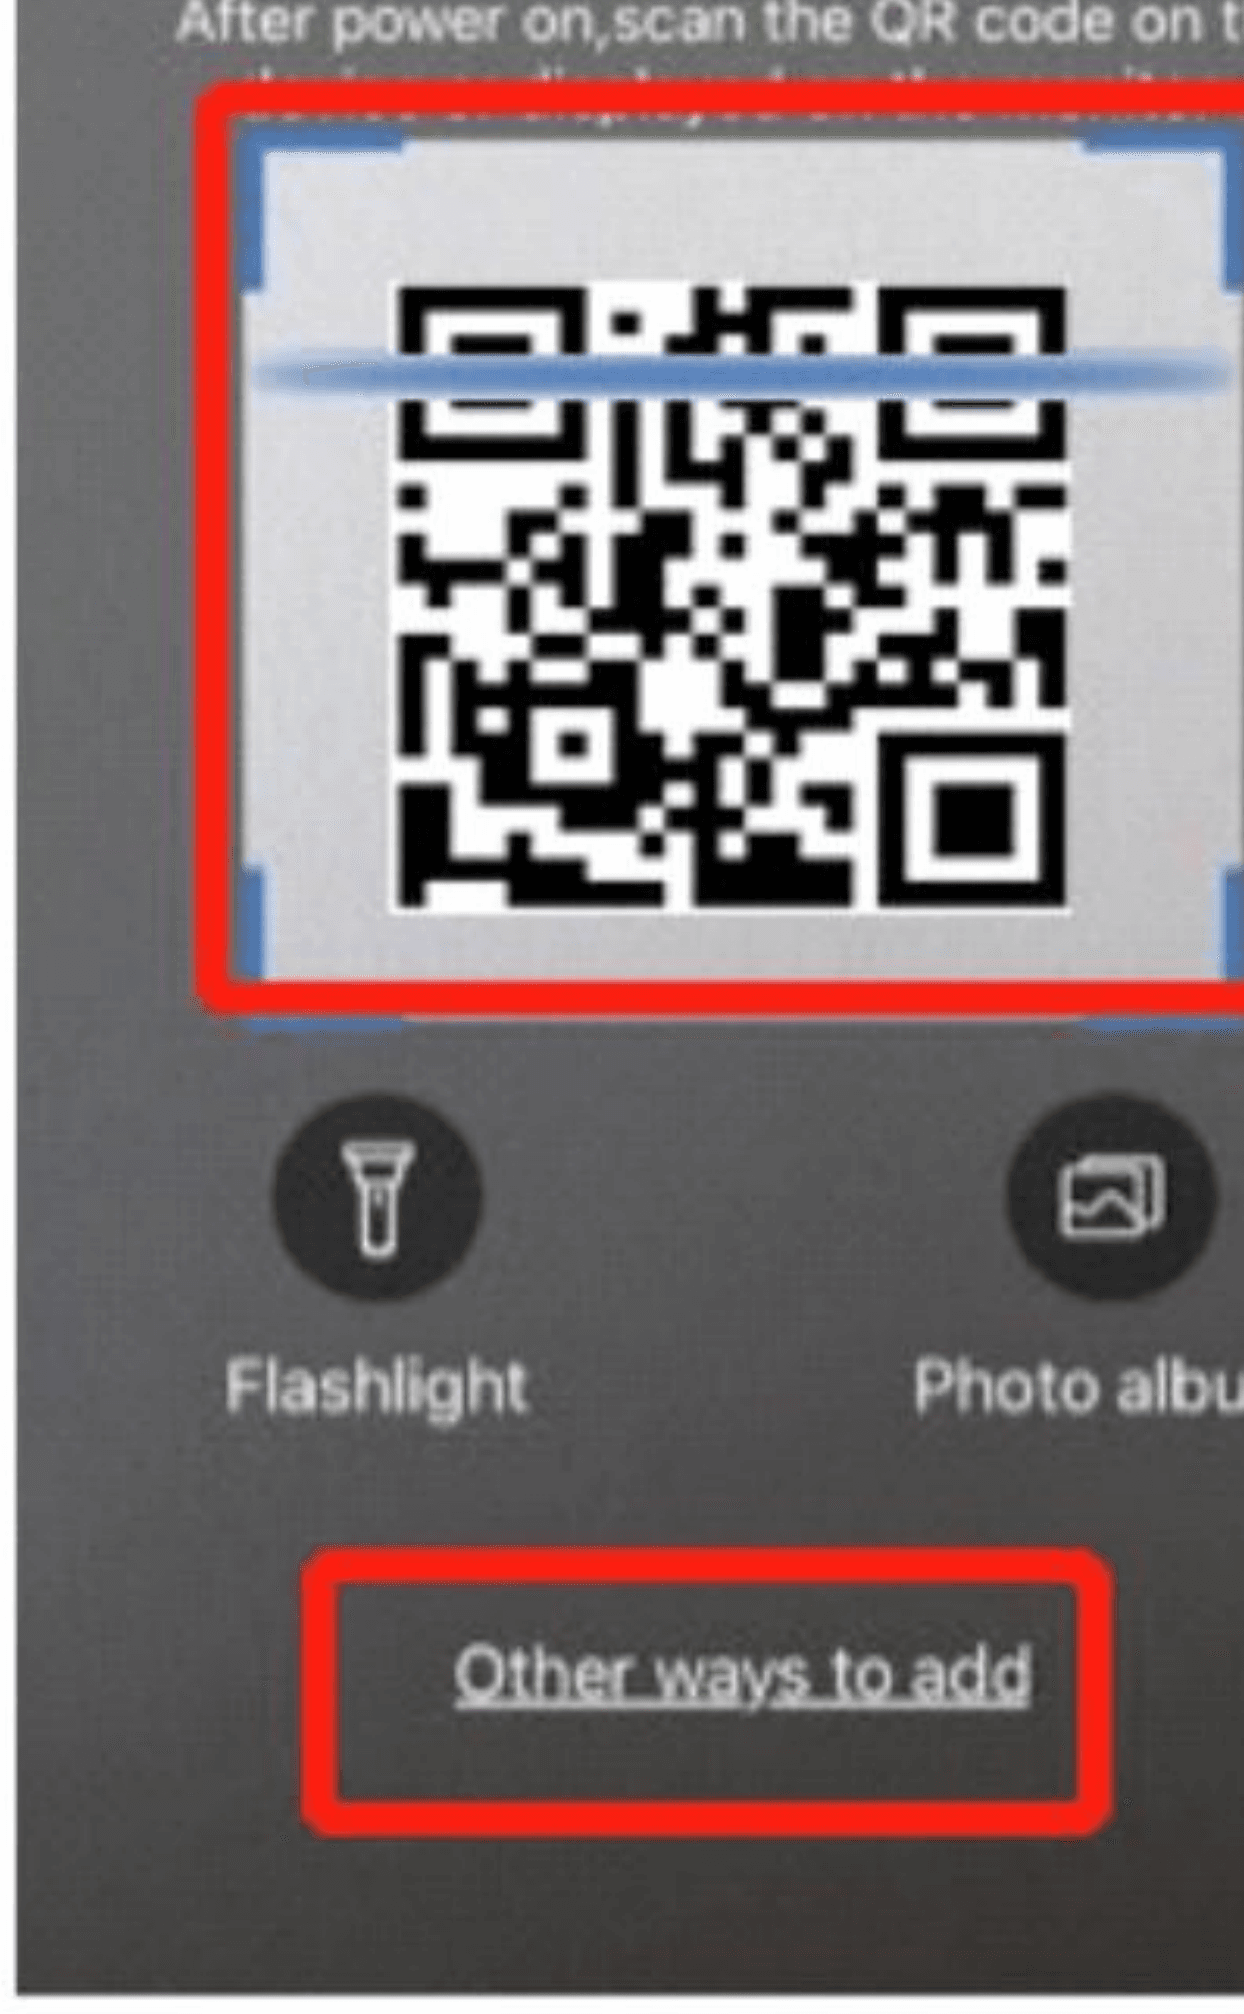
3. Scan the QR code on monitor, or you can put Cloud ID in your APP
Please scan the QR code at NETWORK SETUP or add Cloud ID (it is at the right down corner of your video home page).
a) Scan QR code
Scan the QR Code from the monitor on the NETWORK SETUP page.
b) Add Cloud ID
Instead of scanning the QR Code, putting the Cloud ID is another option. Add the Cloud ID from the RIGHT DOWN CORNER of your monitor.
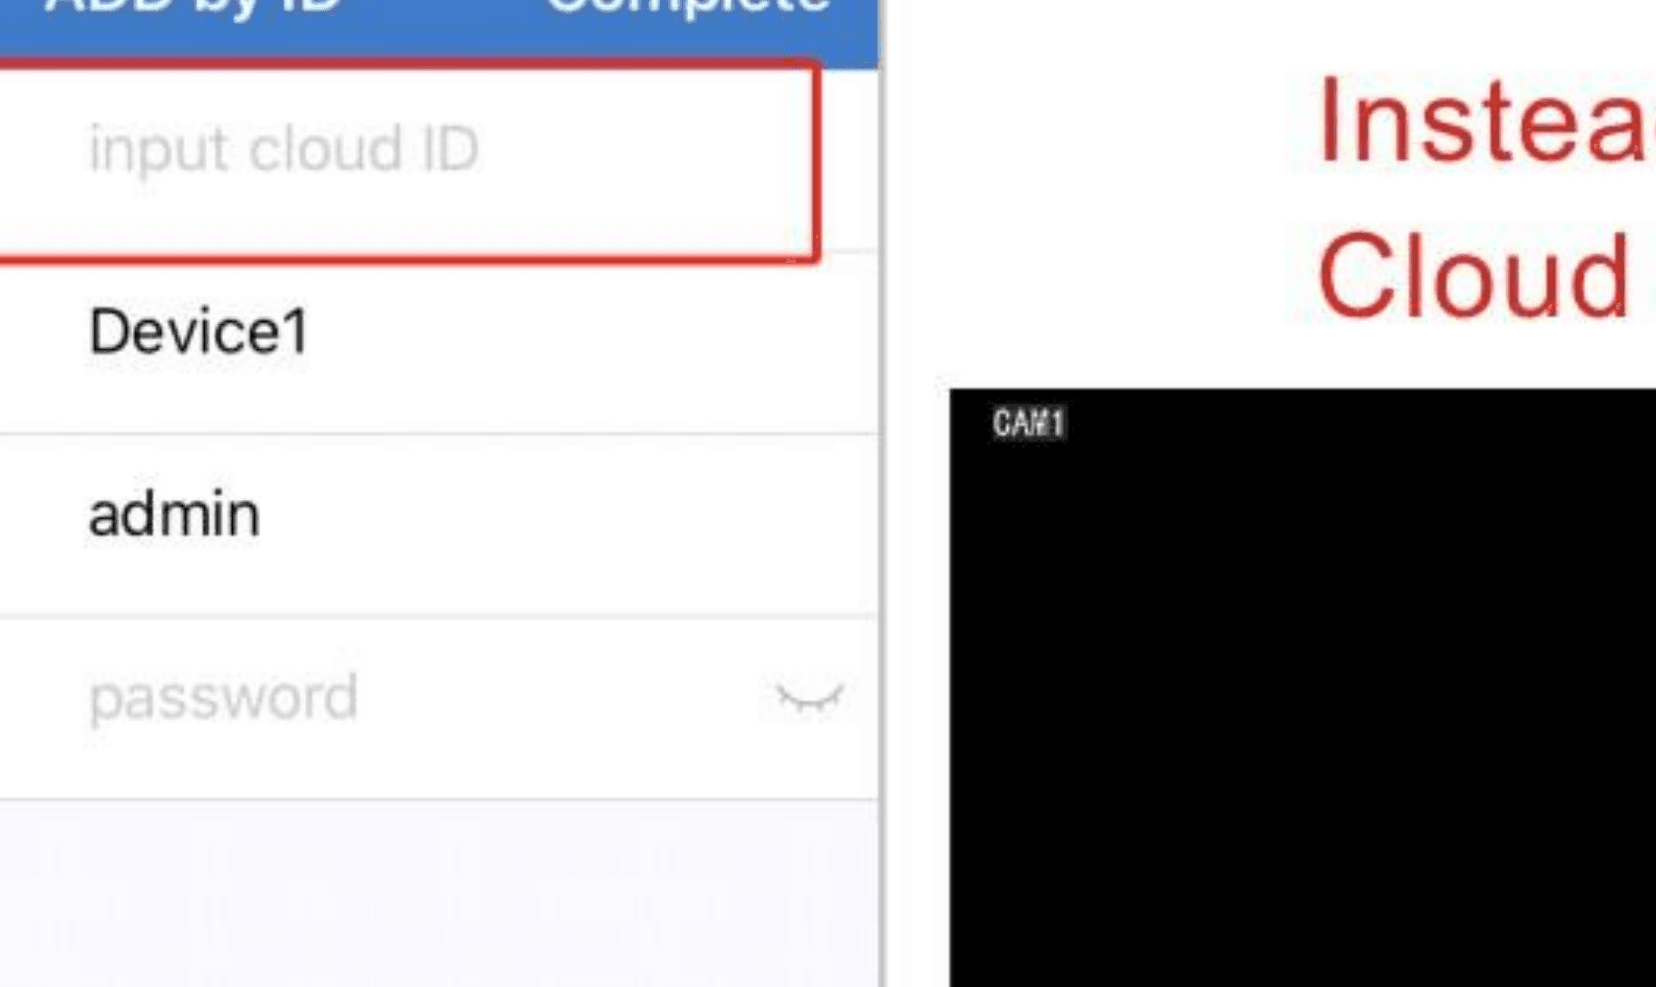
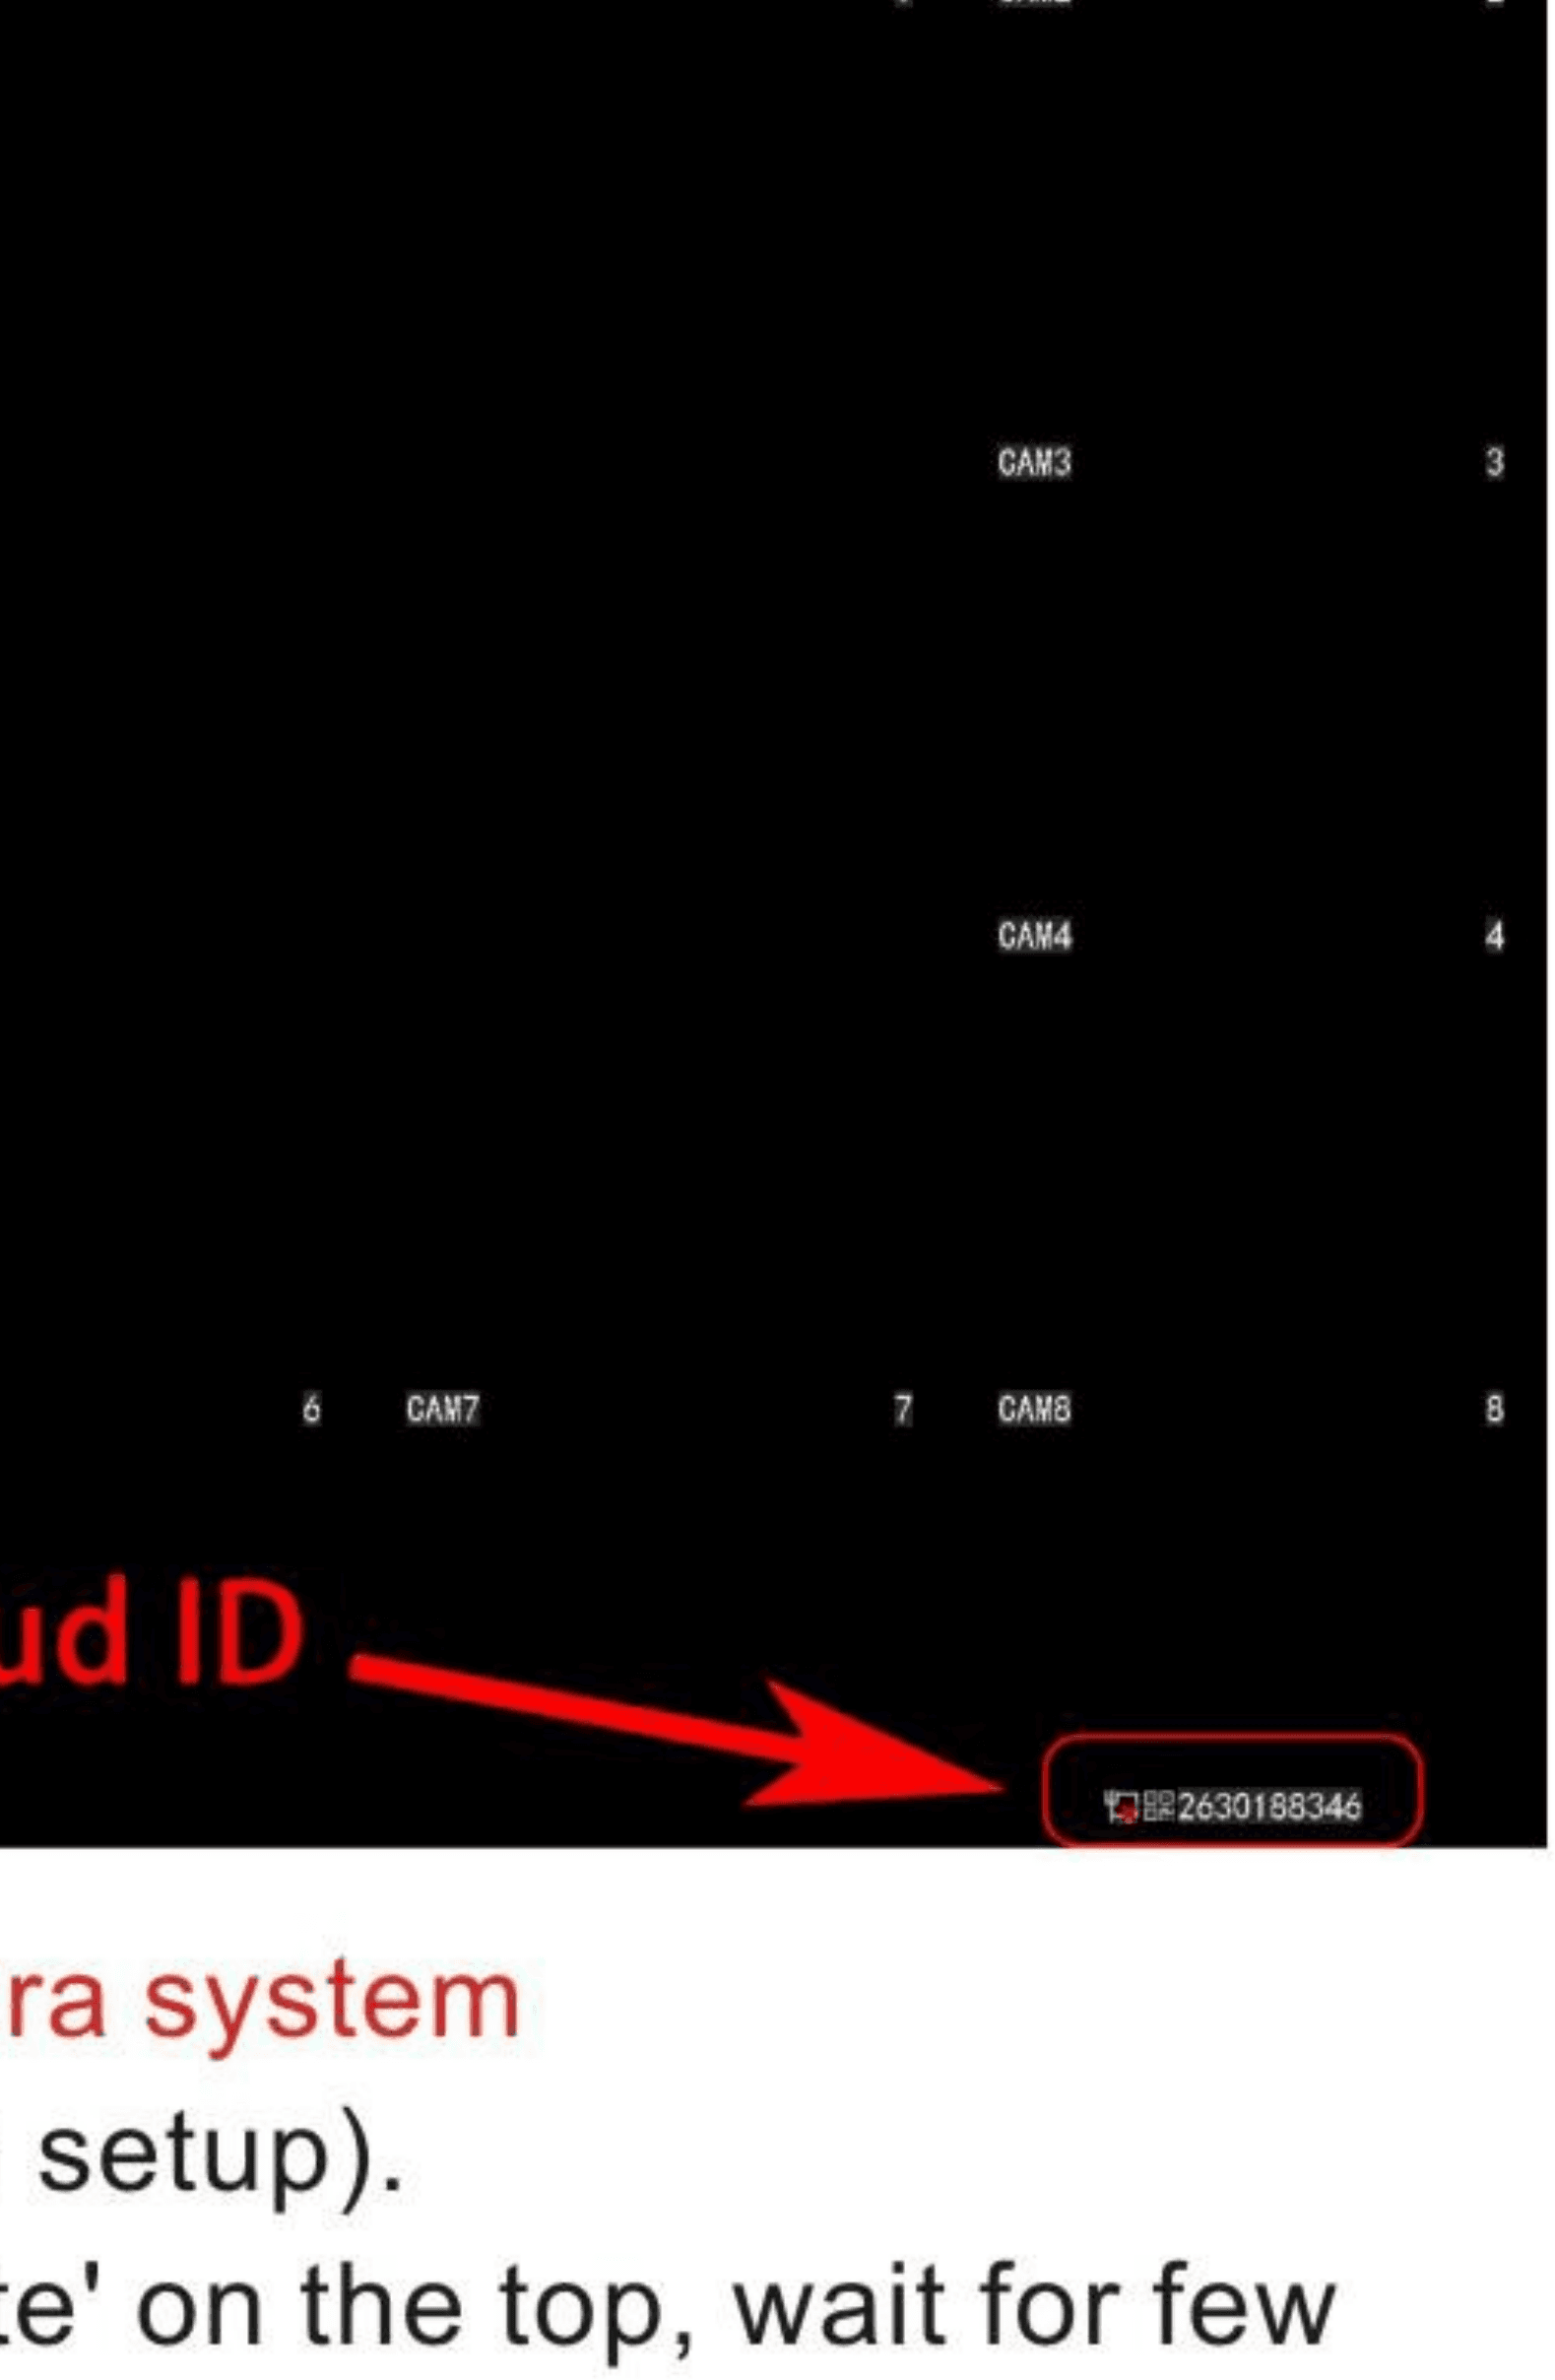
Password is the same with your camera system (no password required in first time system setup). After you input/scan the Cloud ID, click Complete on the top, wait for a few seconds until add device success. Select COMPLETE at the right up corner, wait for a few minutes for videos to update.
Laptop Setup (CMS)
1. Please download CMS EseeCloud on OOSSXX website
Please visit www.oossxx.com. Click Download. For PC (Windows), please visit PC (Windows) CMS Client English; for MAC, please visit MAC CMS Client English.
2. Install CMS on your computer / laptop / Mac
3. Login to EseeCloud
Username: admin. Password: keep in blank.
4. Click ADD to add your camera system on computer
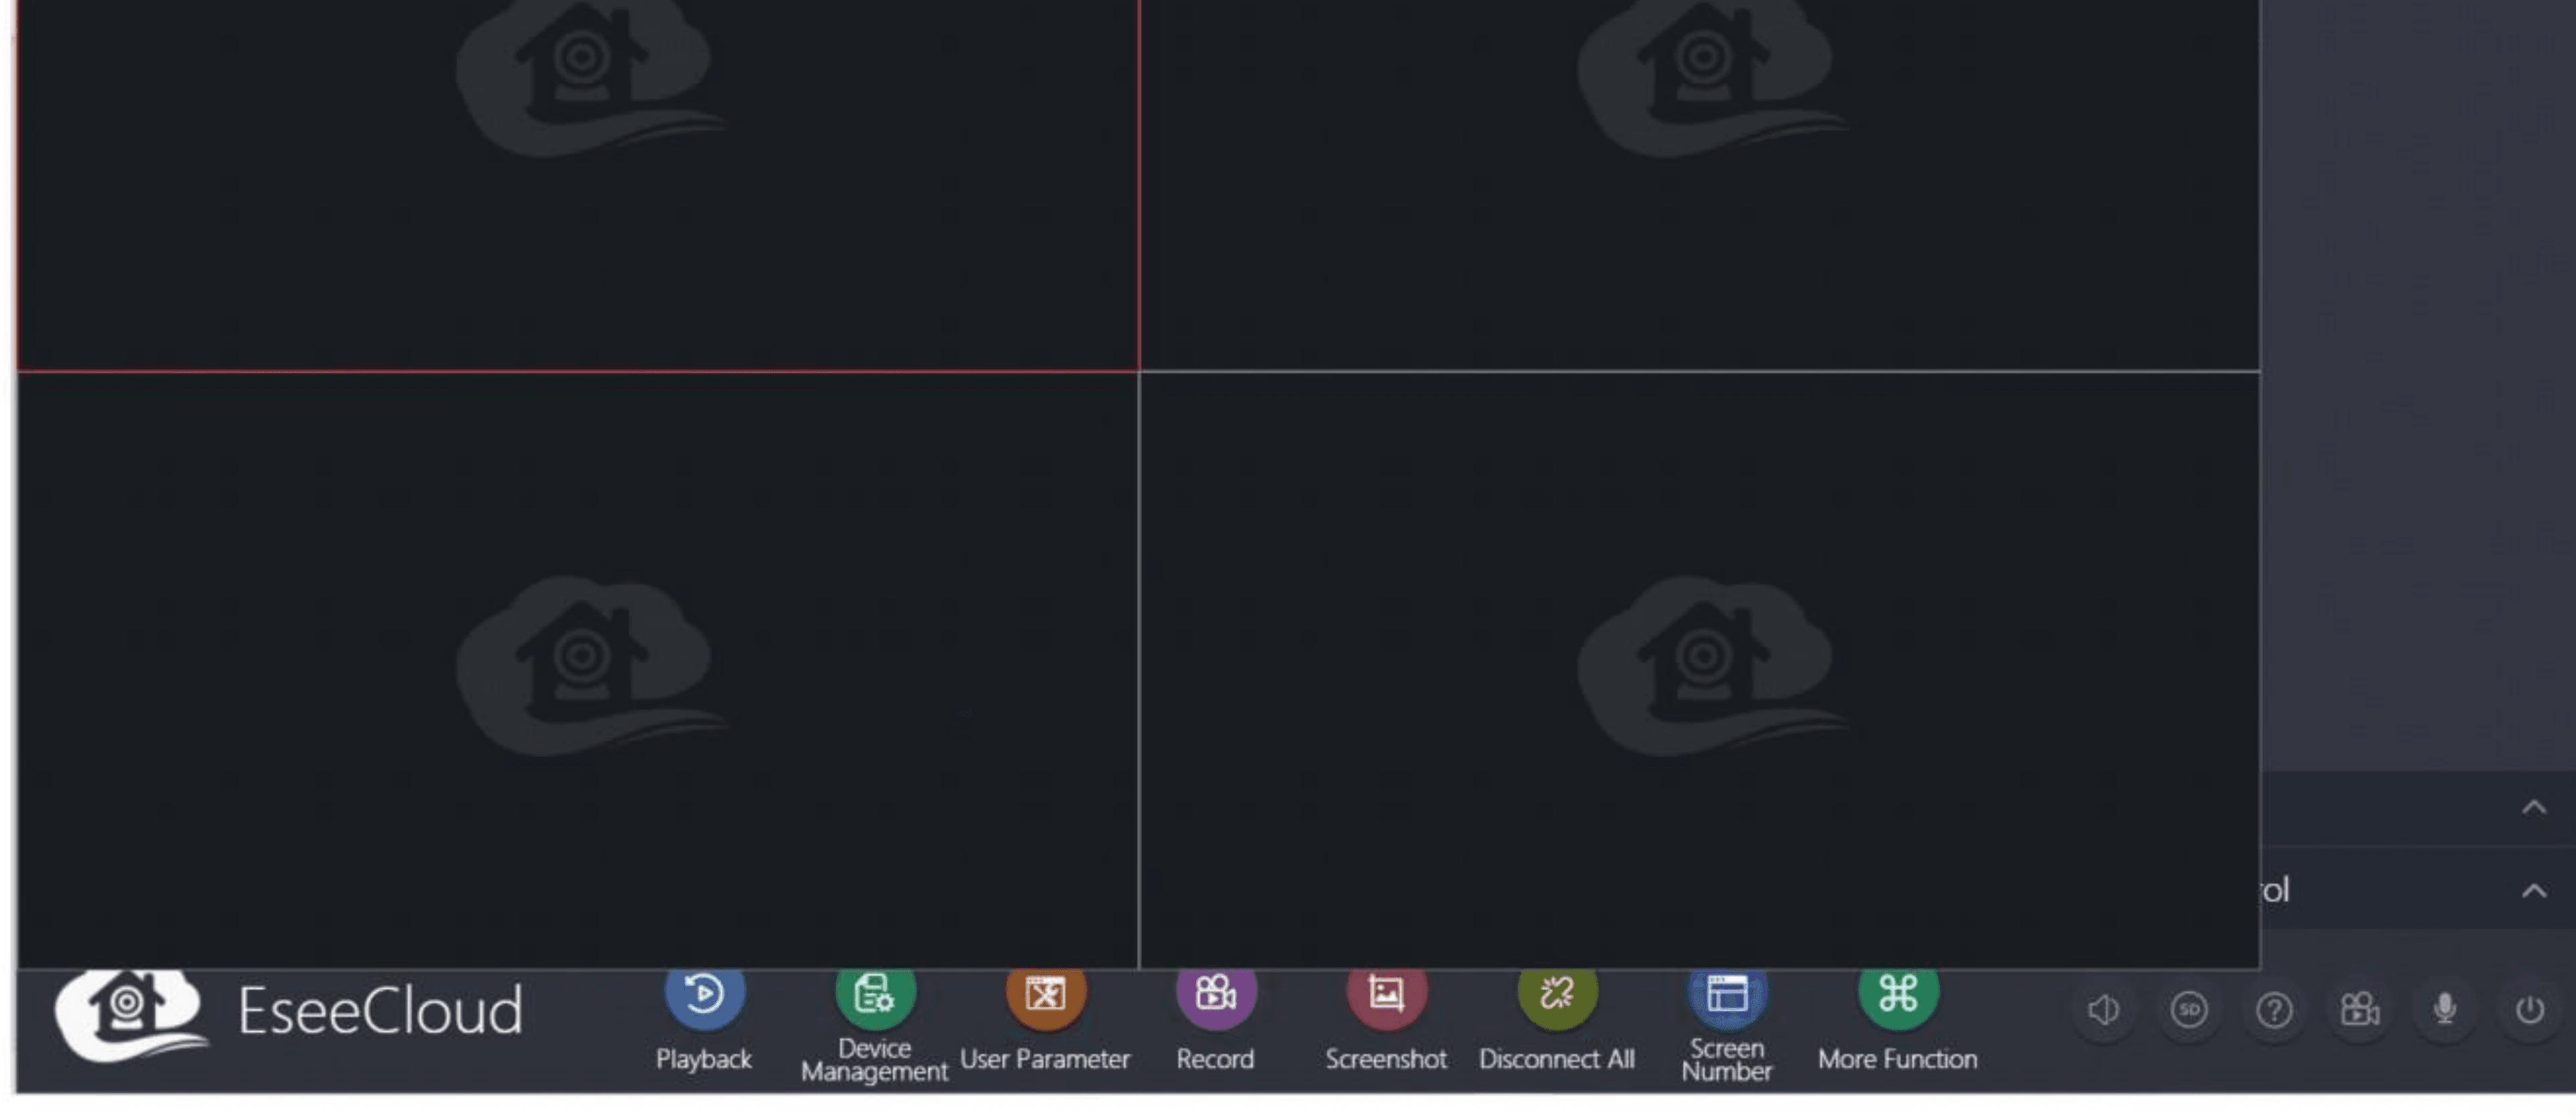
5. Fill in CLOUD ID, PASSWORD, NUMBER OF CHANNELS
Cloud ID is at the right down corner of your monitor, please keep Cloud ID online by connect NVR to router with an Ethernet cable.
PASSWORD is your camera system password. Number of Channels means the number of your cameras.
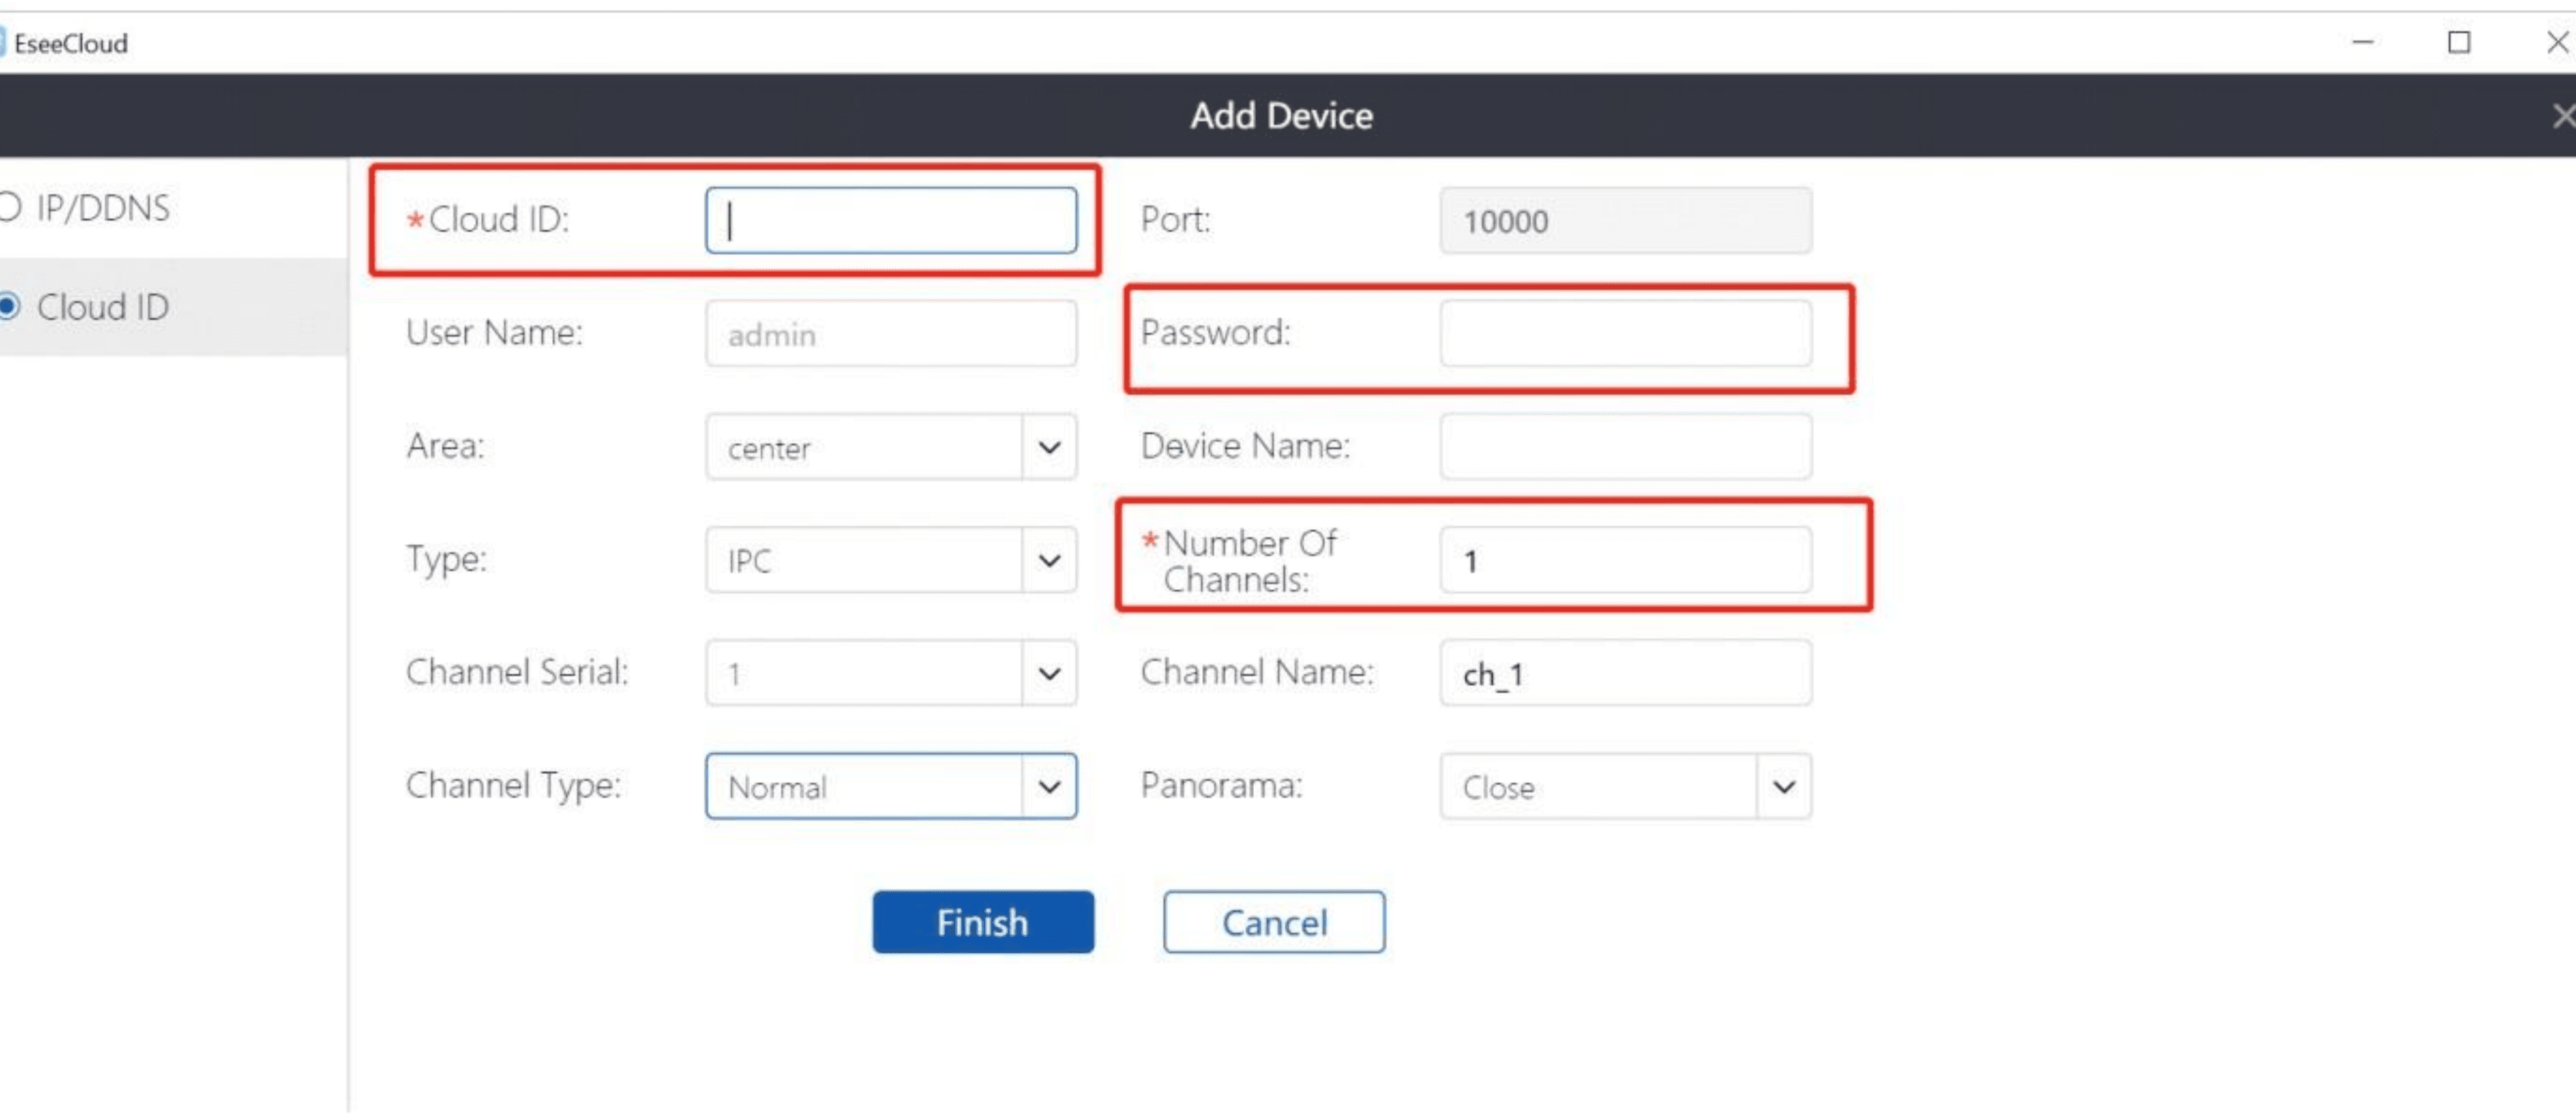
6. Click FINISH
Click FINISH and wait for a few minutes to have cameras add to your system.
7. Playback, Record and Screenshot
You can PLAYBACK, RECORD and SCREENSHOT (hard drive is required to have these functions).
Email Setup
Go to Channel setup → motion detection, select the channel as need, check on Email notice, click apply to network setup → Email.
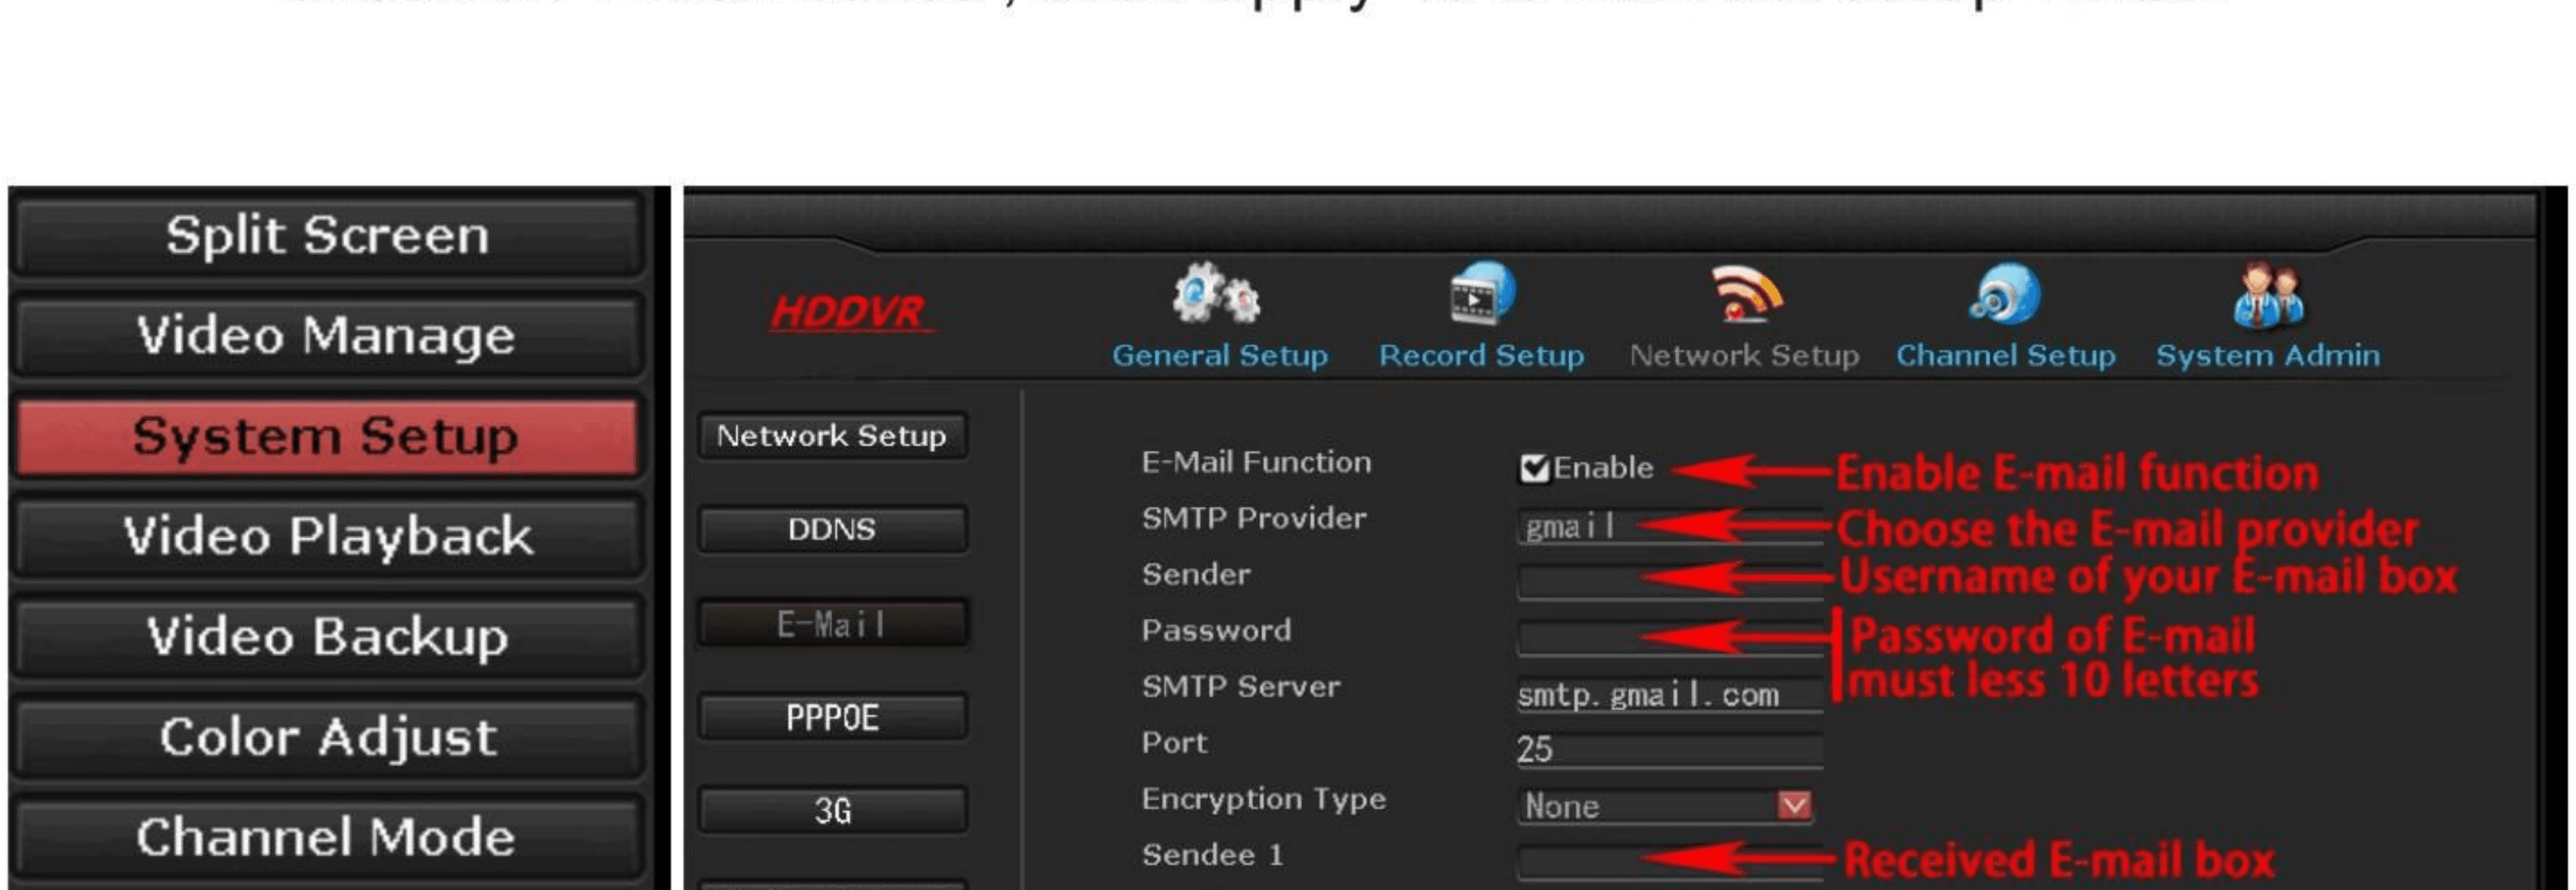
In the E-mail setup interface, the following items need to be configured:
- a) Enable E-mail function.
- b) SMTP Server: The input format is smtp.live.(yahoo./gmail.)com.
- c) Port is 25.
- d) Username: Your username of your mailbox. For example: if your mailbox is [email protected], your username is [email protected].
- e) Password: Password of your email.
- f) Encryption Type: You don't have to select it, but if the test fails, modify it to SSL.
- g) Sender: Your email address (for example: [email protected]).
- h) Sendee: The email address you use to receive email from the sender (for example: [email protected]).
- i) Subject: default is ok, you can change according to your need.
- j) Interval: The time interval for receiving emails (if the alarm triggering frequency is high, short interval can lead to a full inbox).
- k) Enable Health Mail: Used to detect the DVR input is running normally.
- l) Health mail interval: The time interval for sending messages when the device is running normally.
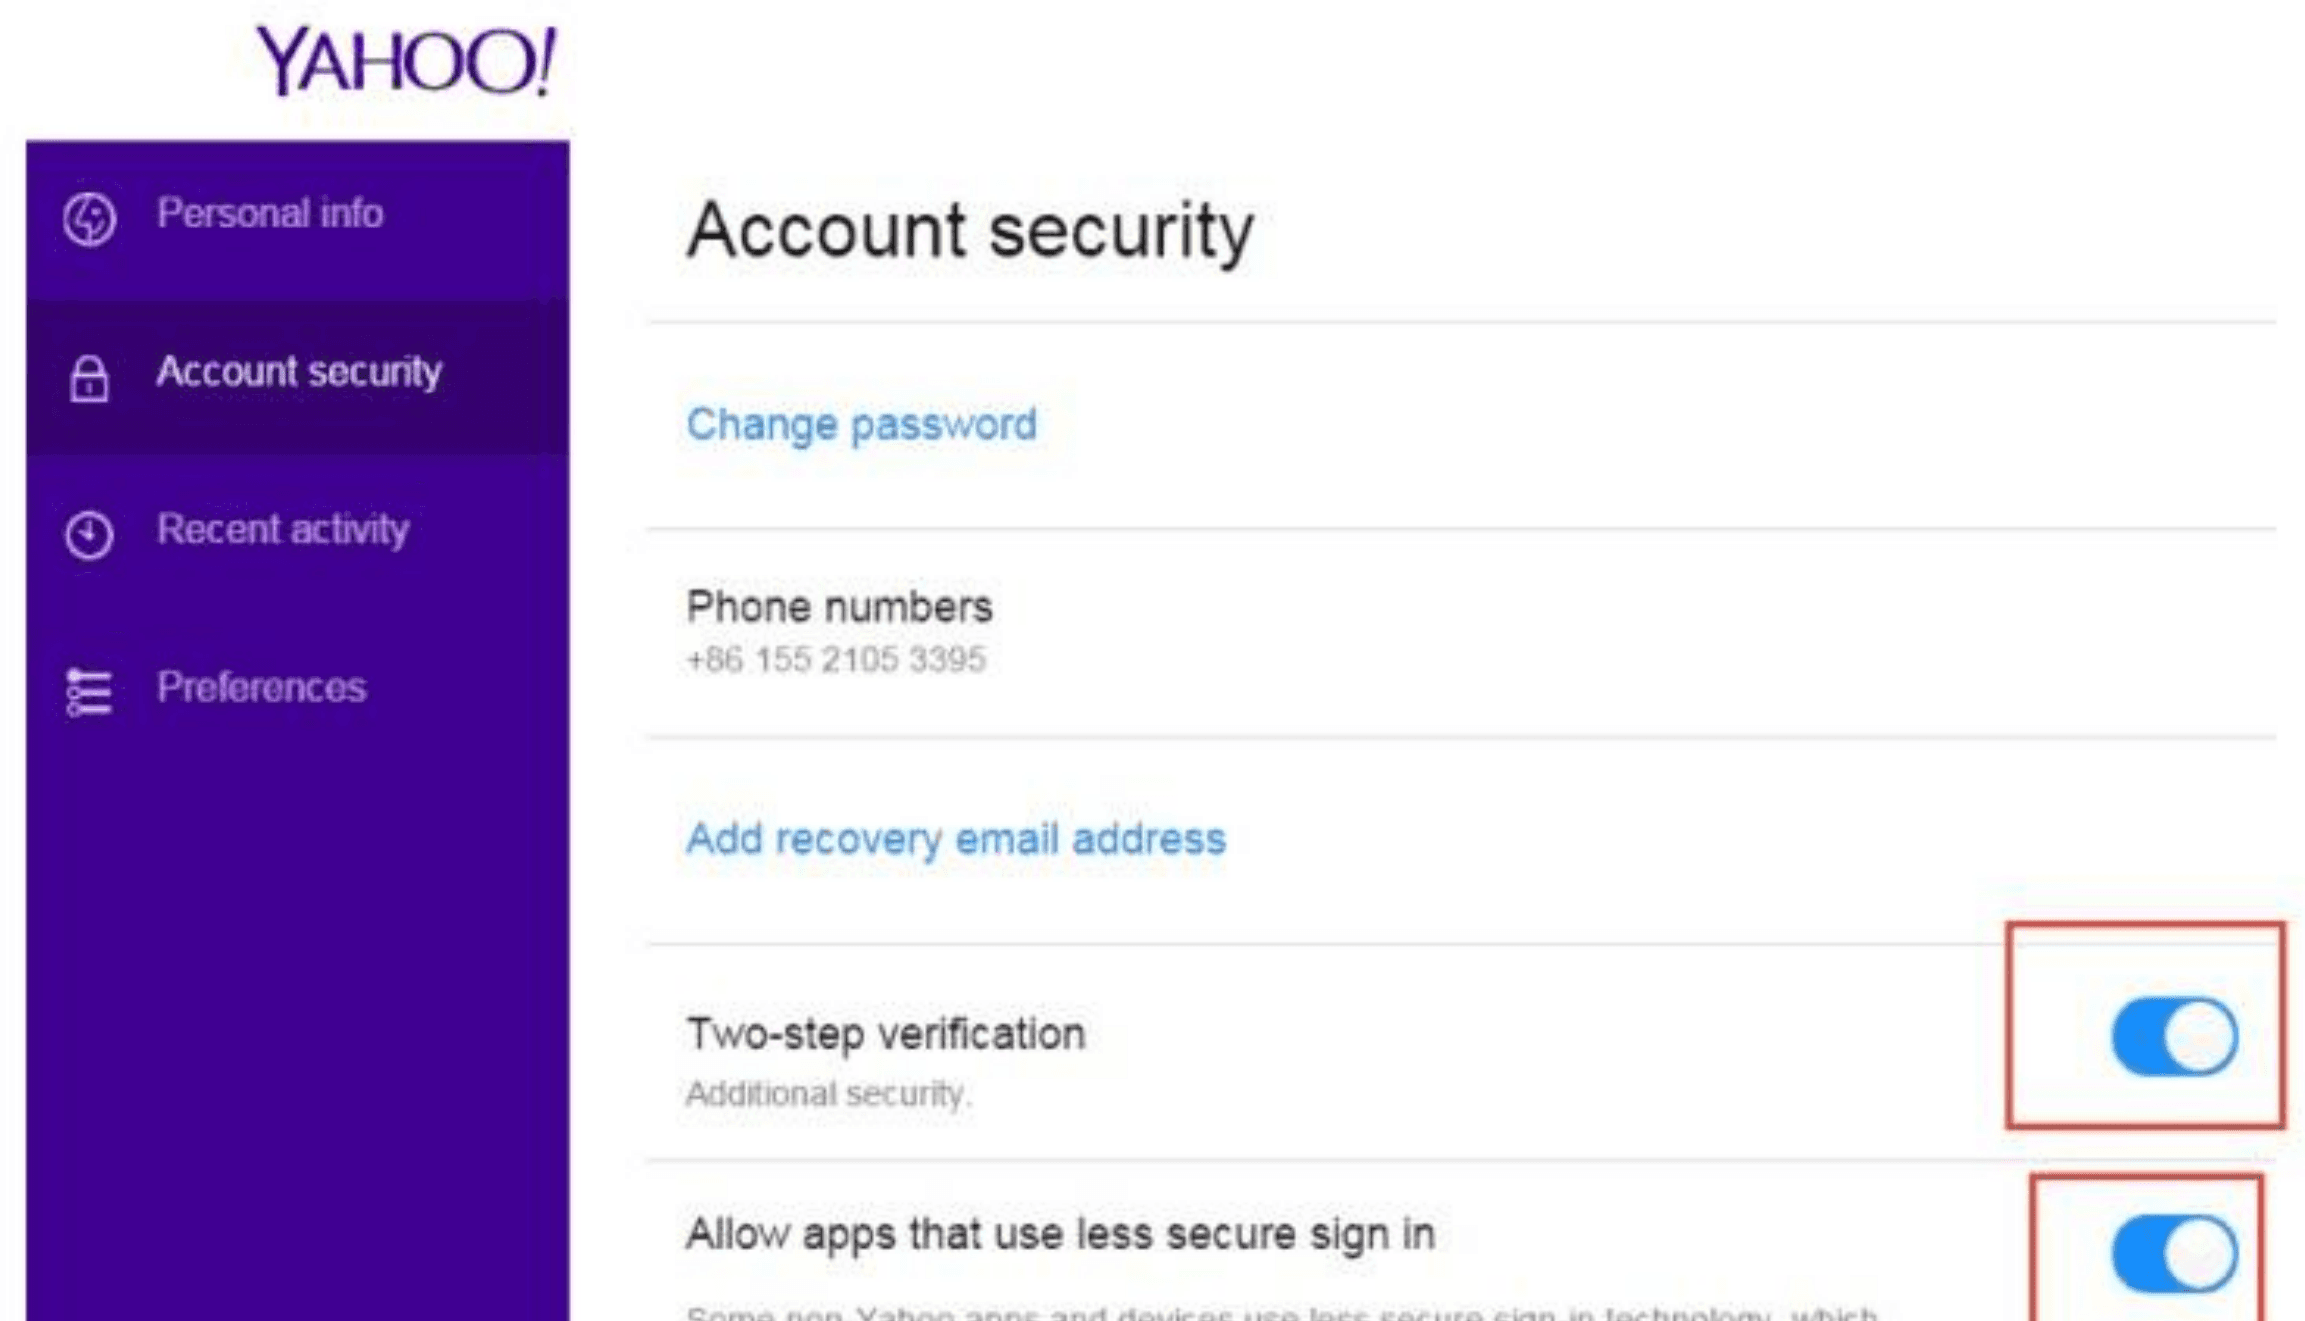
Yahoo E-Mail box Setup Demo
Login yahoo account, close "two-step verification", meantime Allow apps that use less secure sign in. As below:
Recording Setup
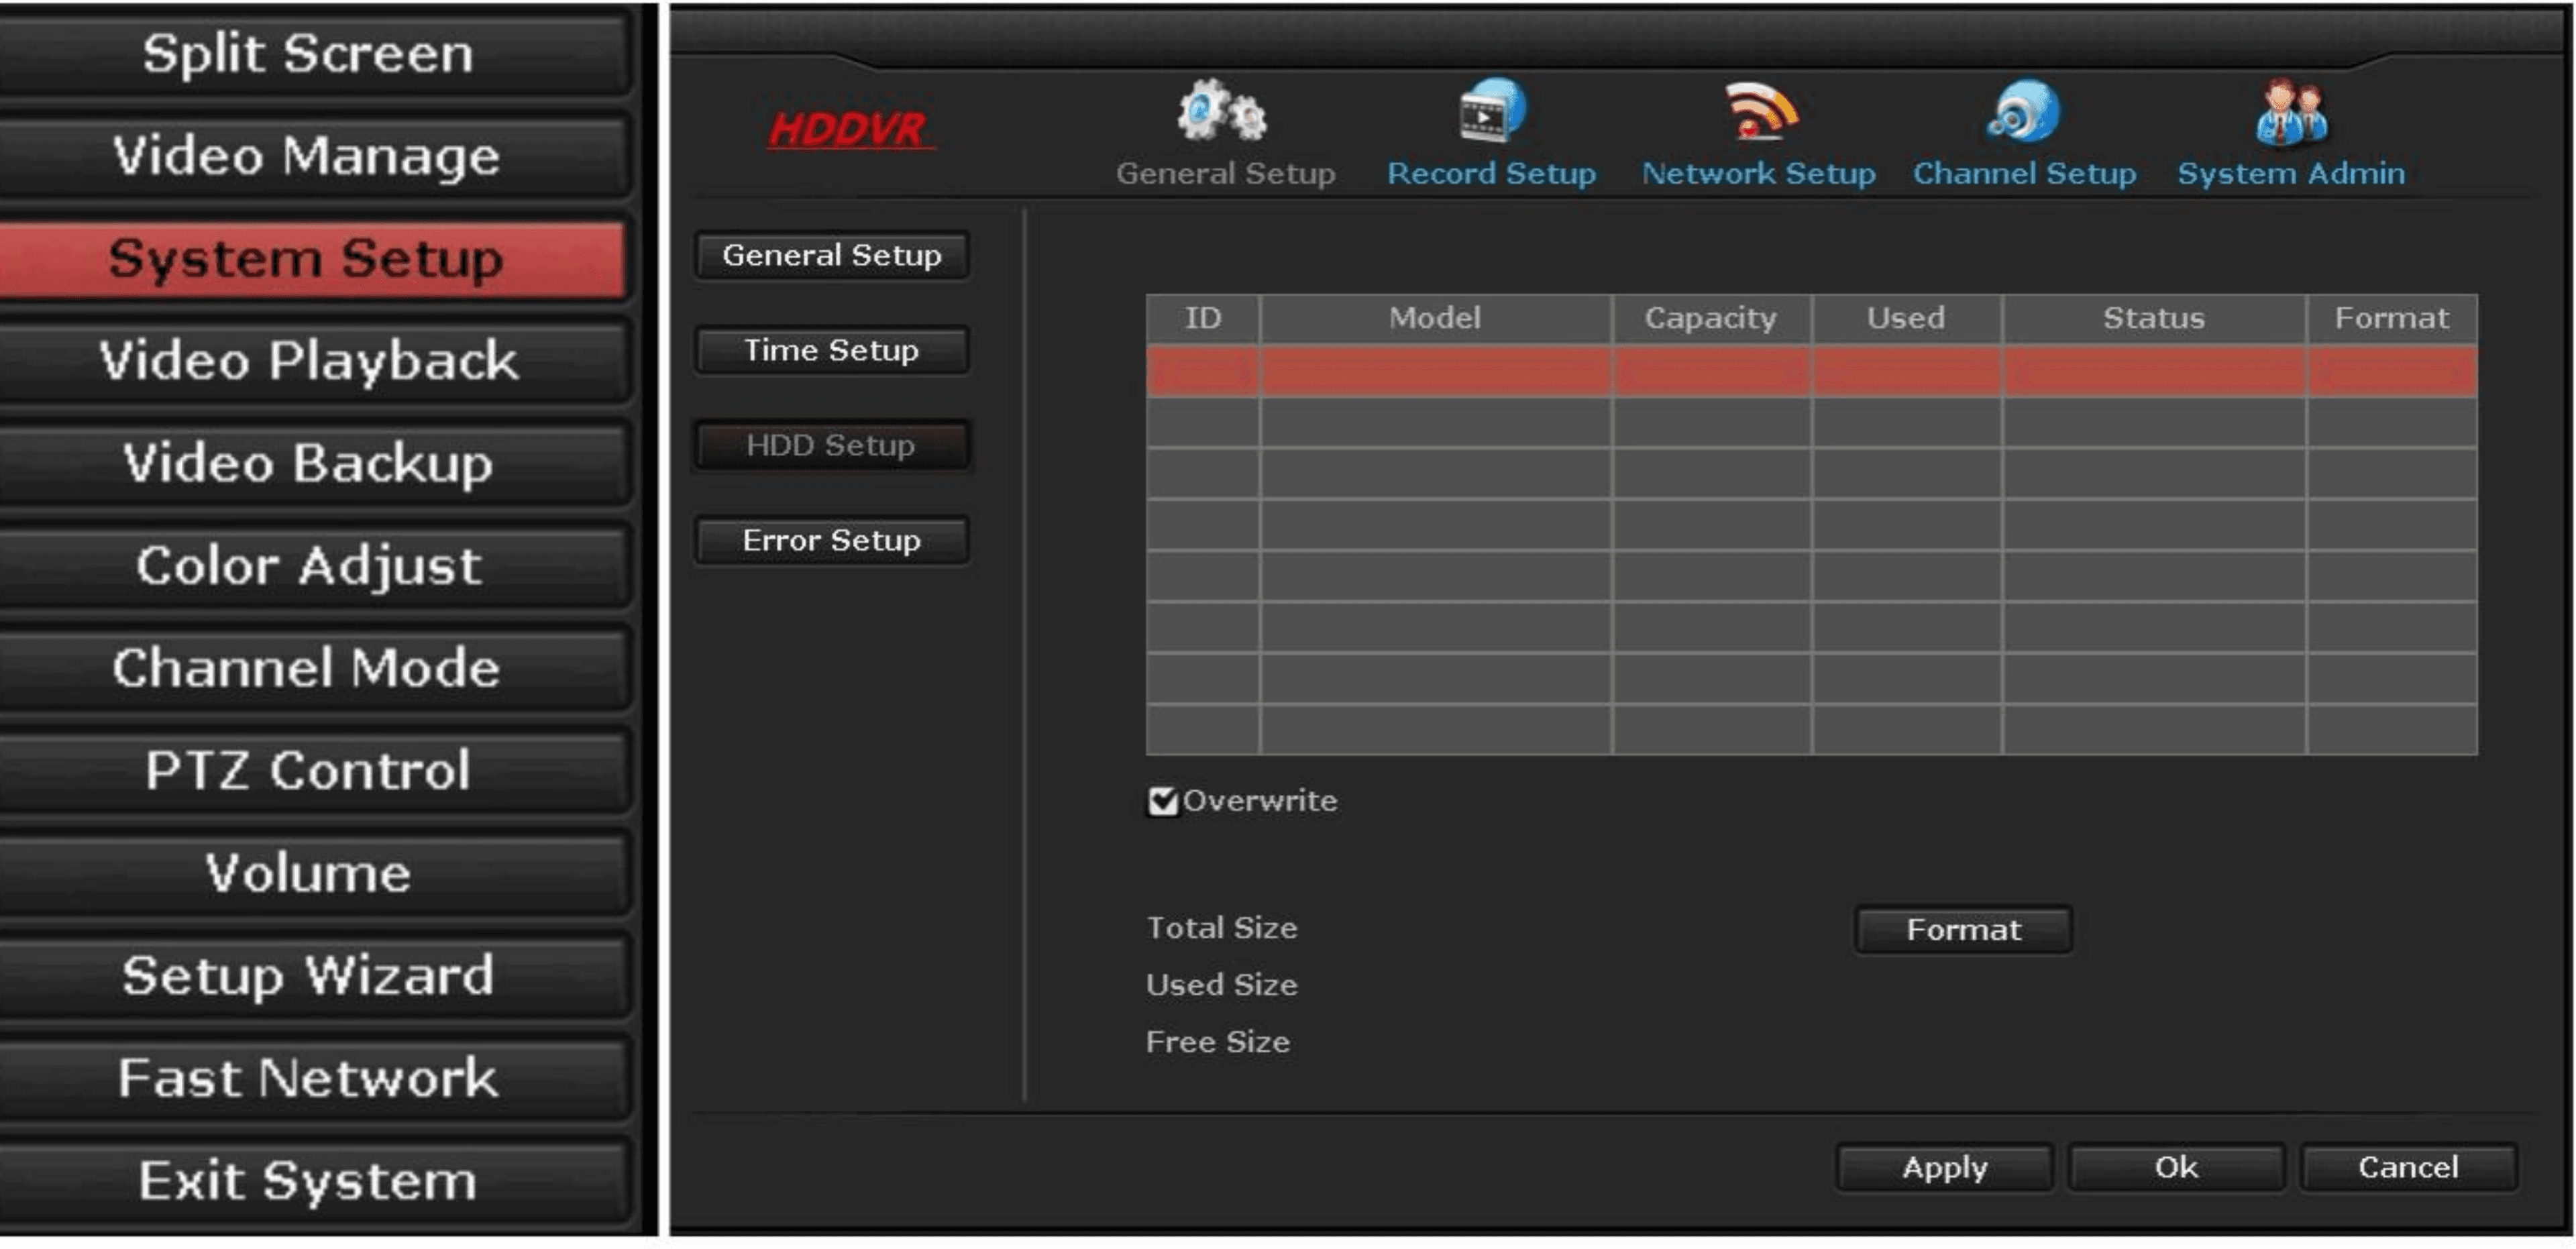
1. Format hard drive
- a) Click SYSTEM SETUP, GENERAL SETUP, HDD SETUP.
- b) Please check 1 and 2 as the image below, wait for 2 minutes.
- c) After format hard drive, click CANCEL to exit the page.
You could check the box Overwrite so that it will auto overwrite the records with new videos when the HDD is full; you could also edit days in Auto delete old files.
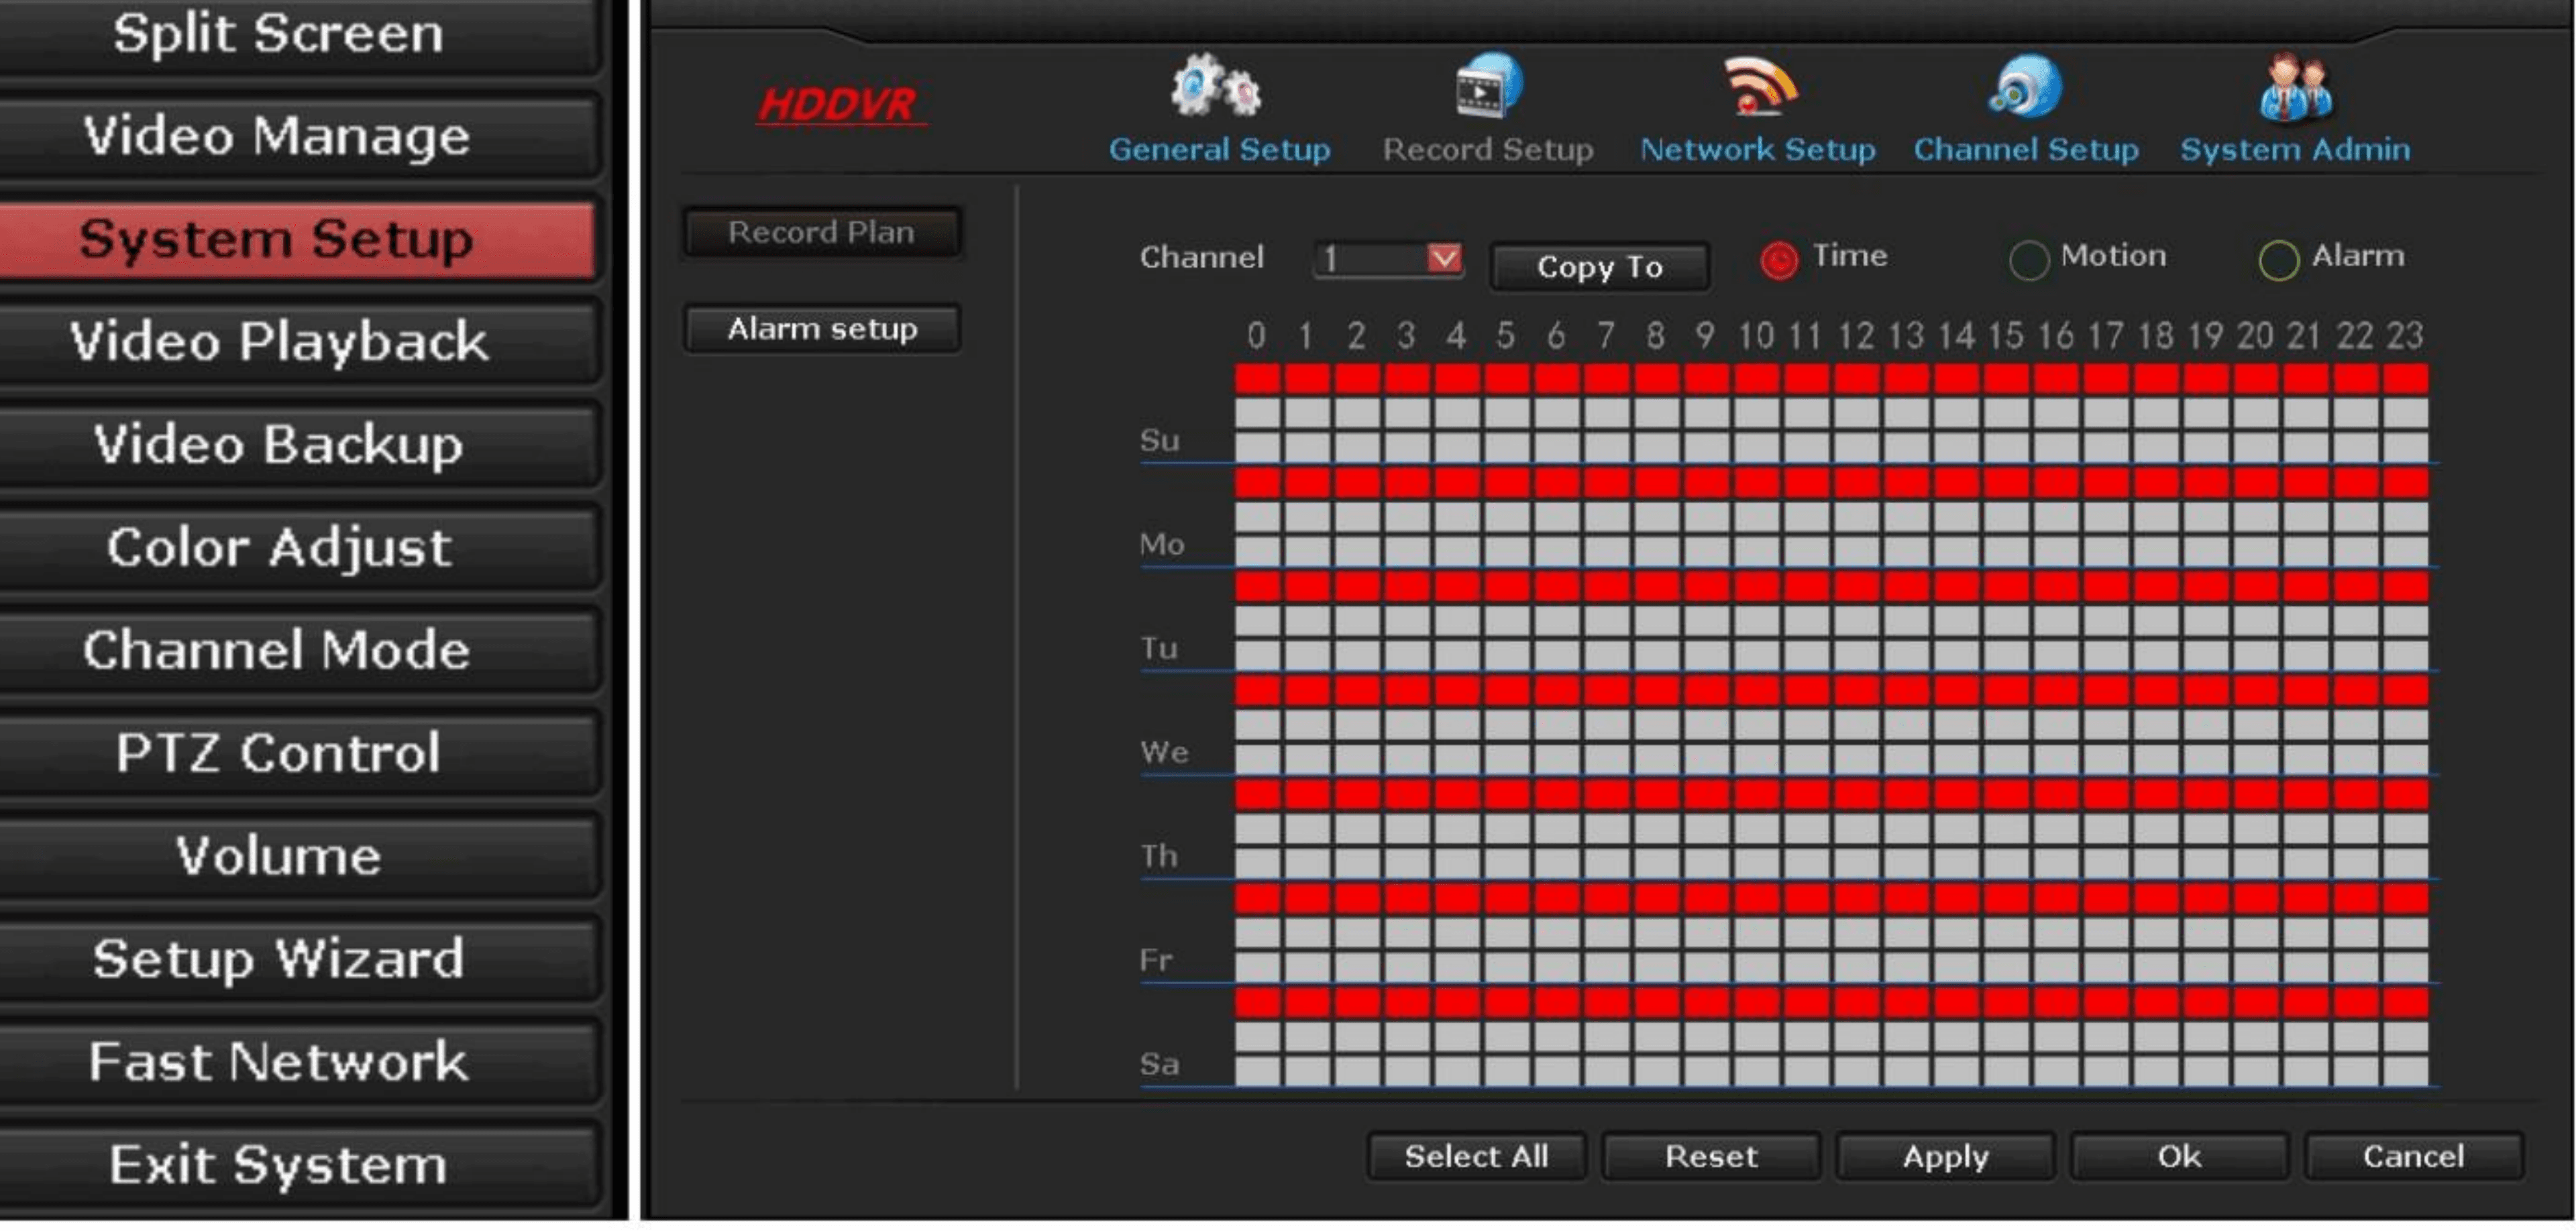
2. Recording by TIME and Motion Detection
1) Time recording
- a) Select a camera that would like to have it record during specific time period.
- b) Choose TIME.
- c) Drag with mouse to select days and hours that the cameras would be recording.
- d) Click COPY TO if all cameras have the same setup.
2) Motion detection recording
- a) Select a camera that would start record when motion is detected.
- b) Choose MOTION.
- c) Drag with mouse to select days and hours that the cameras would be recording.
- d) Click COPY TO if all cameras have the same setup.
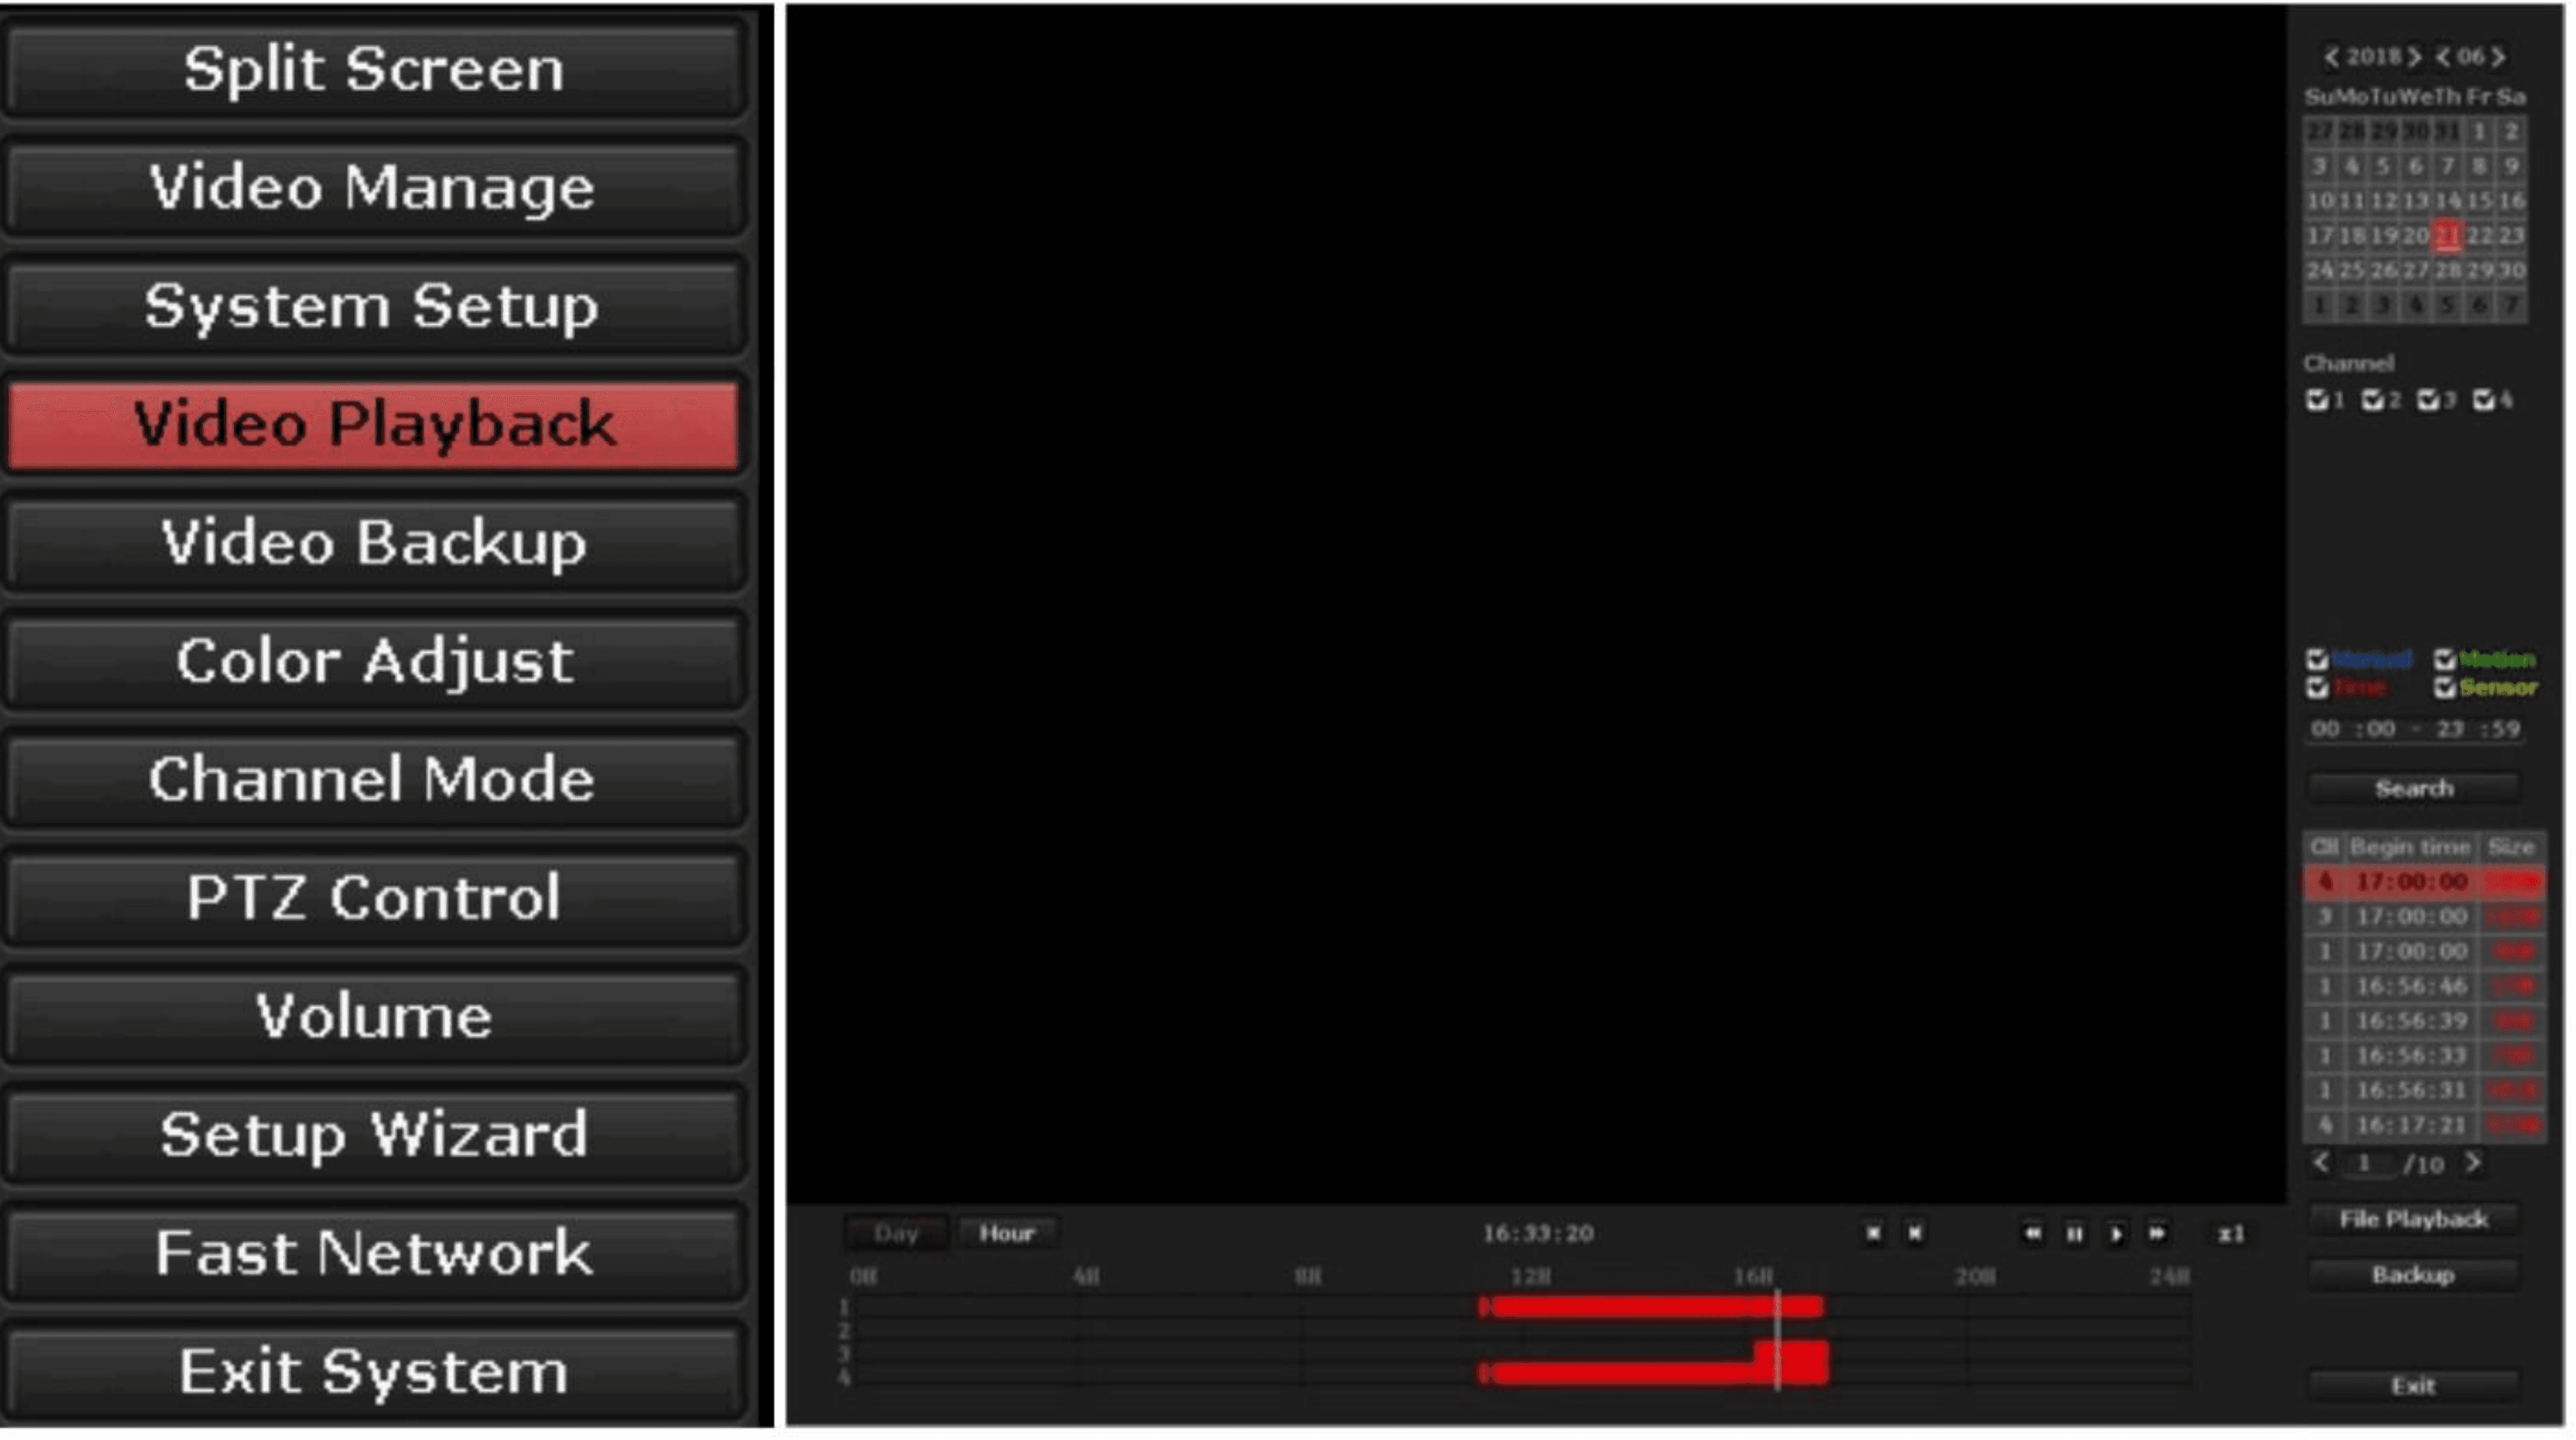
Video Playback
Only systems with hard drive pre-installed are able to have videos play back.
- Right click at home video page, click VIDEO PLAYBACK.
- Select the date and time, channels that you would like to have it play back.
- If necessary, select TIME and MOTION play back.
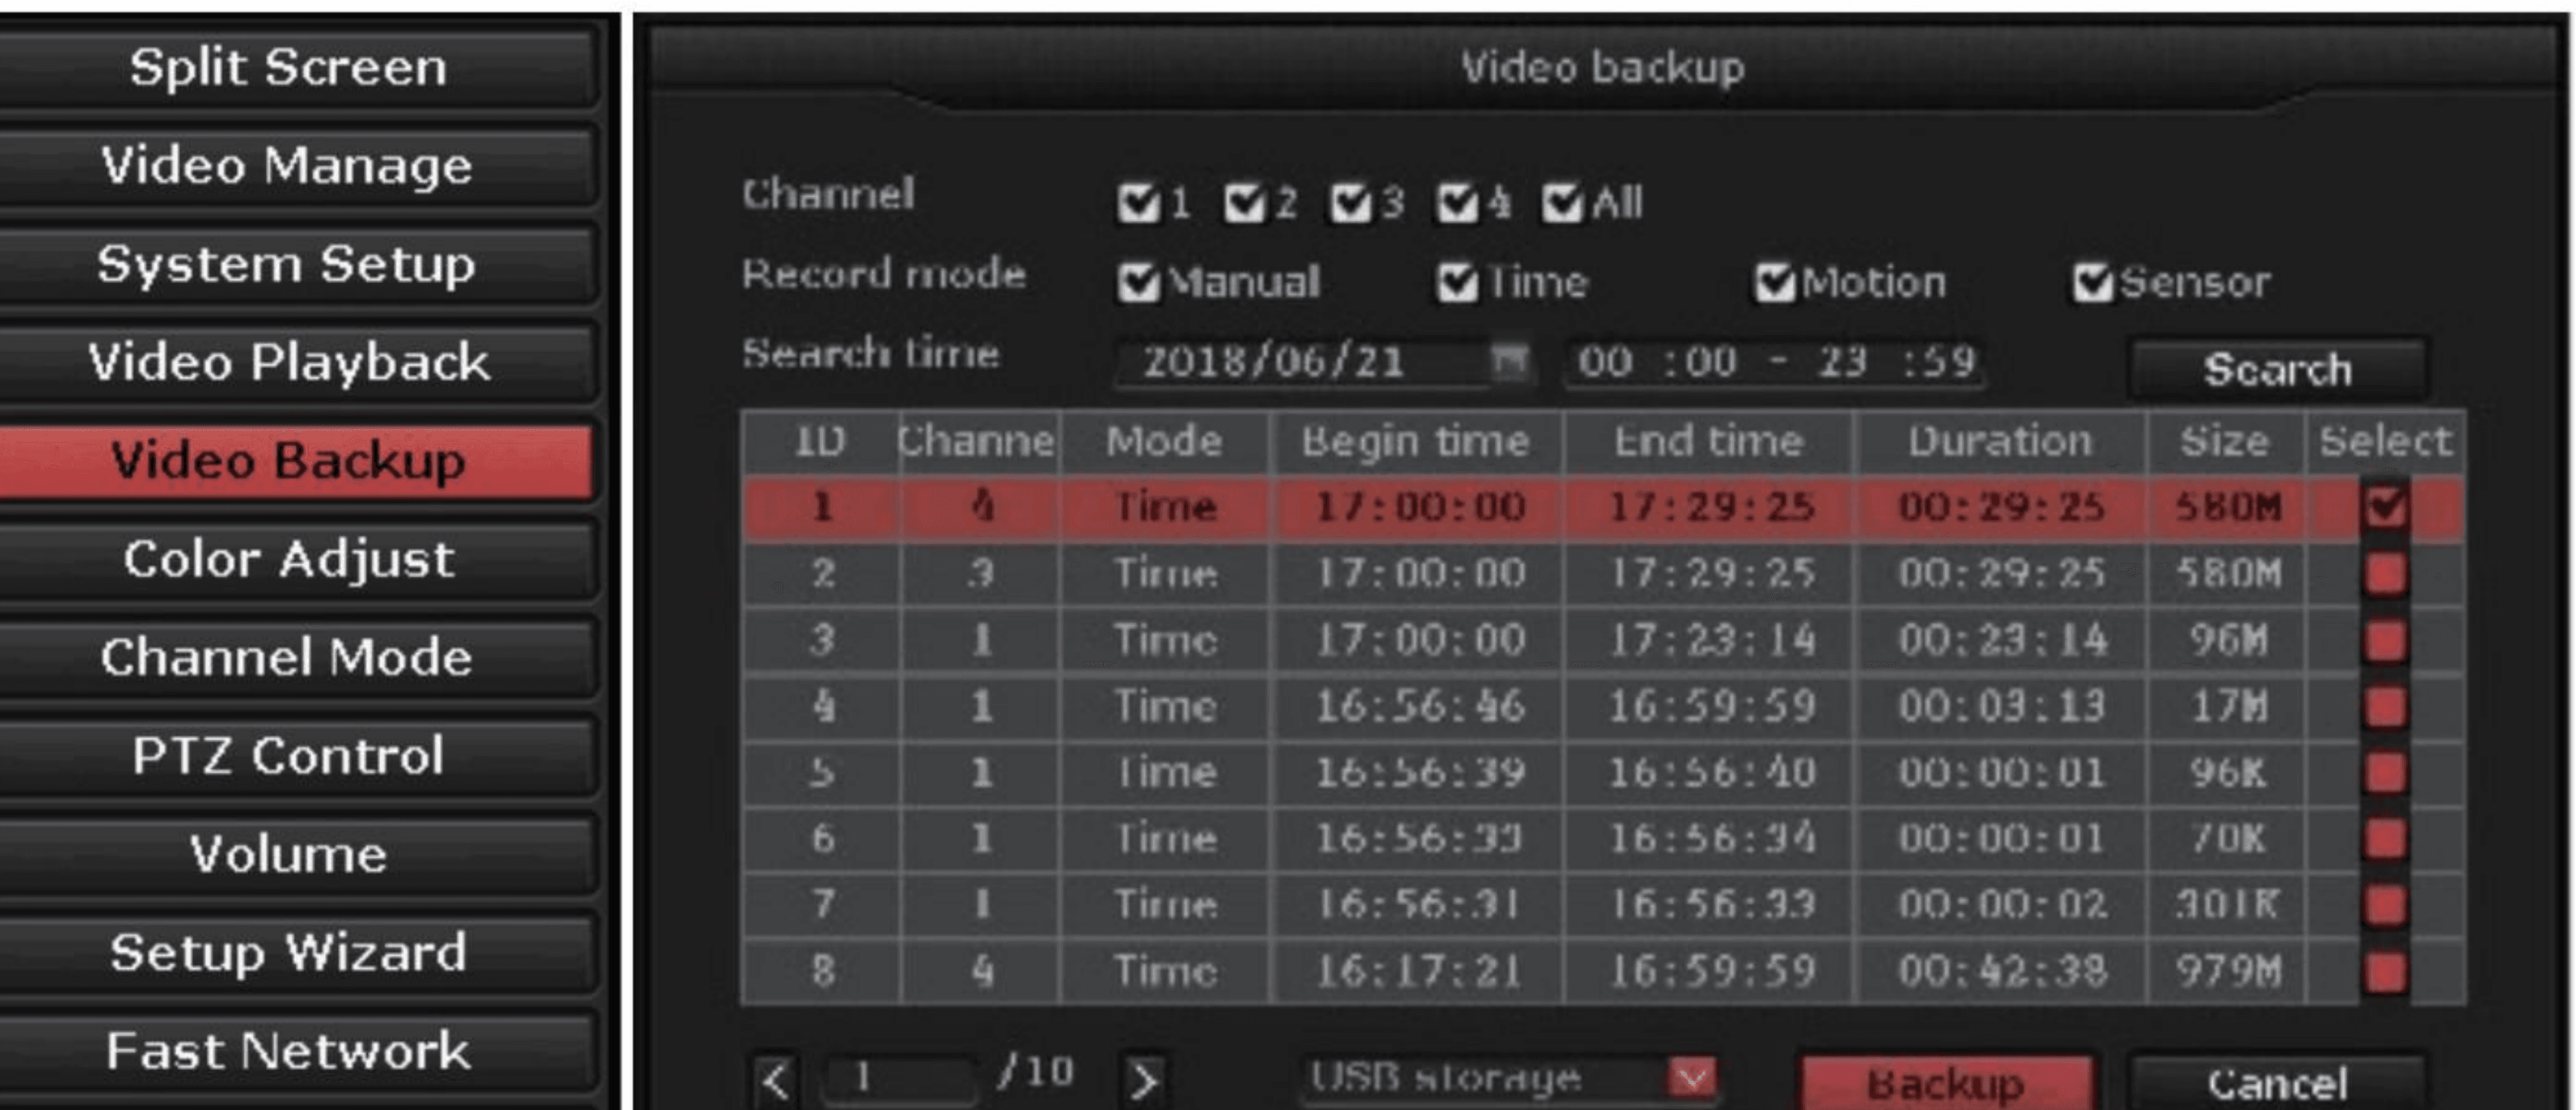
Video Backup
Only systems with hard drive pre-installed can have videos backup.
- Right click at home video page, click VIDEO BACKUP.
- Select date, time and channel that the video you would like to backup, and click SEARCH.
- Select the videos that you would like to BACKUP, and click BACKUP button.
- The screen will start count down for one minute, and please insert U-Disk. The system will automatically backup videos in the U-Disk.
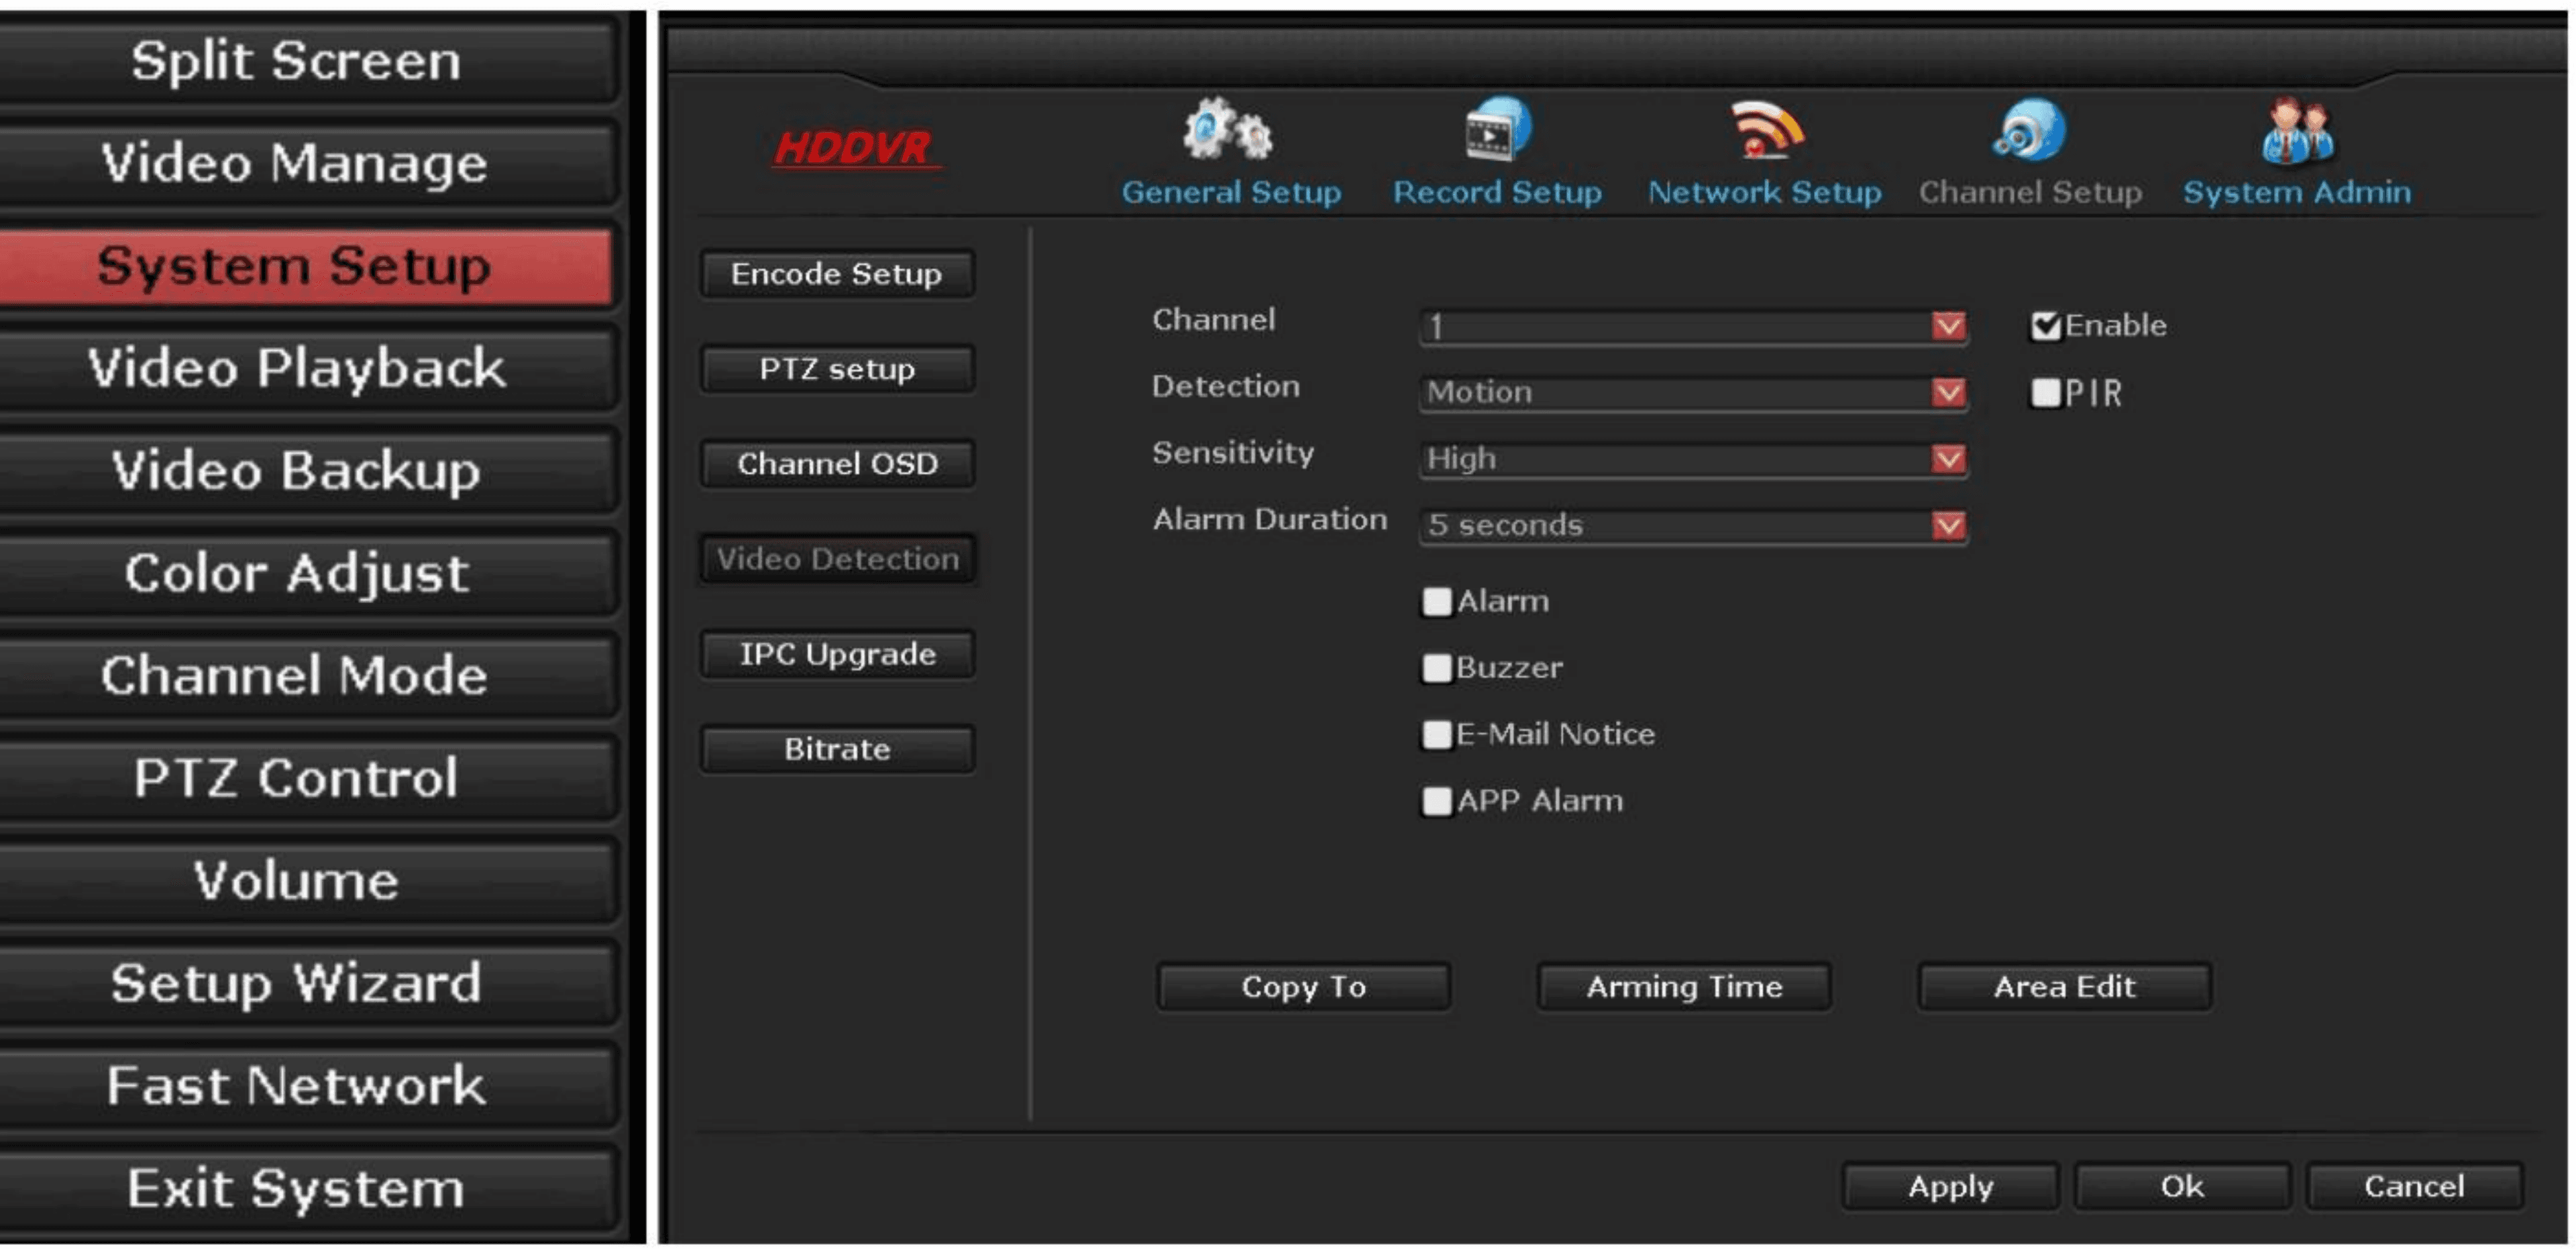
Motion Detection
There are three ways to get alarm when motion is detected.
- Buzzer: System will make alarm, and a triangle alarm sign will show on the left down corner of the screen. Click it, you will see the date, time and channel information that motion is detected.
- Email: A notification will be sent to your email that a motion is detected with a screen shot of the motion.
- APP: A notification will be sent to inform you that a motion is detected.
- Right click at home video page, and click SYSTEM SETUP, CHANNEL SETUP, VIDEO DETECTION.
- Select the way you will like to be informed when motion detected.
- Click APPLY, OK.
Please enable Notification function in your cellphone.
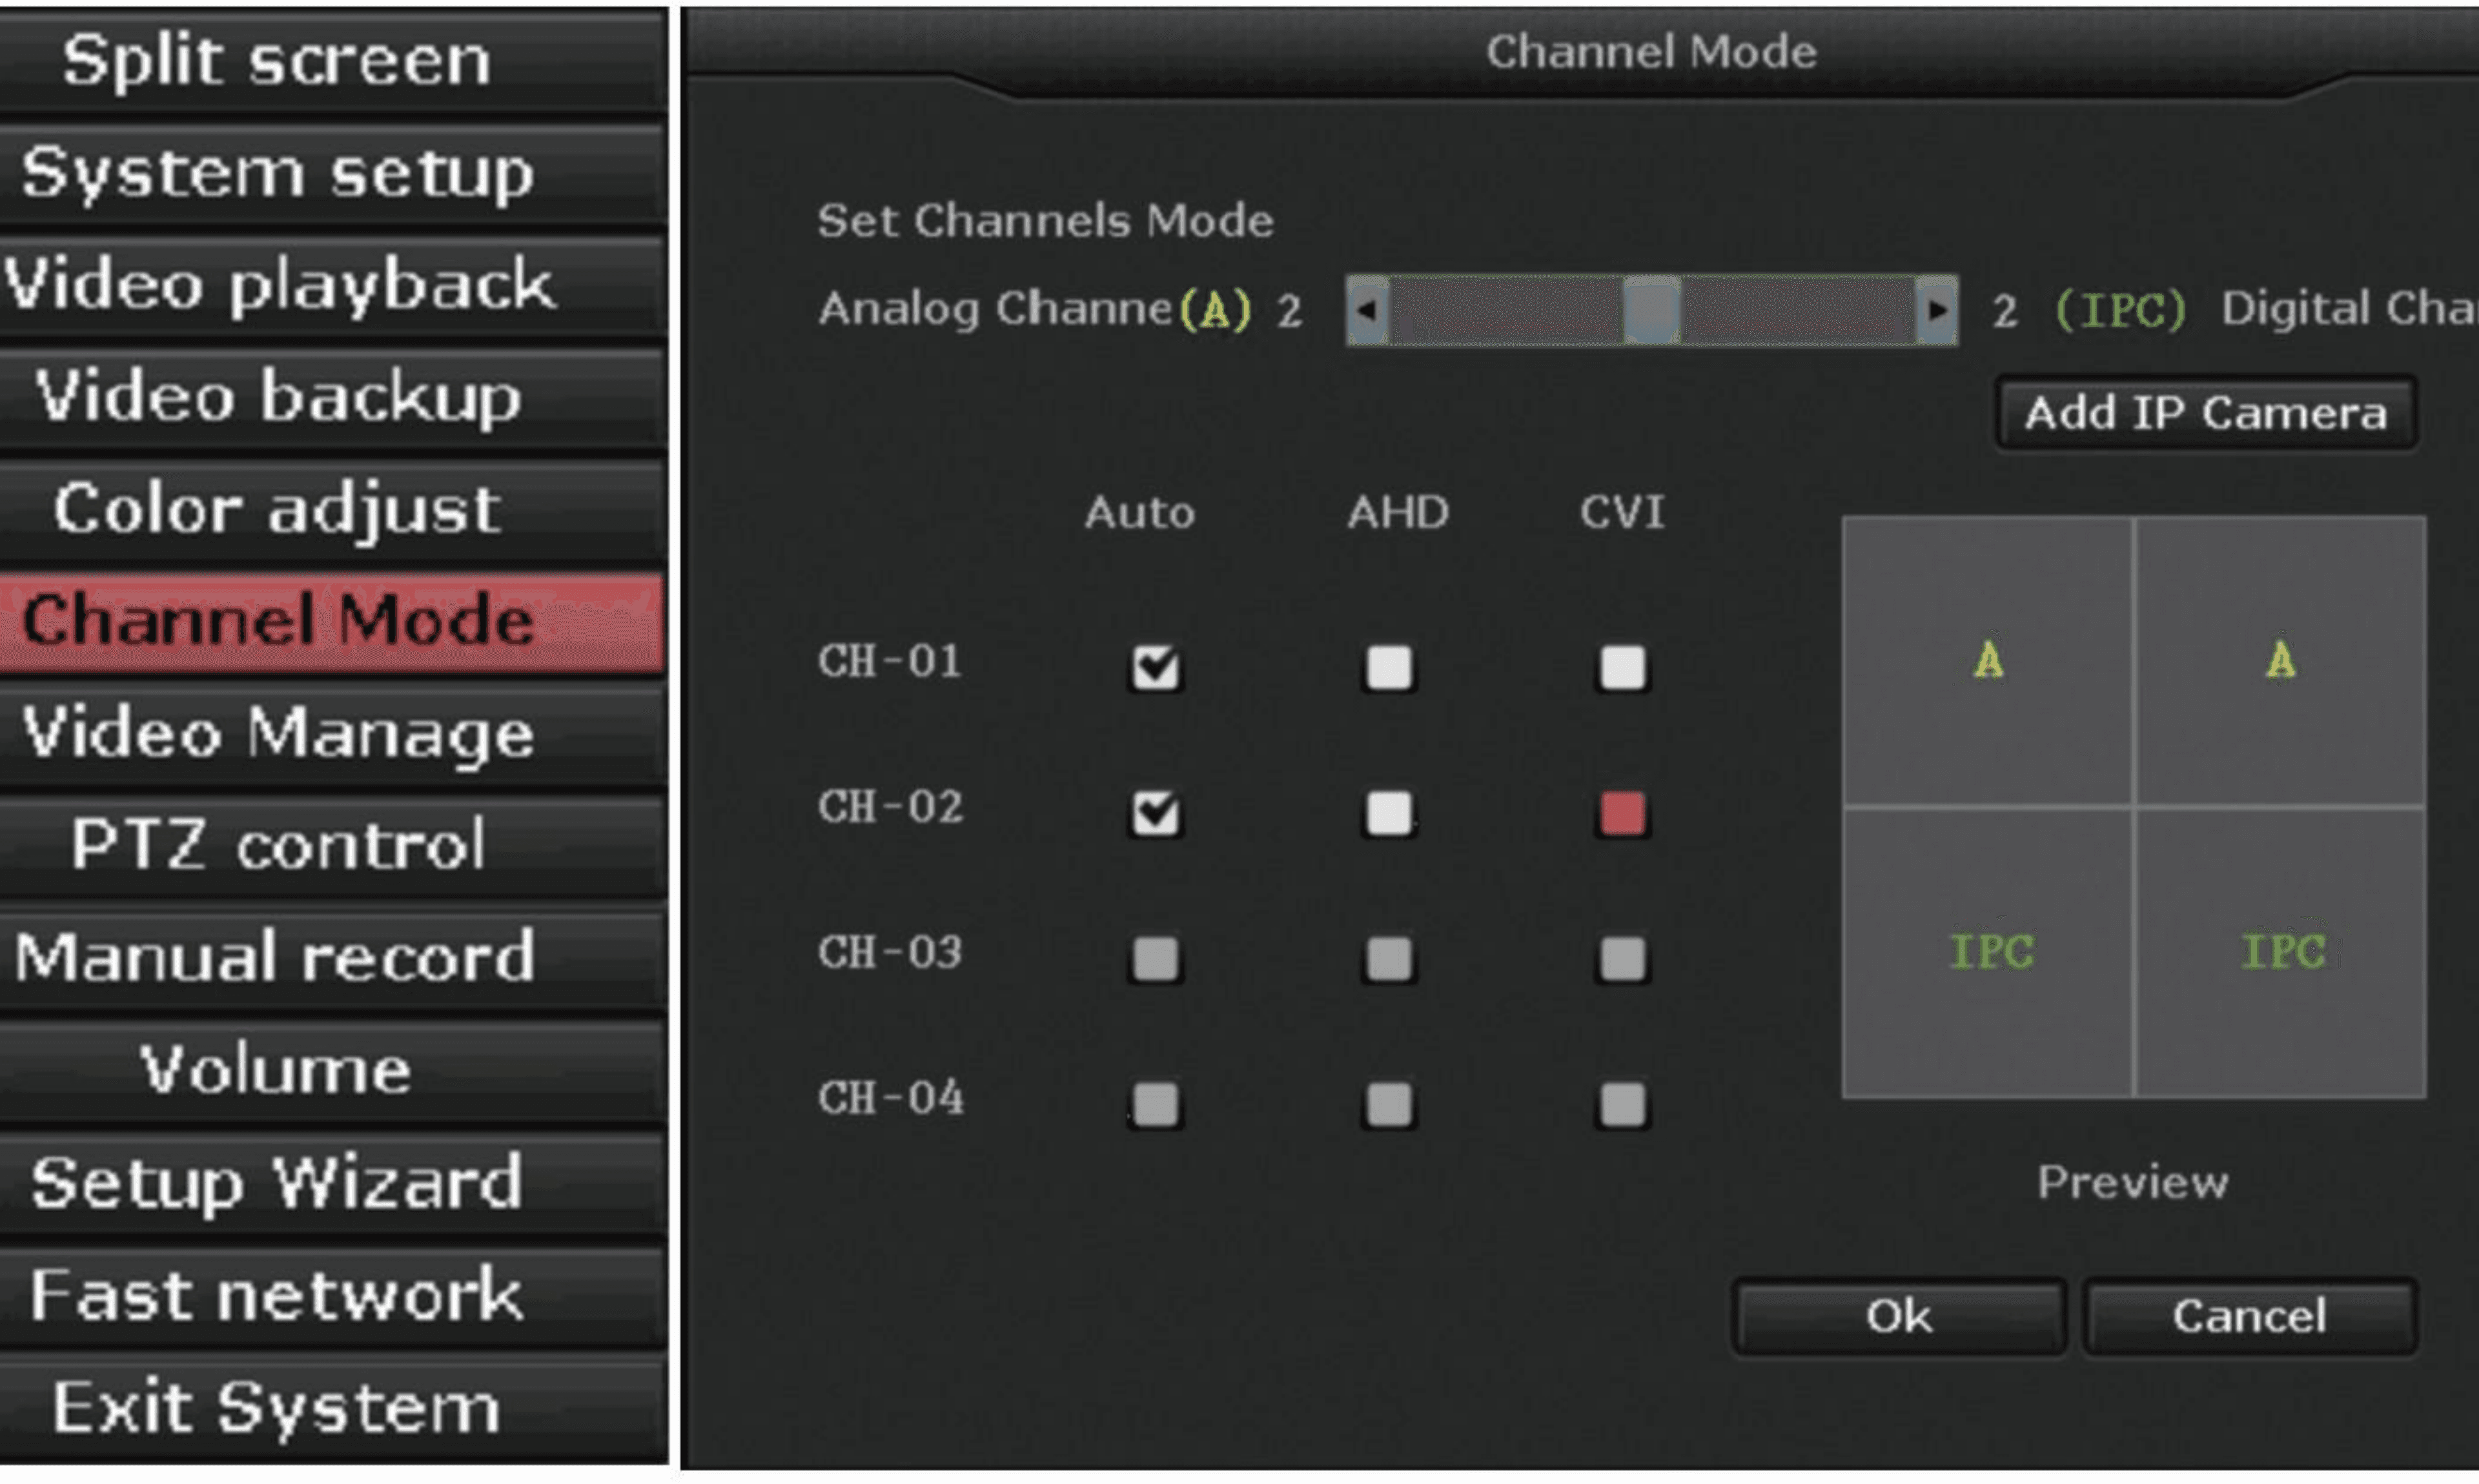
Channel Mode (DVR mode, mixed mode, NVR mode)
Step 1: Right click on channel mode.
Step 2: According to the demand to choose the corresponding channel model, through the mouse scrollbar to set the number of analog cameras and digital cameras, after finishing Settings, click ok to save.
Tips: Channel mode default set is DVR mode, can't click channel mode of add camera to enter, need set the number of the IPC channel, then can click enter after restart.
Analog channel defaults set is automatic mode, can automatically identify analog and HD AHD, TVI cameras. If connect CVI camera, must set to CVI mode, manually detect CVI automatically.
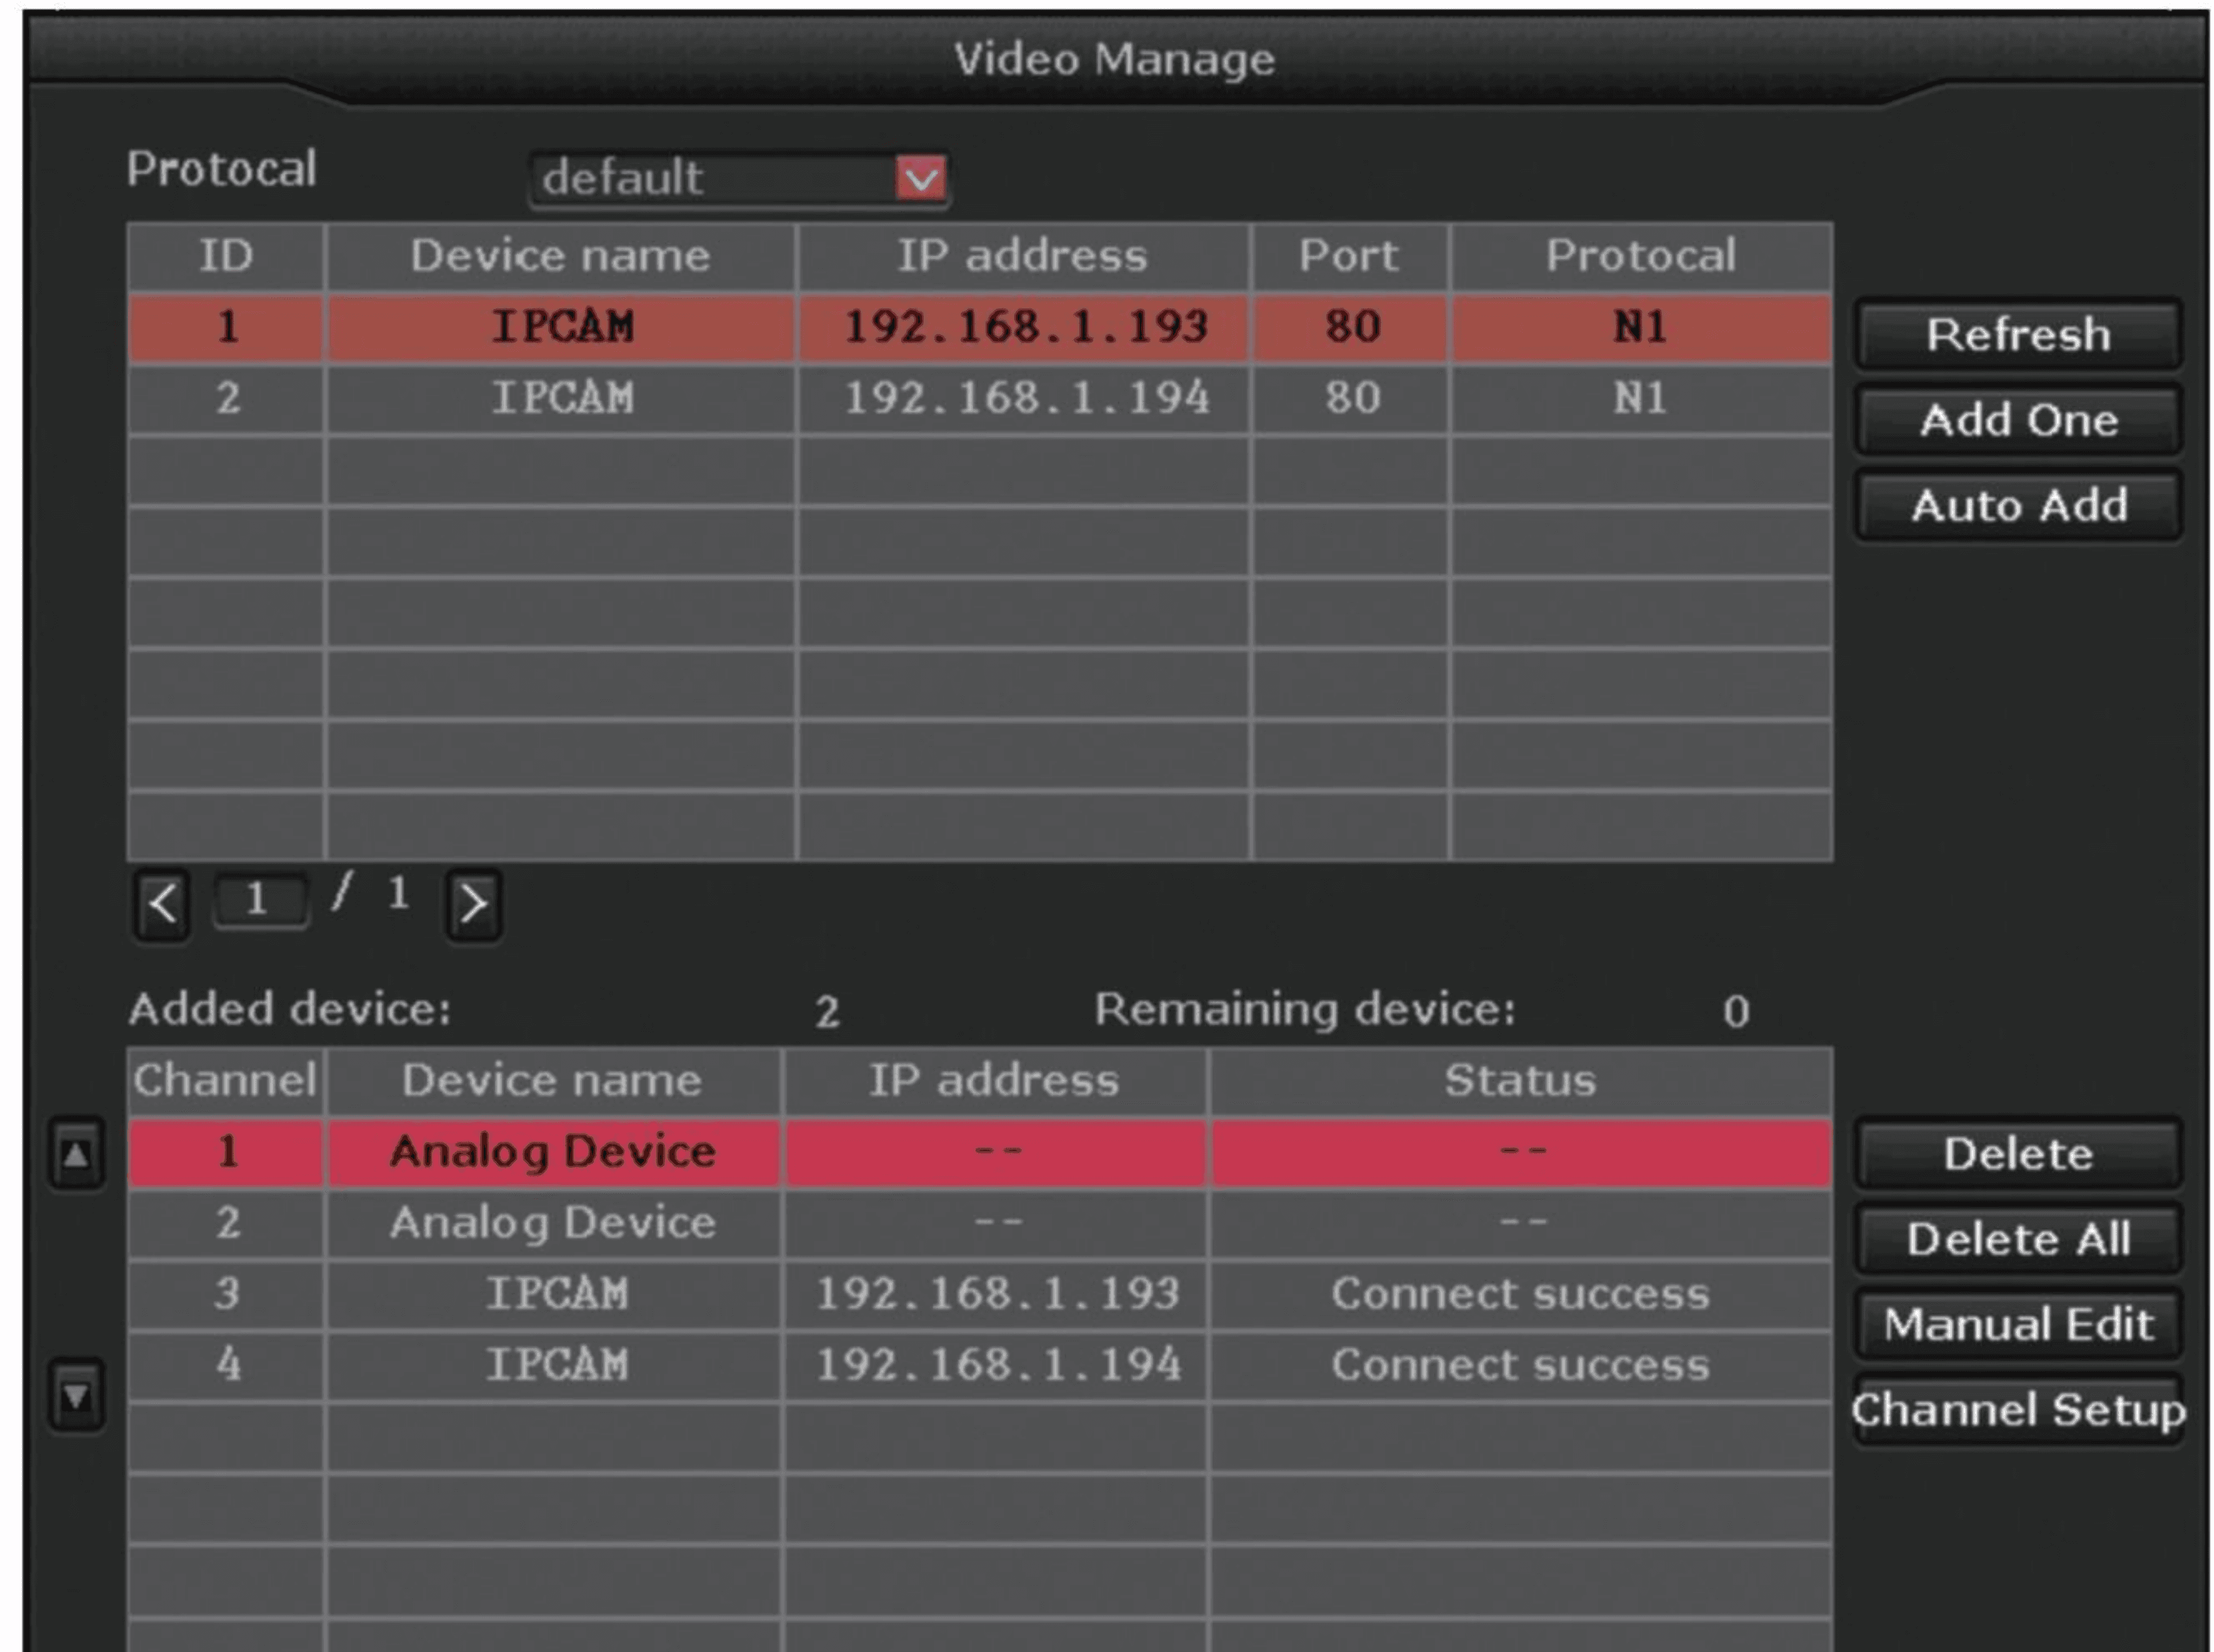
IP Camera Video Manage
Step 1: Right click on video manage.
Step 2: Click Refresh, there will be the IPCs for adding.
Step 3: Use mouse to select the IP camera, double click the mouse or click add to complete the IPC channel adding.
Frequently Asked Questions
1. How long is my warranty? We provide one year warranty for the camera system, including cameras and NVR. It started from the purchase date on your receipt.
2. How do I reset password? Please understand that we are very strict with resetting password for security reason. Please email customer service with your Amazon or Walmart order number, your full name and address. The email address is: [email protected], [email protected].
3. Can I add more cameras? Yes. Each NVR box can take 8/16 cameras maximum. You can add more cameras if you have less than 8/16 cameras now.
4. Do I have to have a monitor? Yes, for initial setup, you need to have a monitor to see the system. It can be a TV, a computer monitor. It is necessary to have a VGA or HDMI cable to connect it.
5. Why my cellphone doesn't send me motion detection notification? Please make sure that your cellphone doesn't disable notification function.
6. Which time zone I am at? At eastern coast of US, please set your time zone -5:00, and western coast, please set -8:00.
7. Why HDD is not found? Please make sure you have hard drive pre-installed in your NVR. When HDD is not found, please open top of NVR by a screw driver, and unplug and plug them back the wires, which are connected to hard drive. After doing this, please check the middle light at the front of NVR is flashing, and the hard drive is vibrating.
8. Do I need Internet to support the system? To remote access to the system from cellphone and computer, you need Internet to support the system. Please connect the NVR to router in your property with an ethernet cable.
9. The camera working great in day, but in night vision part bright. Pic A:
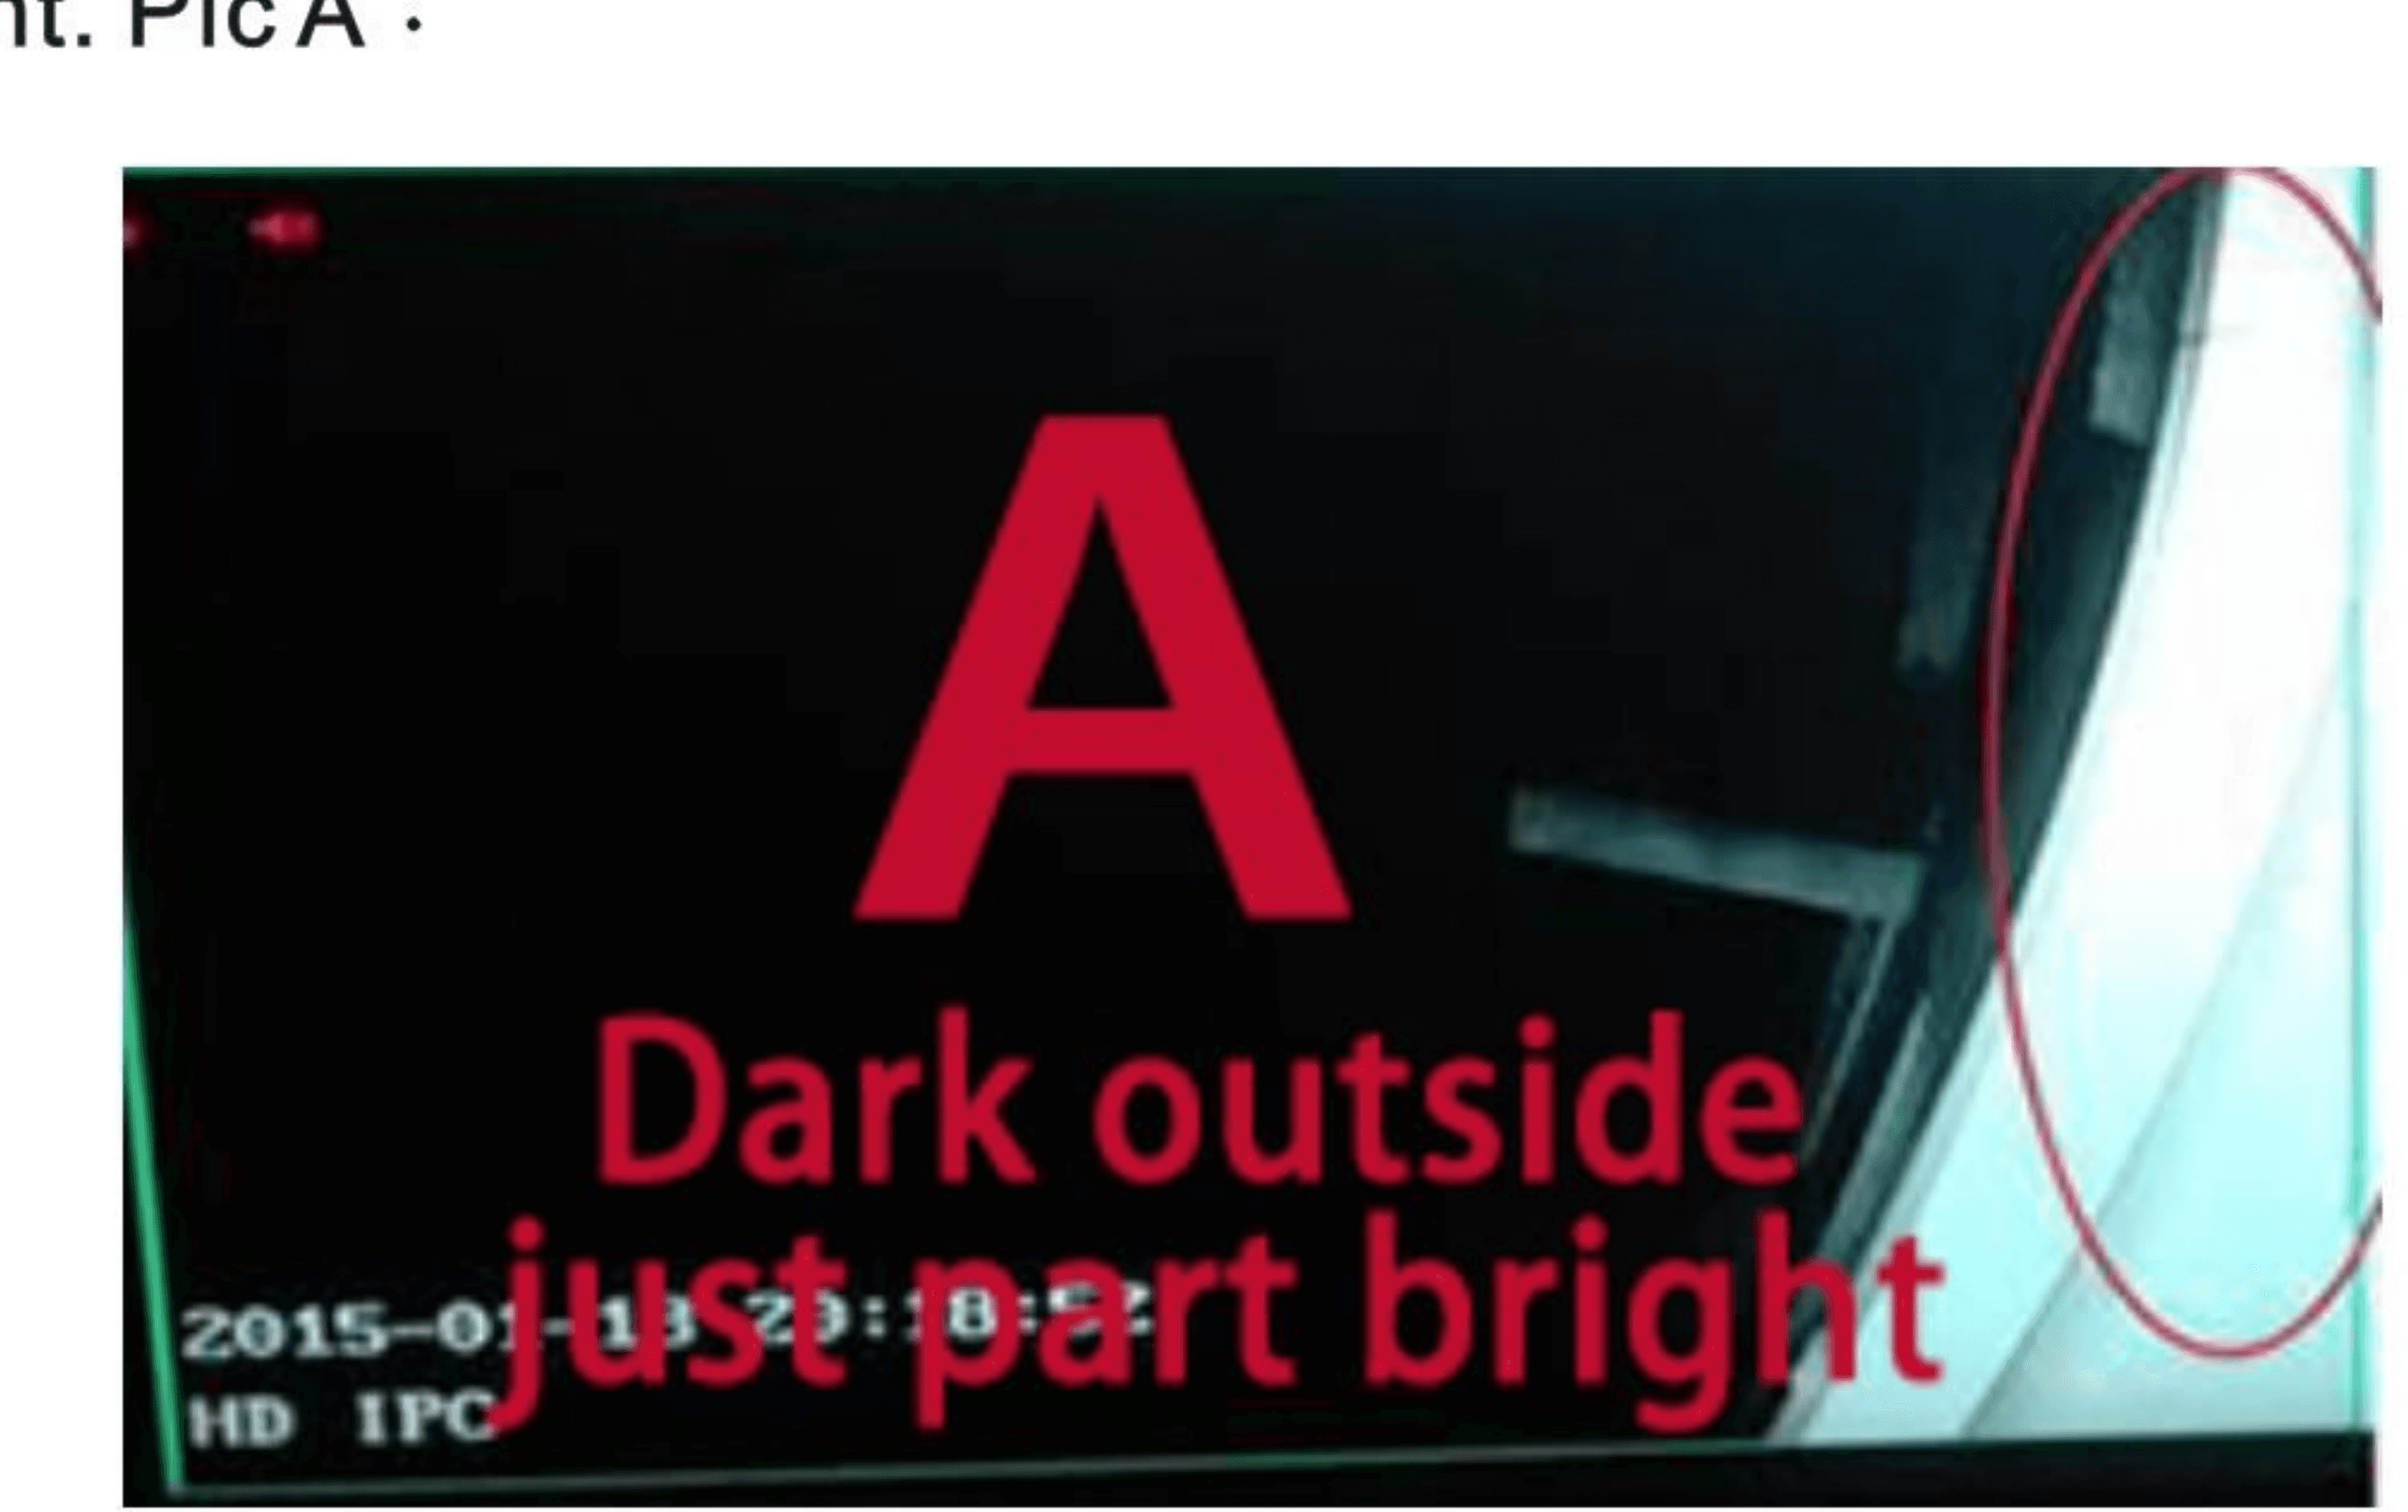
This Problem is Camera near the wall or others, Camera received reflection from wall. Please Adjust the camera installation angle. Avoid the wall, the problem will been solved.
10. The camera working great in day time, but in night vision has reflection. Pic B:
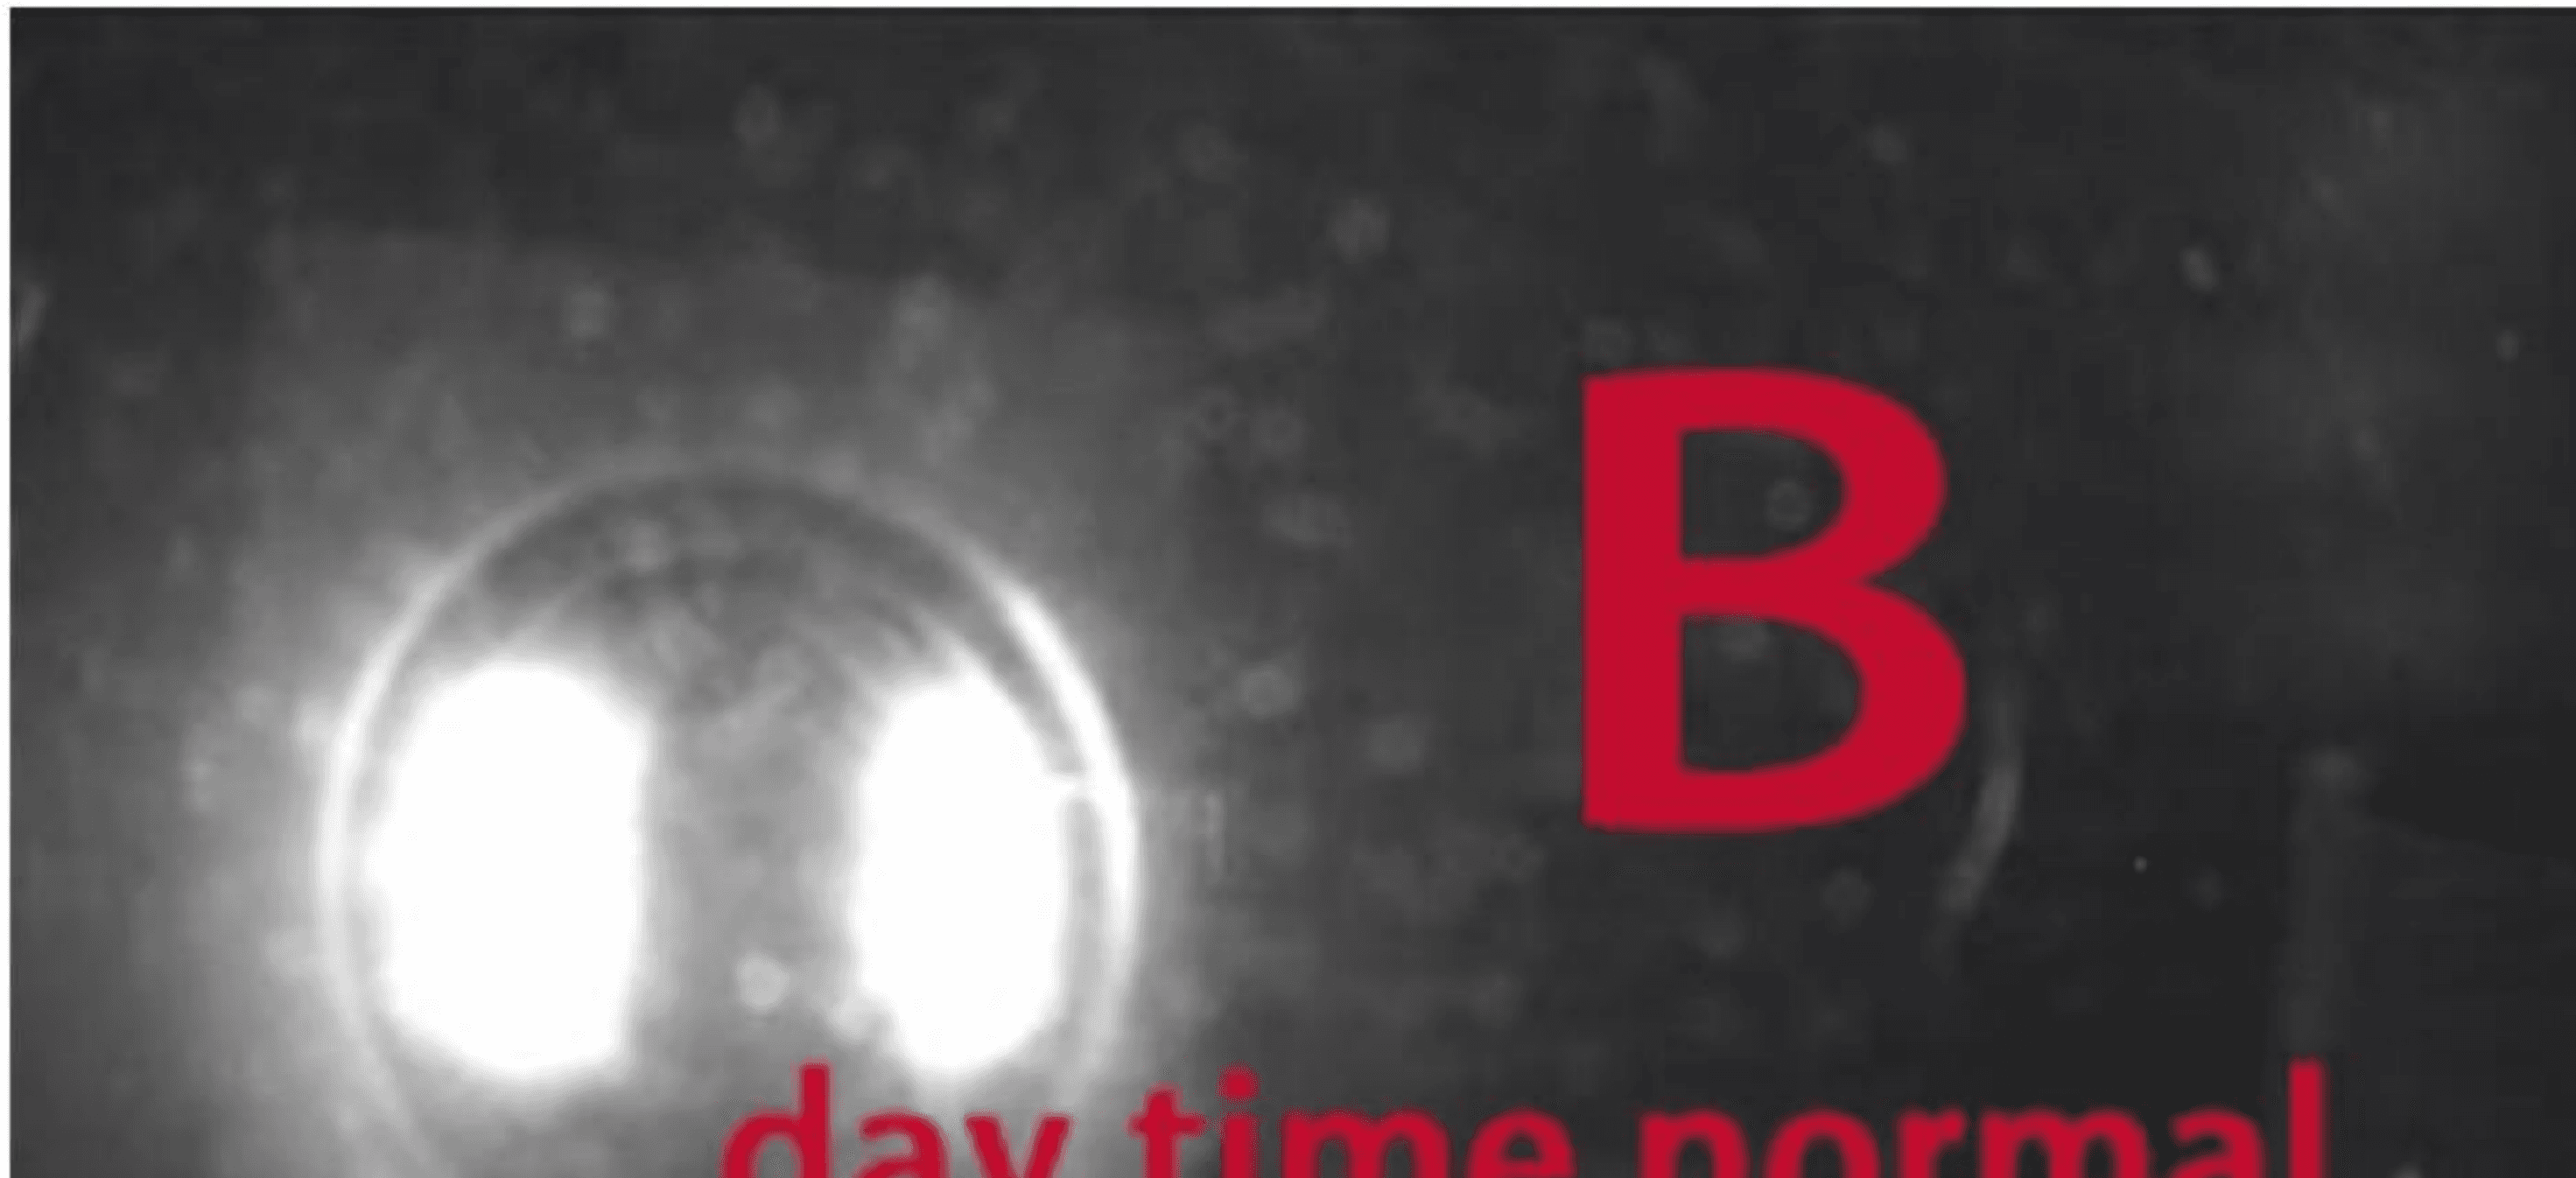
The camera cannot show clear picture of what's outside at night through the window, the windows glasses will reflect to Camera. Please move camera to outdoor, the problem will be solved.
Customer Service
| Website | www.oossxx.com |
| [email protected] (reply in 24 hours) | |
| Tel | +1 (352) 900-4656 (Eastern time, Monday–Friday 9:00am–5:00pm) |
Looking for more help? Visit the Help Center, the ESeeCloud App User Guide, or the ESeeCloud CMS guide.
OOSSXX
User manuals and quick guides for OOSSXX security camera systems, kits, and solar cameras.
OOSSXX HD PoE Security System Manual
Full manual for the OOSSXX HD PoE NVR security system — packing list, NVR and PoE camera specs, port diagrams, app and CMS setup, Cloud ID remote access, recording, motion detection, audio, and FAQ.